Findflarex.com Browser Threat
Findflarex.com can be described as a browser hijacker because it can replace the primary search engine (e.g. Google) and redirect all searches to its website for the malware’s author’s gain. Not to mention how difficult it is for the ordinary user to uninstall from their web browser.

The website is linked to ONFIND, a previously discussed extension that serves as Findflarex.com’s primary gateway to the user’s PC. If all of your search requests result in Findflarex.com rather than the search site of your choice, you have been infected with a risky browser hijacker.
Browser hijackers in general
Browser hijackers are precisely what their name implies. They utilize malicious code to take control of the infected computer’s internet browser by changing the default home page, look, and search engine to forcefully promote their unwanted website without the user’s permission.
They insert unwanted adverts and affiliate links into the browser by sending the user’s queries to their own problematic search engine, where they control the results and display advertisement links rather than legitimate search results.
As previously stated, Findflarex.com is a browser hijacker that sends searches to its website via browser extensions. This type of threat is potentially serious since, in addition to producing poor search results, the malware can track and monitor the infected computer’s browser activities.
Threat behavior
We analyzed the aforementioned browser hijacker in a malware-testing environment, and after installation, it quickly altered the default search engine shortcut to its own search engine. When you use the main search box, your browser will be directed to Findflarex.com, followed by search results from the Boyu.com.tr browser hijacker.
Findflarex.com redirect in action:
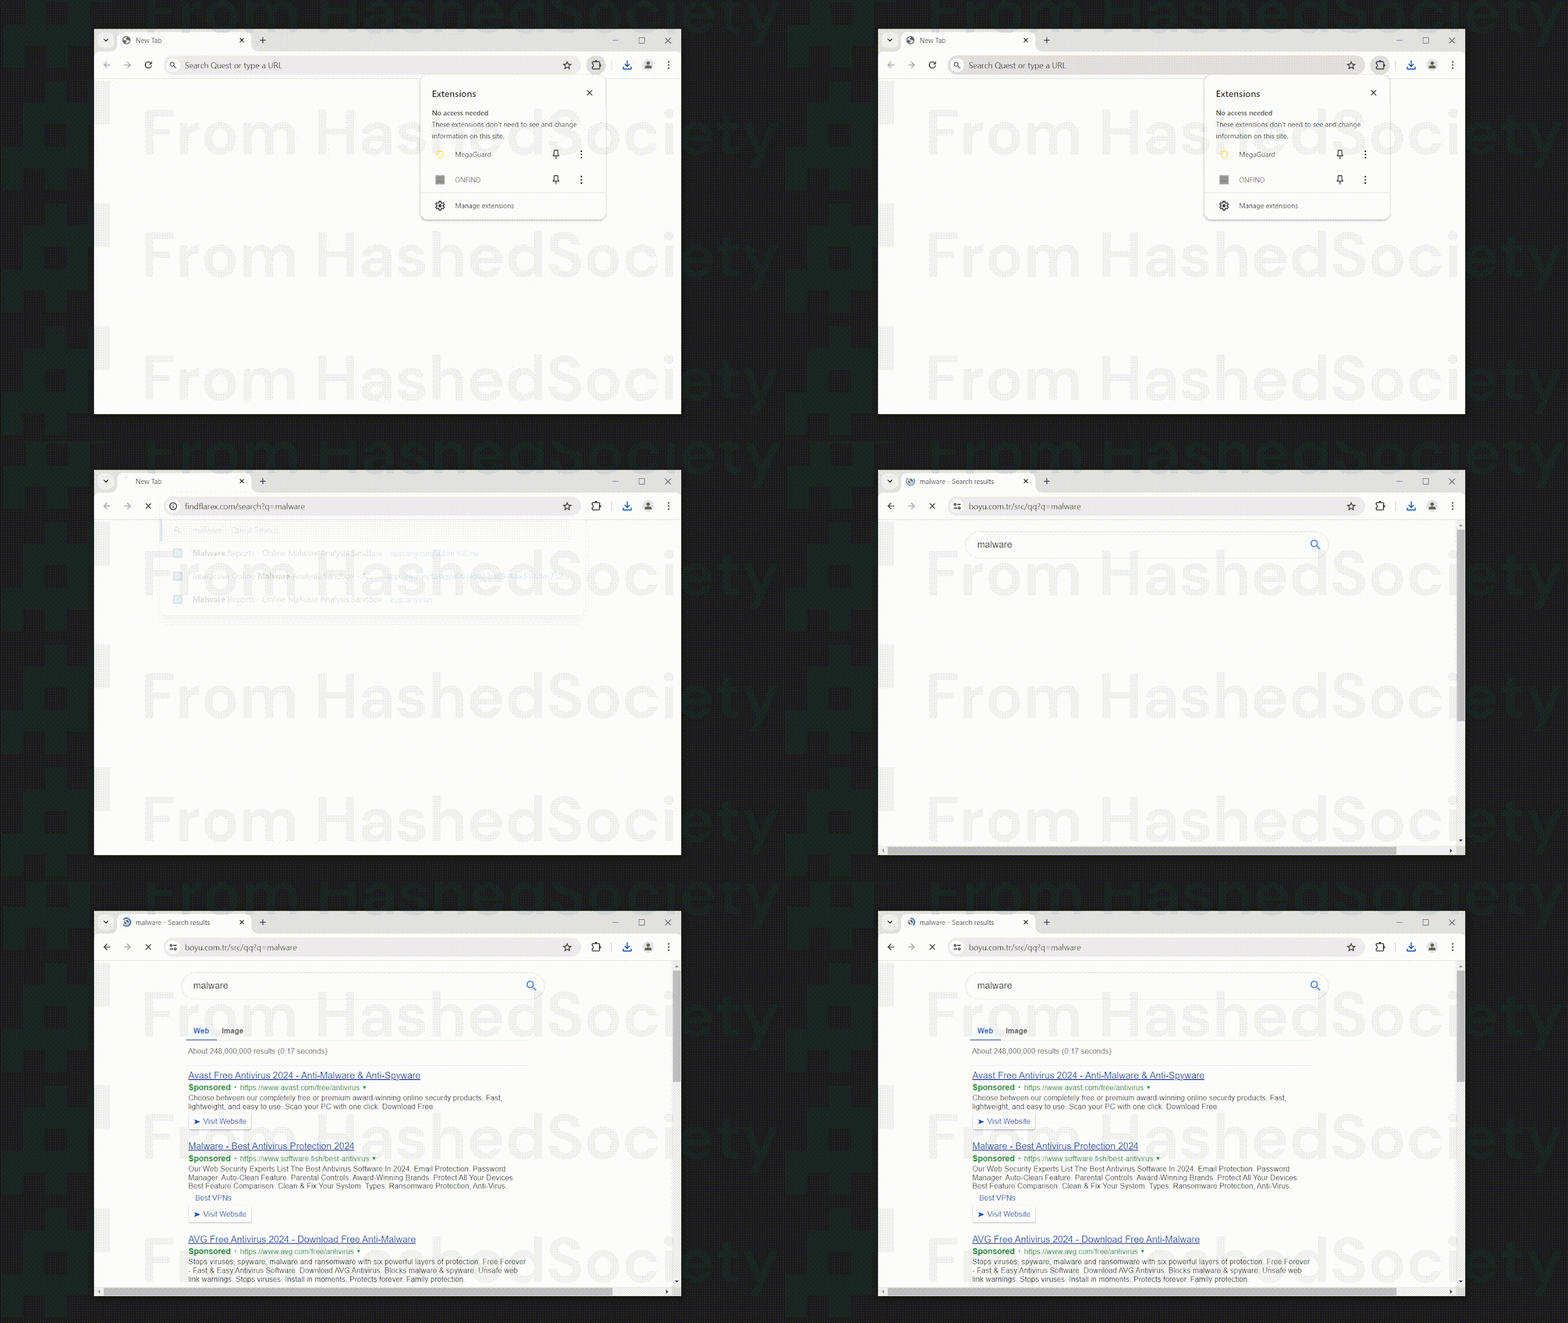
Boyu.com.tr is a malicious search engine that we previously covered; it is a search engine that is promoted by many unwanted extensions, and it appears that Findflarex.com is also linked to the aforementioned search engine and is being used as a medium for the web browser to access the said unwanted website.
Not to mention, the malware authors also set the browser’s “managed by organization” policy, which makes Findflarex.com the organization in charge of the browser.
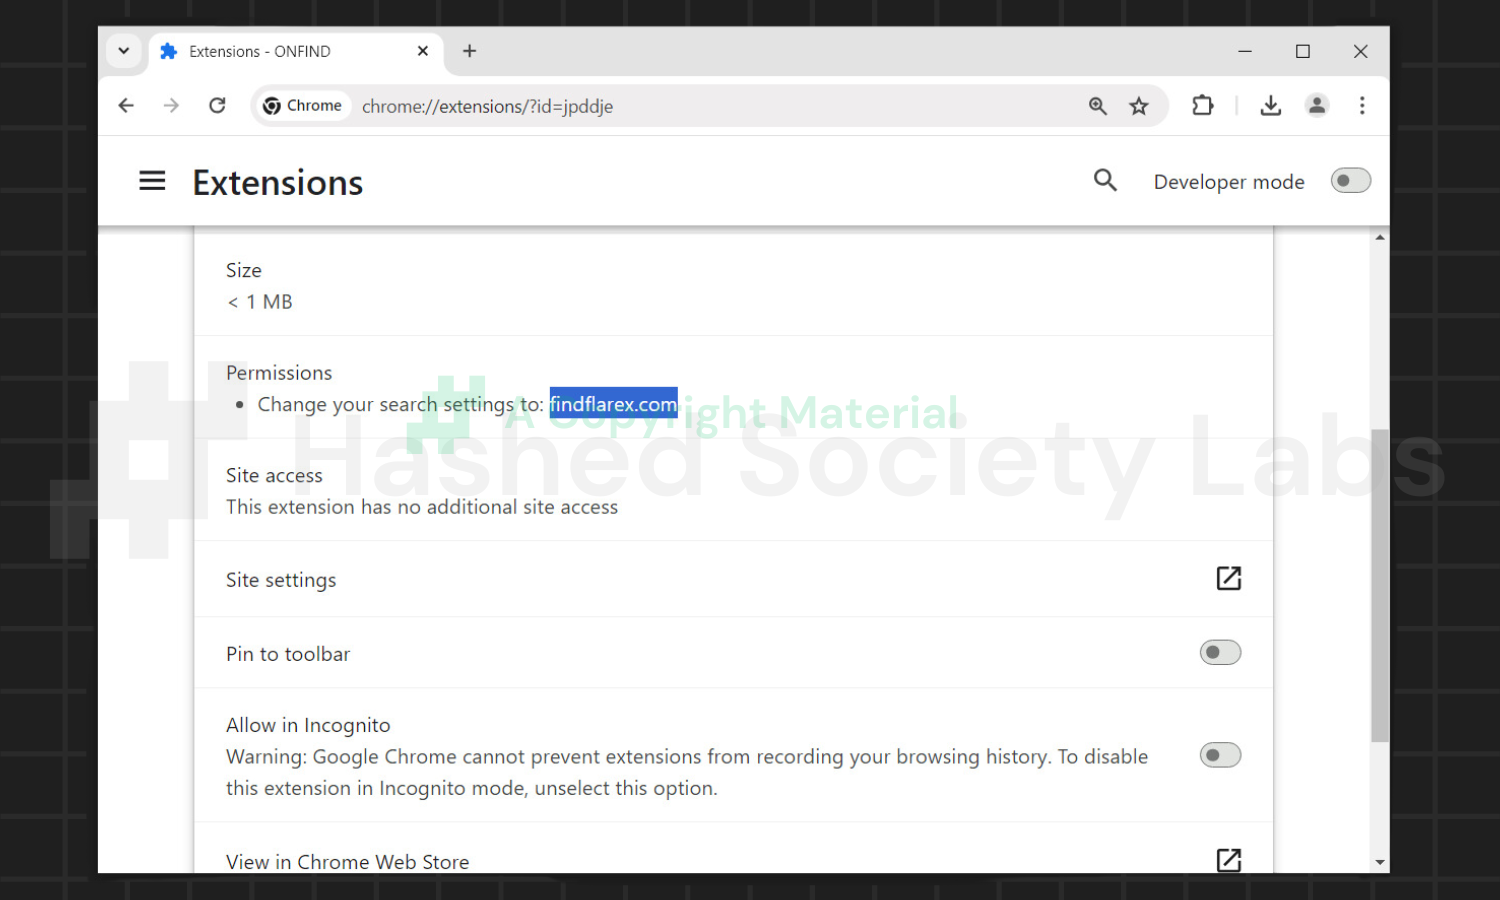
As a result, any efforts to remove the root extension (ONFIND) will fail, and the extension will be reinstalled, regardless of whether the user utilizes the browser extensions folder.
Distribution network
This dangerous browser hijacker, like other malware, installs itself on PCs and browsers using bogus download buttons in torrenting networks and untrustworthy software marketplaces.
Many individuals fall victim to them as they only appear after clicking the download button on a bogus website. File hosting sites are a leading cause of browser hijacker infestations due to excessive advertising that users must skip before downloading.
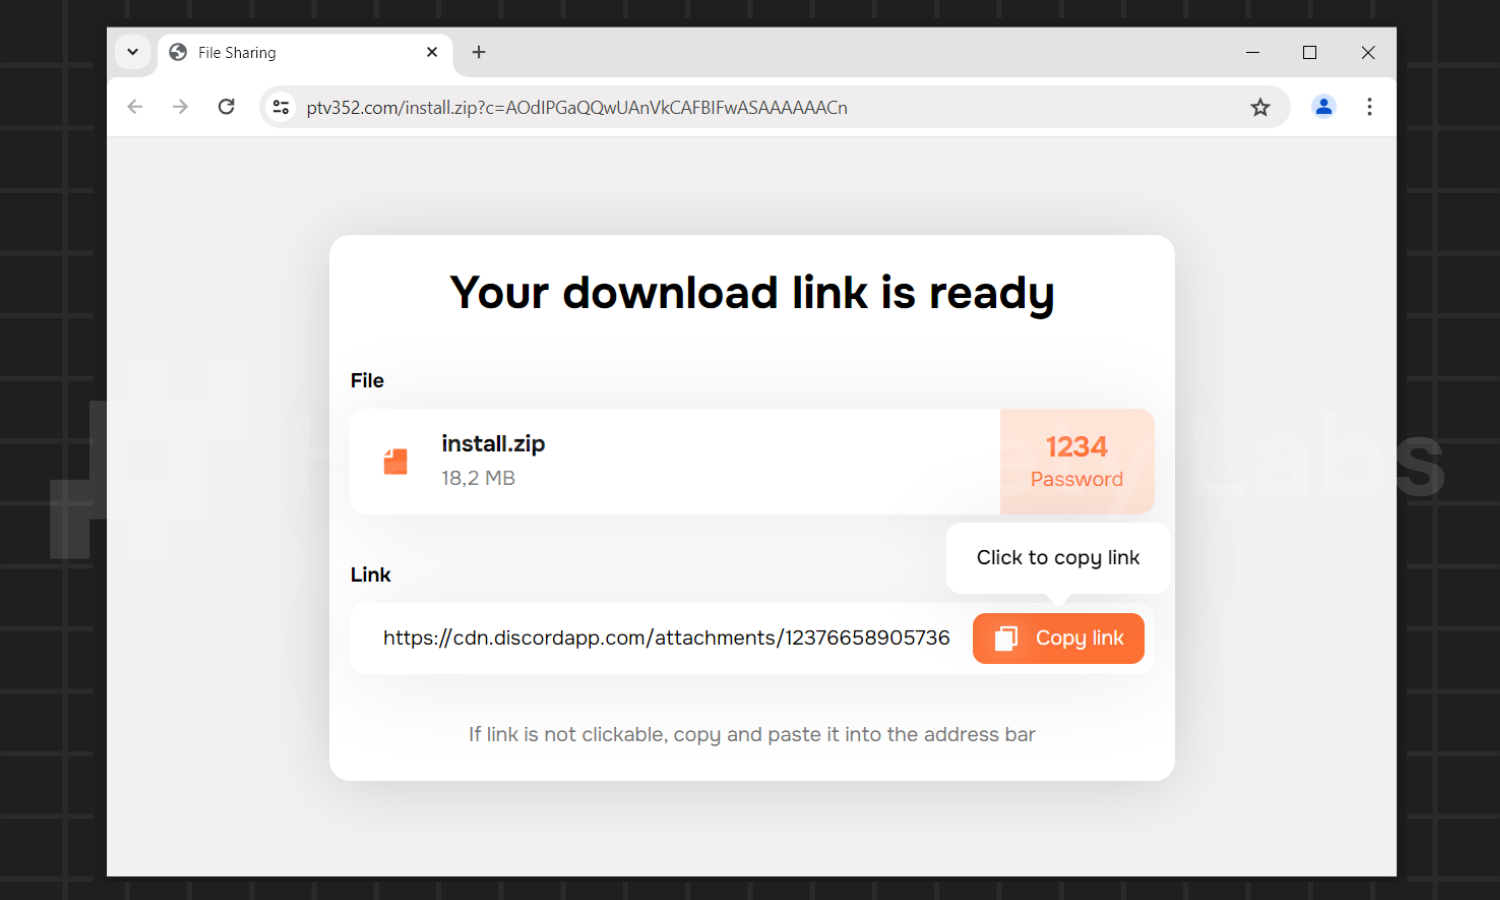
The image above depicts a false download page from a dangerous torrenting site containing the Findflarex.com browser hijacker, extension, and other malicious payload.
Summary of the threat
| Malware name | Findflarex.com |
| Promoted search engine | Boyu.com.tr |
| Root extension | ONFIND |
| Threat type | Browser Hijacker, Adware, Redirect Virus |
| Delivery network | Malicious payload via torrent files, cracked software, and drive-by downloads |
| Malware behavior | Change the default search engine to Findflarex.com & Boyu.com.tr |
| Damage | Poor search results & bad browsing experience |
More details about Findflarex.com
At the time of writing, Findflarex.com is a relatively new threat that we identified in the wild, but based on the sheer volume of payloads we encounter, including the aforementioned browser hijacker, we can deduce that it is now infecting a big number of computer users. If you’re having trouble deleting the Findflarex.com browser hijacker, we’ve included step-by-step instructions below.
How to remove Findflarex.com
If you are in need of help with removing Findflarex.com from your browser, well you’re in luck. This dedicated malware removal section will show you how to do just that. Make sure to follow the steps properly to ensure the proper removal of the malware threat.
We considered the technical skills of users on the internet, thus we divided the instruction into Easy Steps and Advanced Steps. One is for tech newbies and the other is for experts.
Here’s a tip first: Before proceeding below, make sure to back up your data to avoid the potential of your files being corrupted or erased accidentally while you follow the instructions. Normally, such scenarios will not occur, but we recommend doing so as a precaution.
Some ways you can backup your files:
- Copy your files to an external hard drive. (Since we are copying from an infected machine, make sure not to connect it to any other computer.)
- Use a cloud storage. You can use the likes of popular cloud storage services such as Google Drive, OneDrive, and Dropbox.
- Make a copy of your files on an optical media. If you are old-fashioned, you can use CDs and DVDs to store your data.
These are only intended to be backups that can be used to restore data in the worst-case situation; otherwise, if no files were damaged, they would be unnecessary. Now, let’s proceed with the guide.
Easy steps
For non-tech-savvy individuals who have difficulty using their computer other than basic software and applications. If you are more advanced than this, you can opt for the Advanced steps instead.
Step 1: Boot into safe mode with networking
If you have never heard of Windows safe mode, it is essentially a diagnostic mode in which Windows boots normally but does not load all of the computer’s services and non-critical drivers.
This means that safe mode will only launch the services and system processes required to run Windows. In the event of malware infection, this ensures that the computer threat is not running upon boot, allowing us to get rid of it without it interfering with the process.
Not only will we put it into safe mode, but we’ll also enable internet connectivity so that we can use the necessary tools and apps in the following steps. Here’s how you can enter safe mode with networking:
- Windows 11
- Windows 10
- Windows 8
- Windows 7
1. Open the Run command by clicking the Windows button and the letter R at the same time.
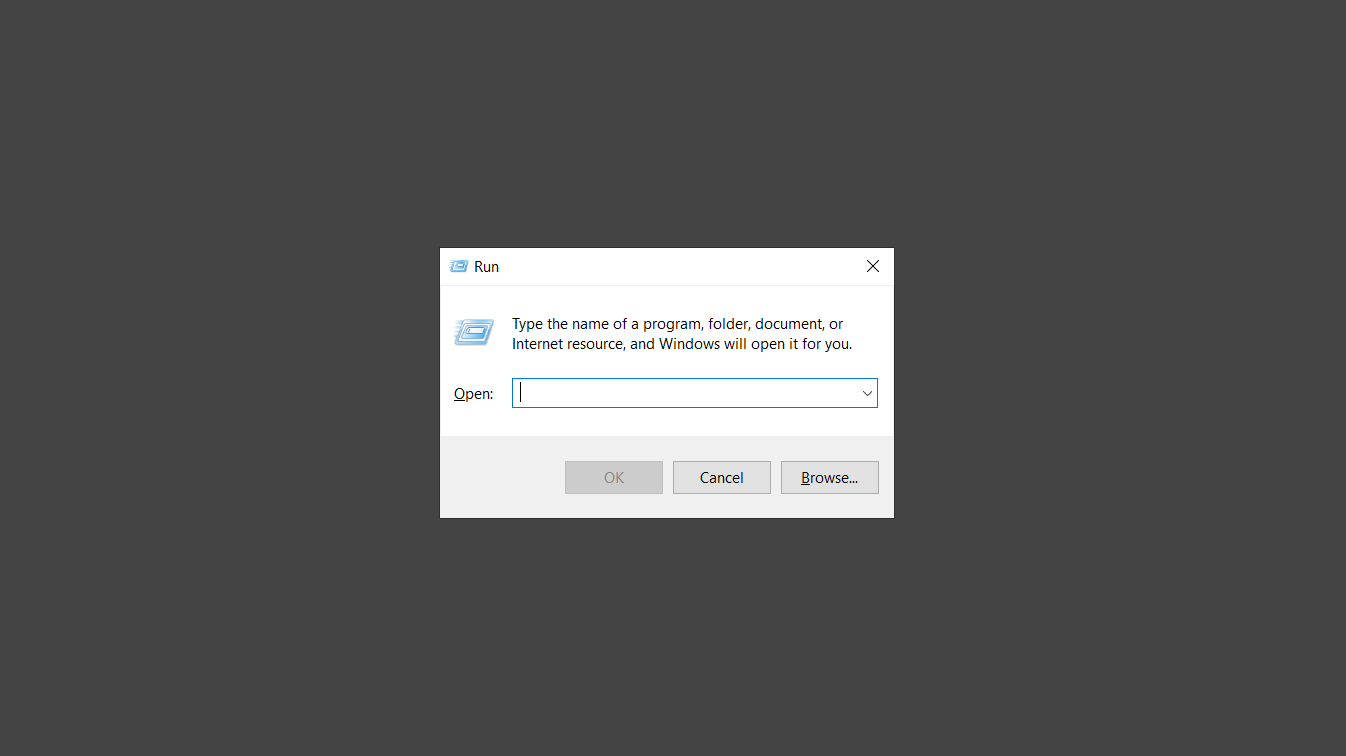
2. Type msconfig on the provided search field.
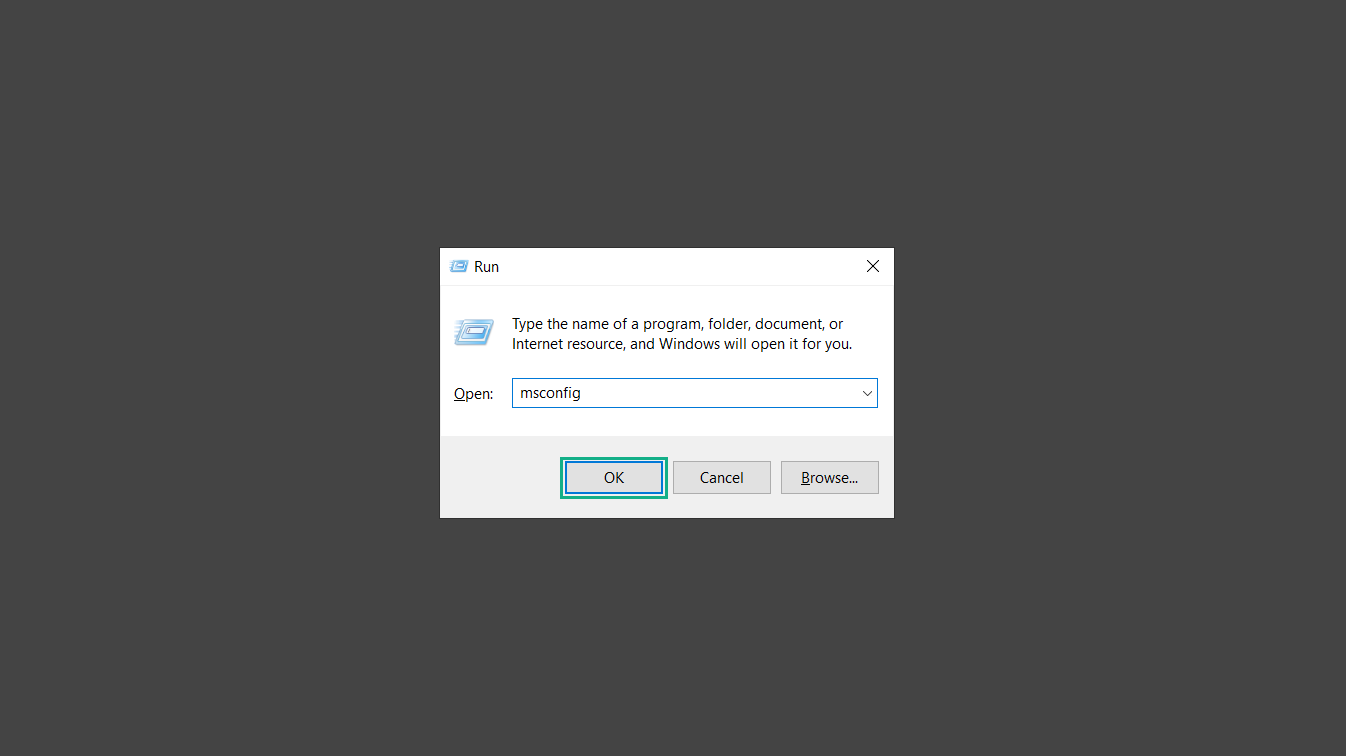
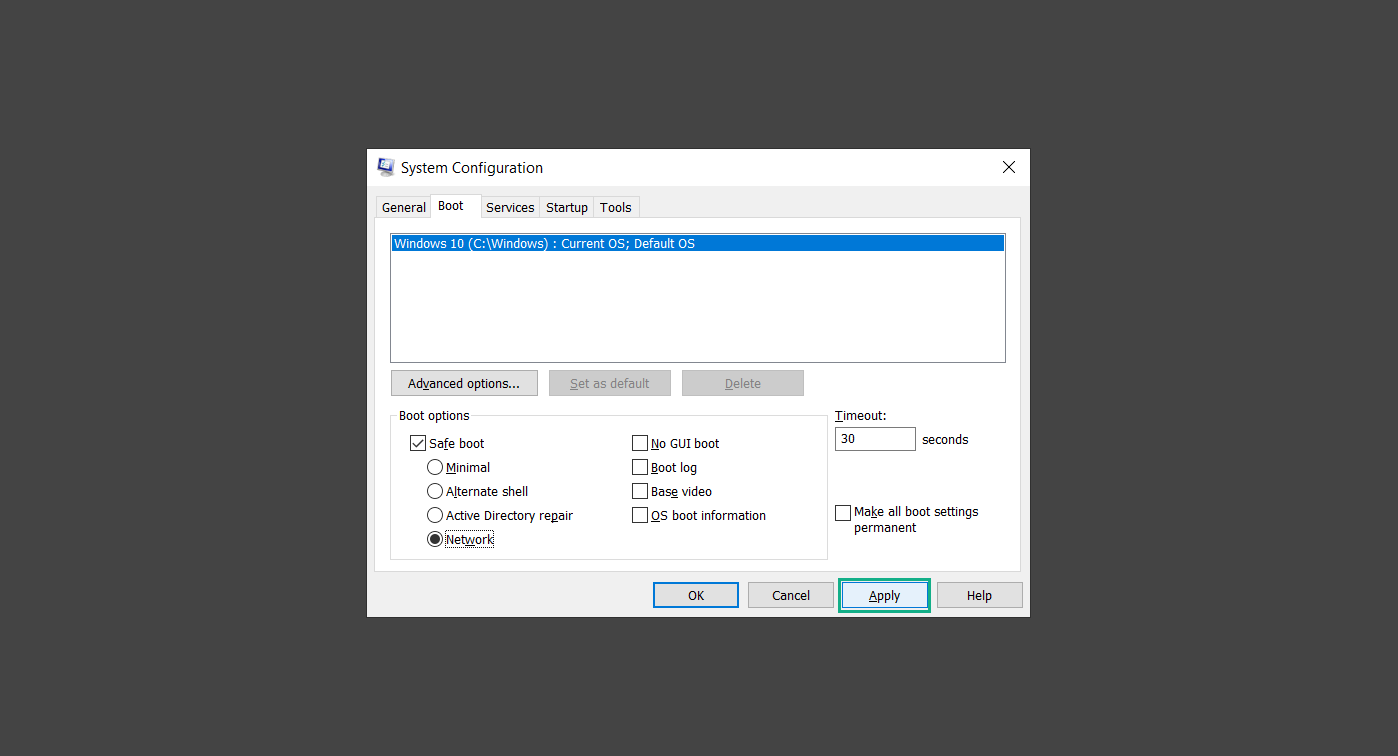
3. Once the System Configuration program has launched, head over to the Boot tab.
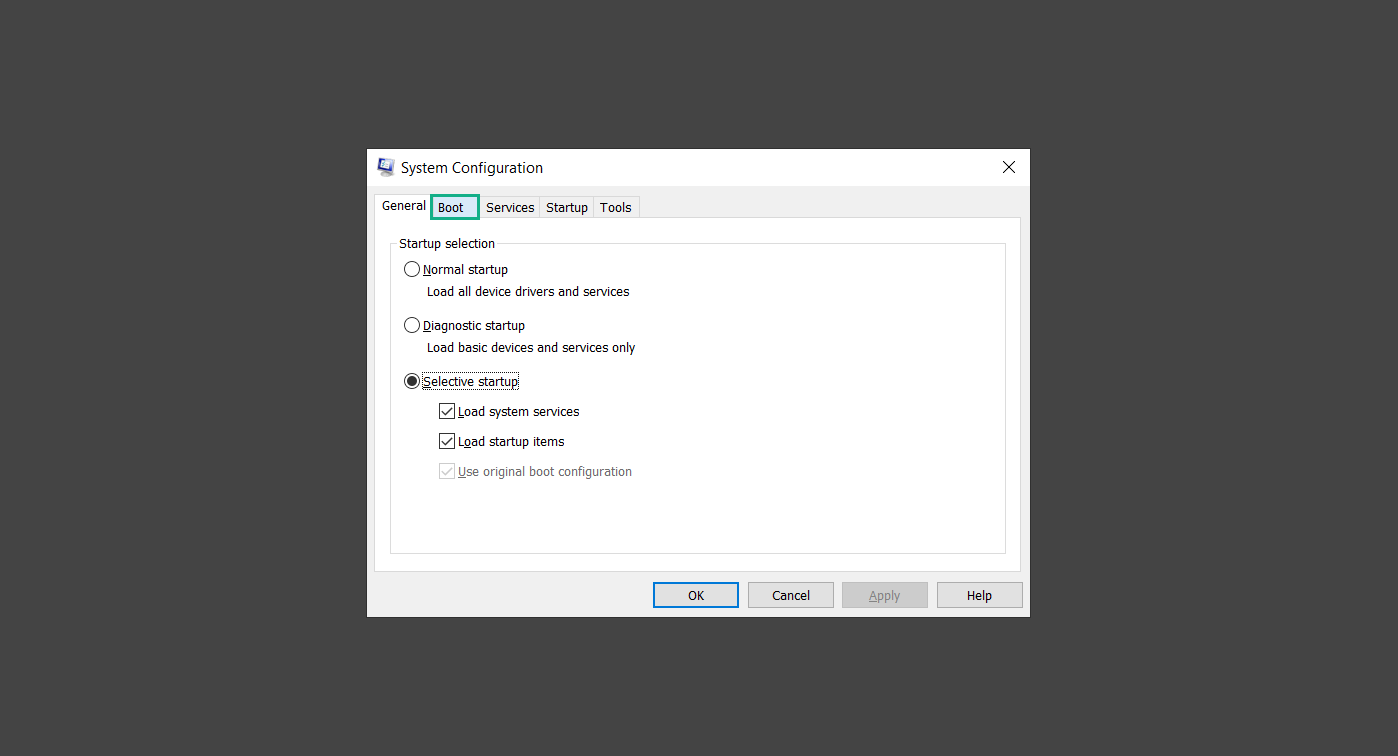
4. Under Boot options, check the Safe boot option as shown below.
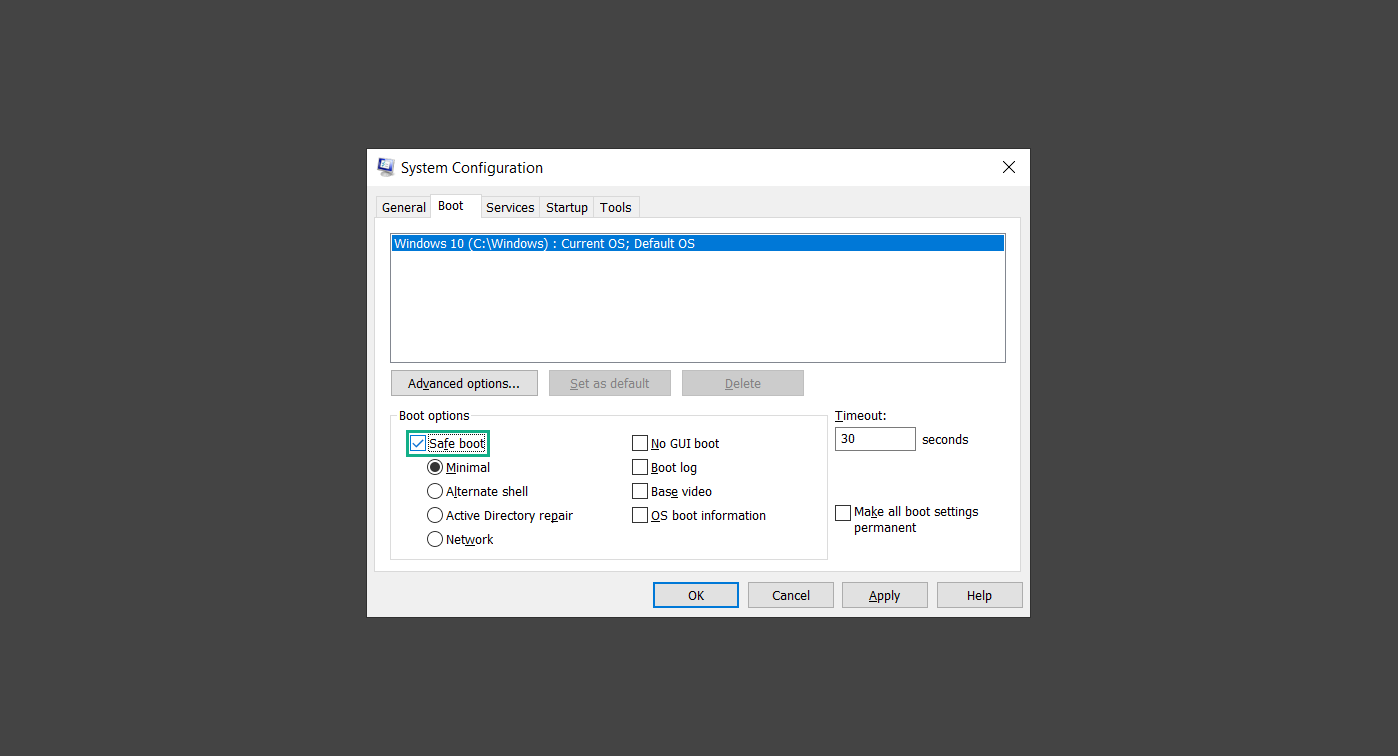
5. Under the Safe boot checkbox, you will see other options that have now been unlocked. Click on the Network option to enable networking upon booting up on Safe mode.
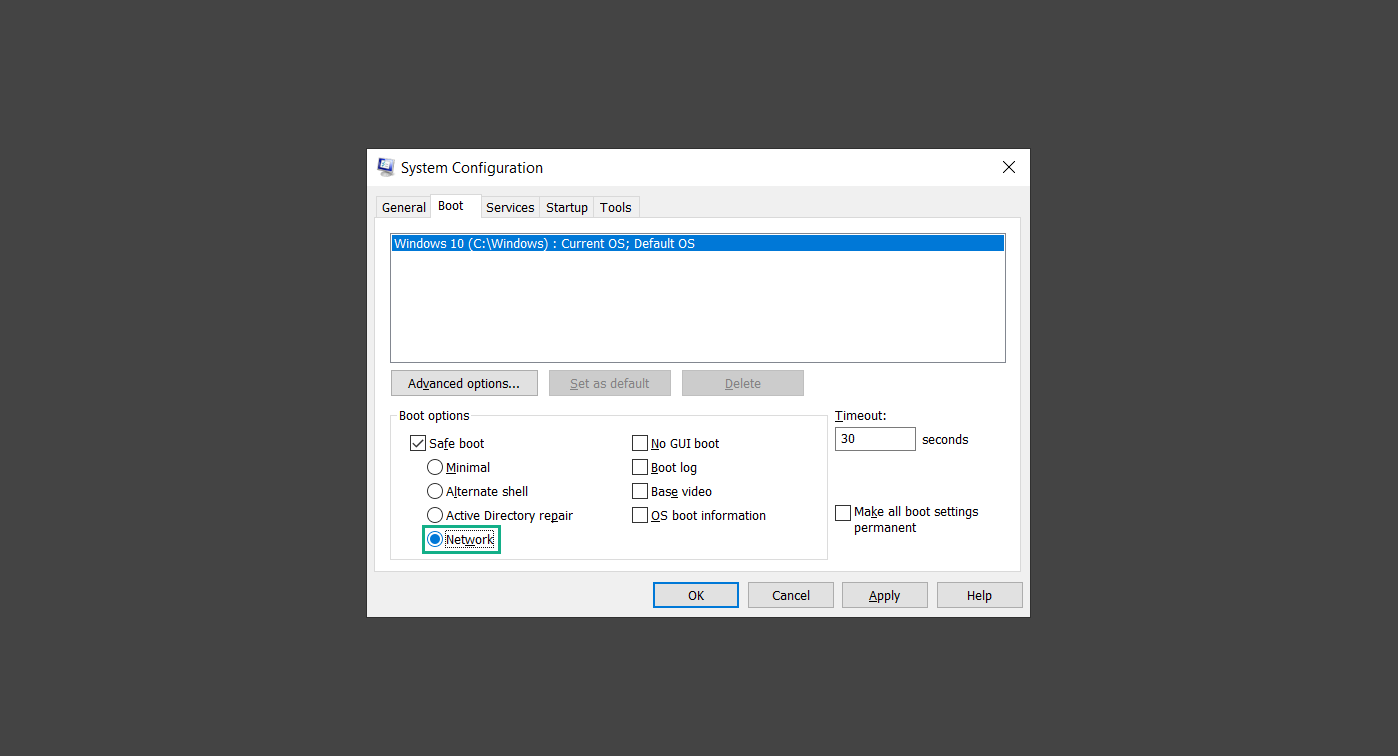
6. Select Apply to save your changes upon the next boot. Restart your computer to enter safe mode with networking.
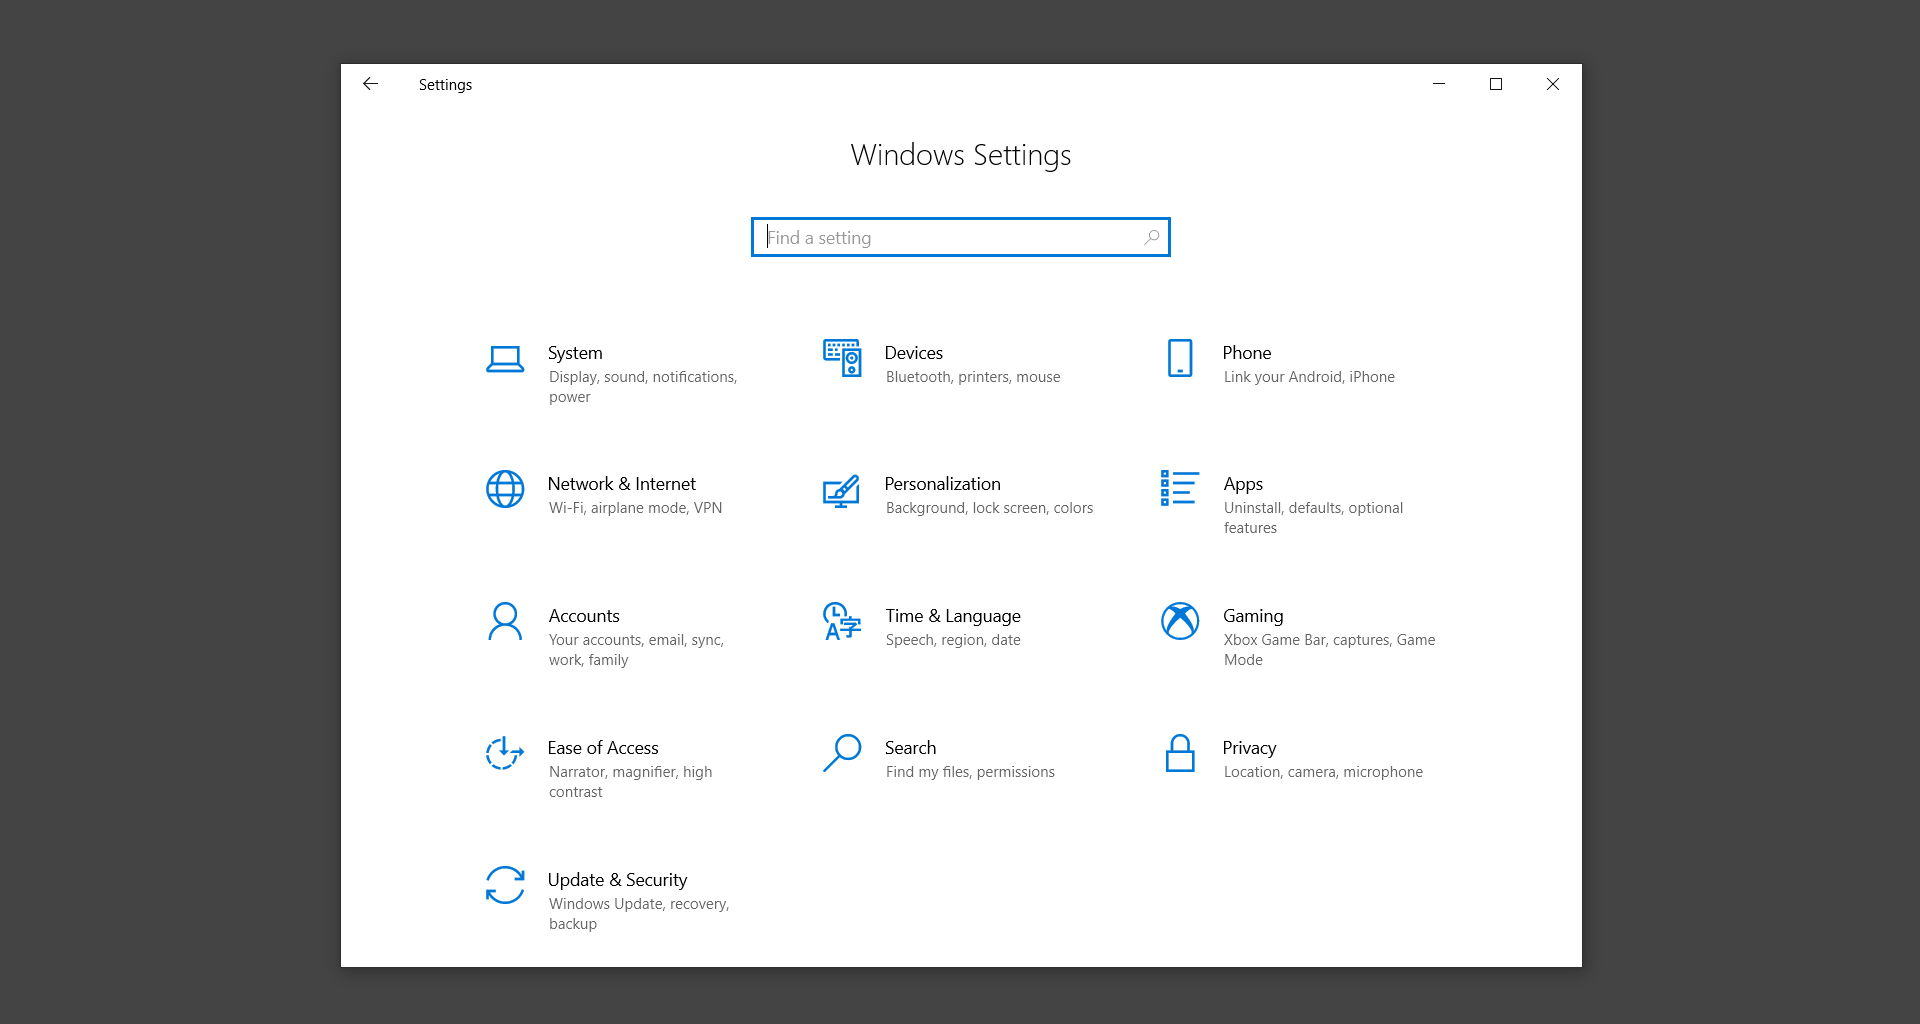
1. Open Windows Settings by pressing the Windows button + I keys together on your keyboard.
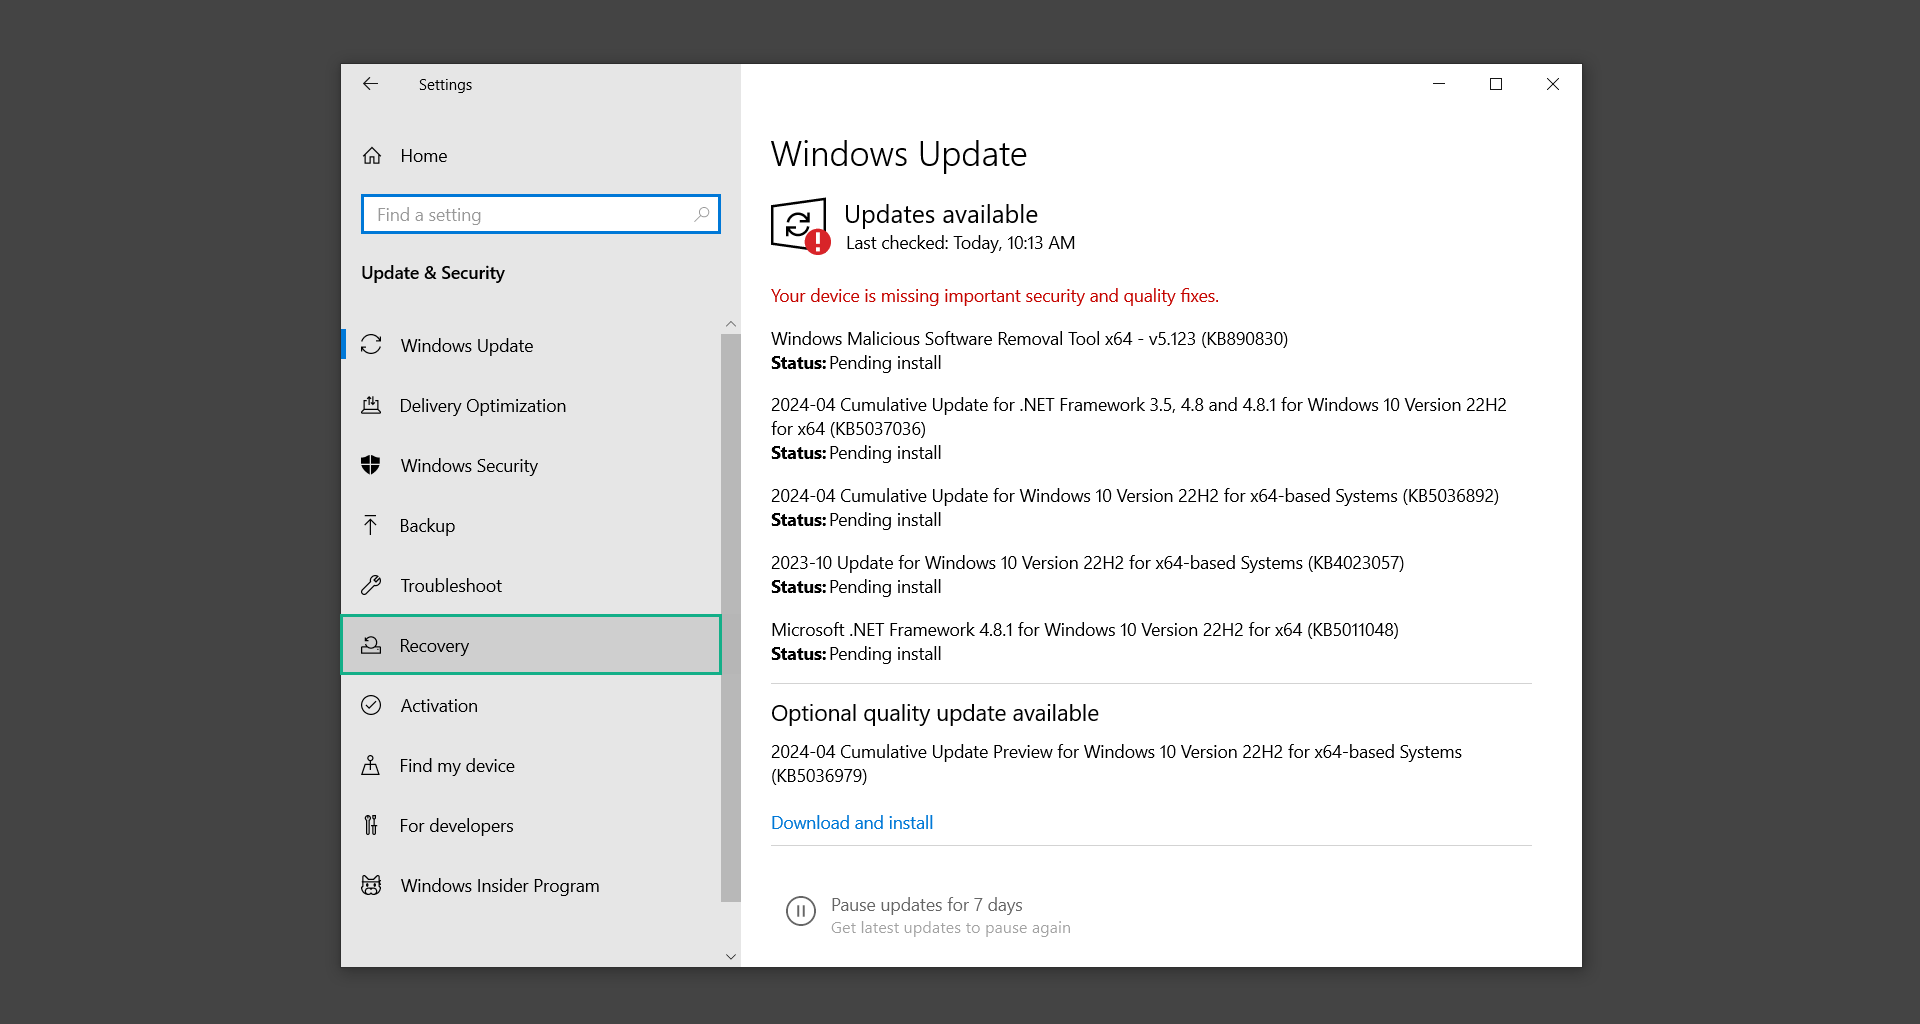
2. Go to Update & Security then navigate to the Recovery section.
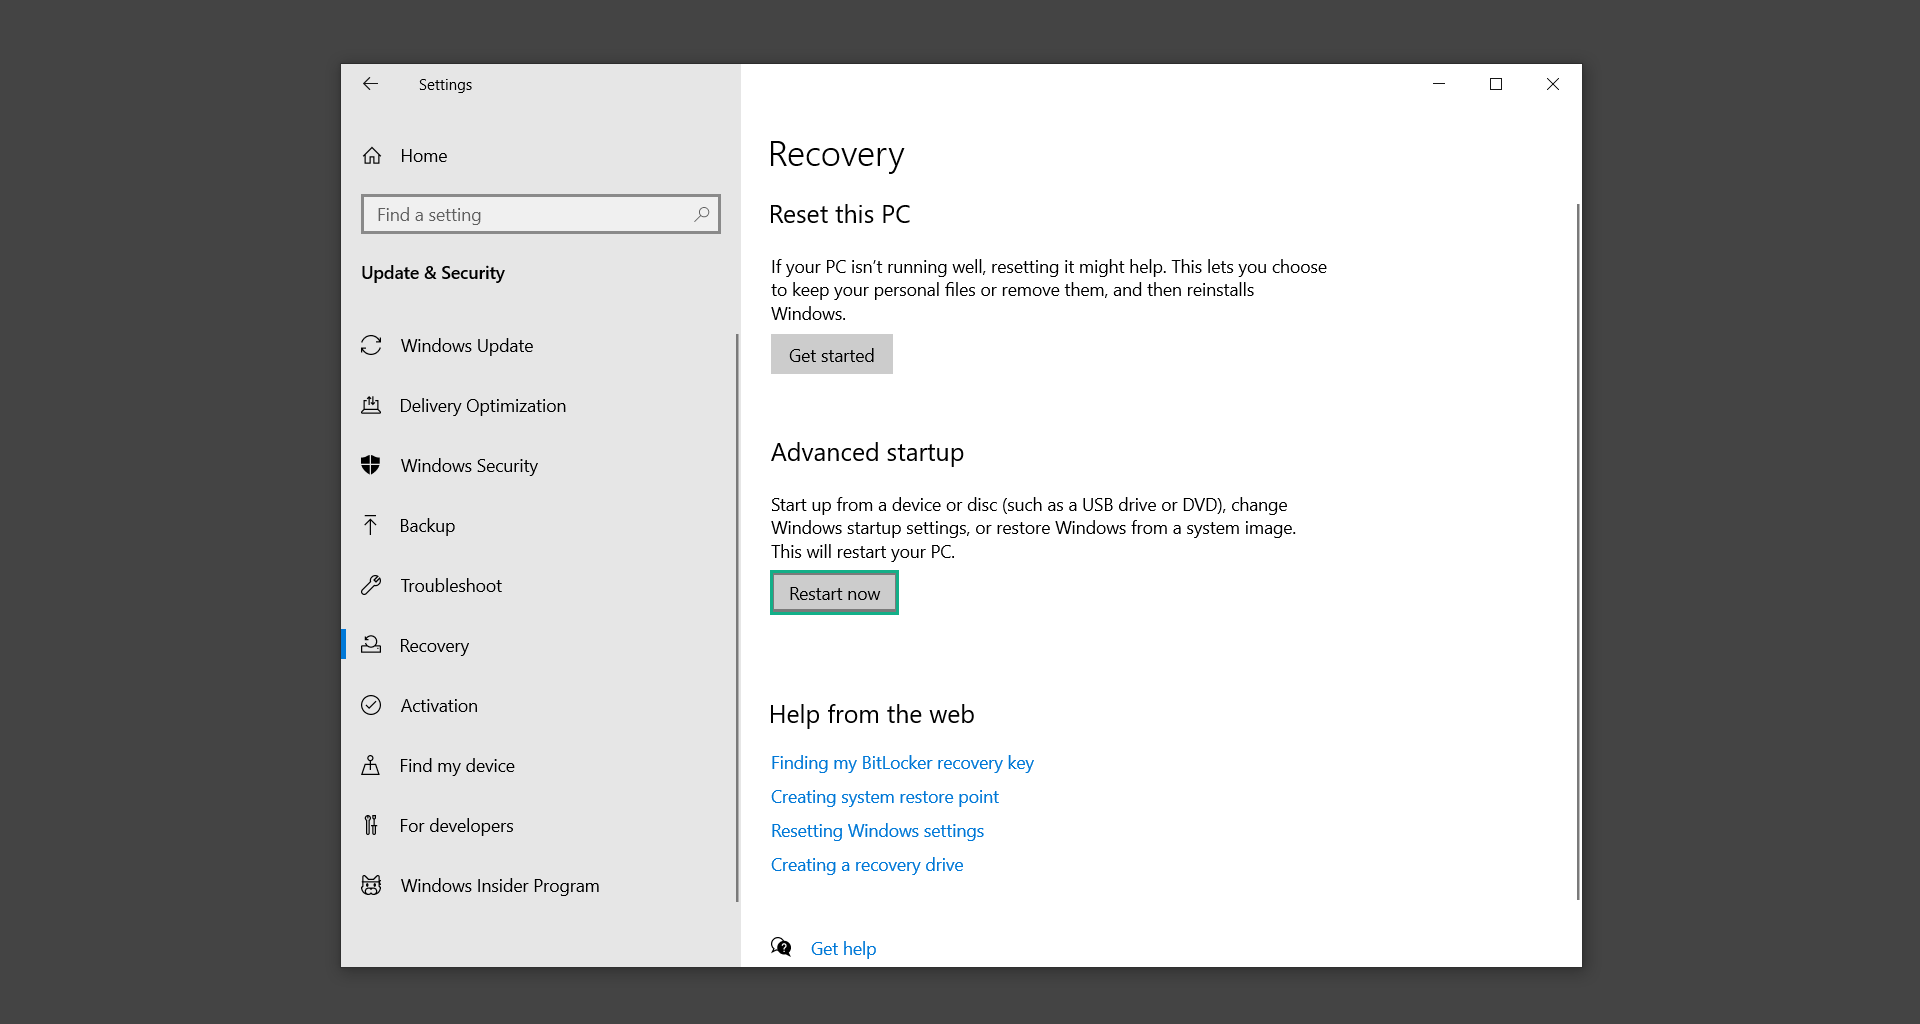
3. Under Advanced startup, click on Restart now.
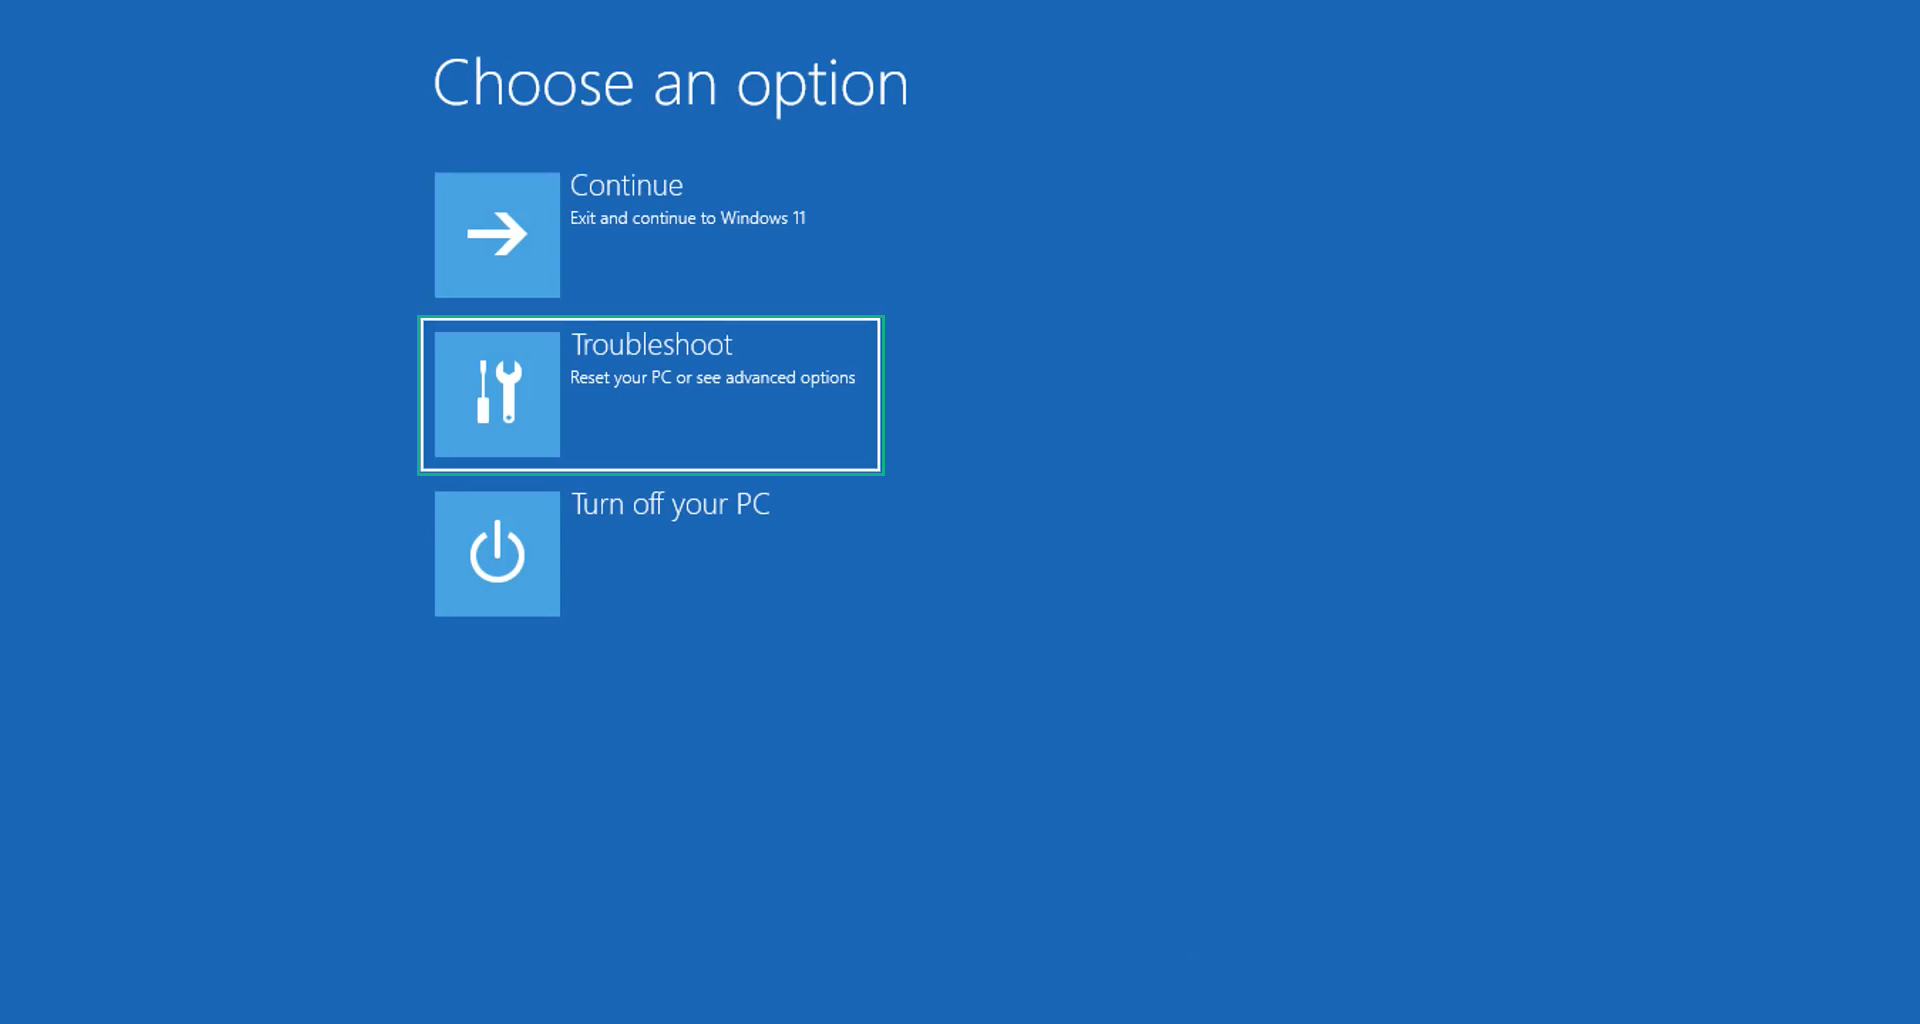
4. After the computer has restarted, you will see 3 options, click on Troubleshoot.
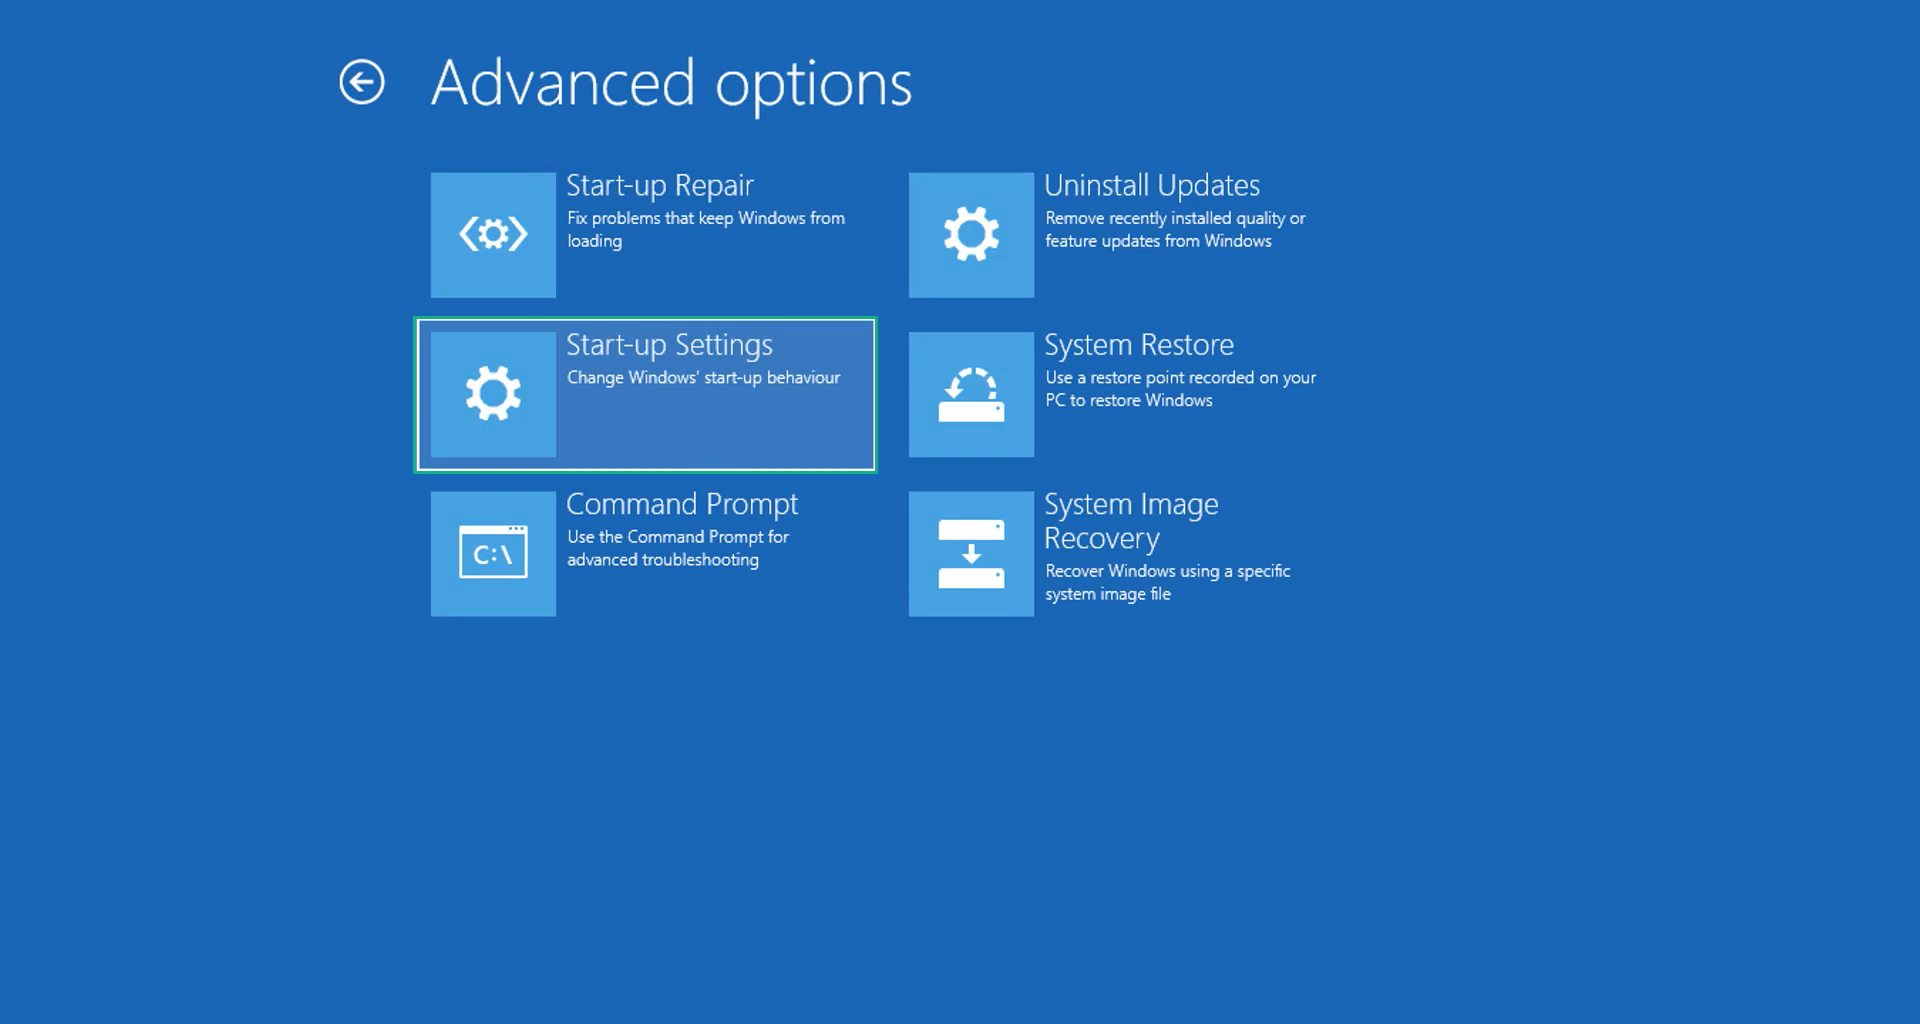
5. Select Advanced options then Start-up Settings.
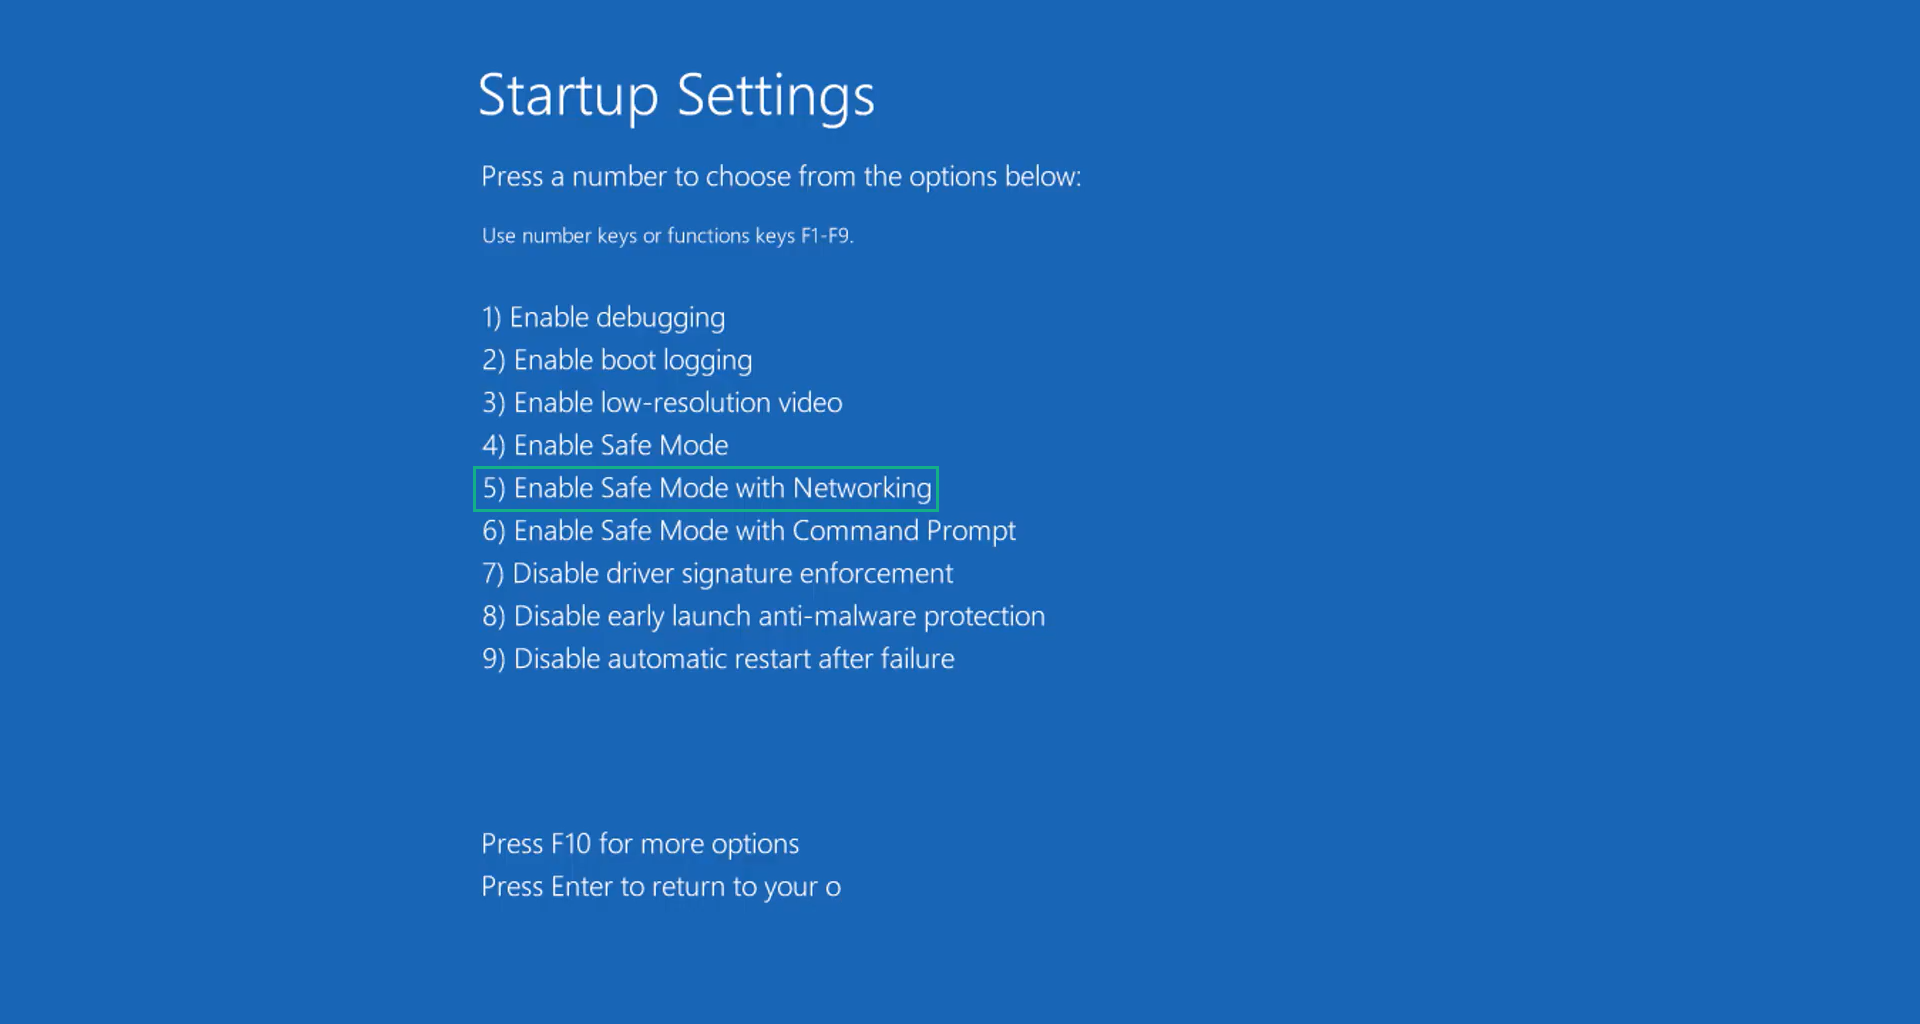
6. The system will boot up and you will be presented with the Start-up Settings. Here, press the number 5 key to finally enter safe mode with networking.
1. Press the Windows key and the letter C to open up the Charms menu.
2. From the right sidebar that opened up, click on Settings.
3. Select Power and then click Restart. You will need to hold the shift button right after the moment you click restart until Advanced Startup presents itself on the screen.
4. After holding the shift button, you will finally be in the Advanced Startup screen. Here, you will see 3 options, click on Troubleshoot.
5. Select Advanced options then Start-up Settings.
6. The system will boot up again and you will be presented with the Start-up Settings. Here, press the number 5 key to finally enter safe mode with networking.
1. Restart your computer and make sure to push the f8 button repeatedly during the boot process. This will boot the computer into the advanced settings rather than the usual startup.
2. Please wait for the system to show the Advanced Boot Options screen. If you started up in standard Windows, restart and try again.
3. Once in the Advanced Boot Options you will be asked to choose an option. Use your arrow keys, mainly up and down to hover into Safe Mode with Networking. Once there, click the Enter button and Windows will now boot into the mode you selected.
Check the corners of your computer screen to see if you booted in Safe Mode; the words “Safe Mode” should appear in white text, indicating that you are in the correct boot option.
In addition, the background would have turned black, which is entirely normal, and you should not be afraid of it if you believe you did something wrong.
We will boot into the normal Windows mode later after we have removed Findflarex.com, but for now, let’s focus on the primary task at hand: getting rid of the malware.
Step 2: Delete unwanted extension/s from the browser
Extensions can be the leading cause of Findflarex.com causing issues with the browser. However, it may be difficult to remove them if certain browser policies are set to make it persist. It might disable the delete button which makes it hard to do so.
For this reason, we will first need to delete the policies it has set on the browser before attempting to remove unwanted extensions.
- Google Chrome
- Mozilla Firefox
- Microsoft Edge
How to remove Google Chrome browser policies:
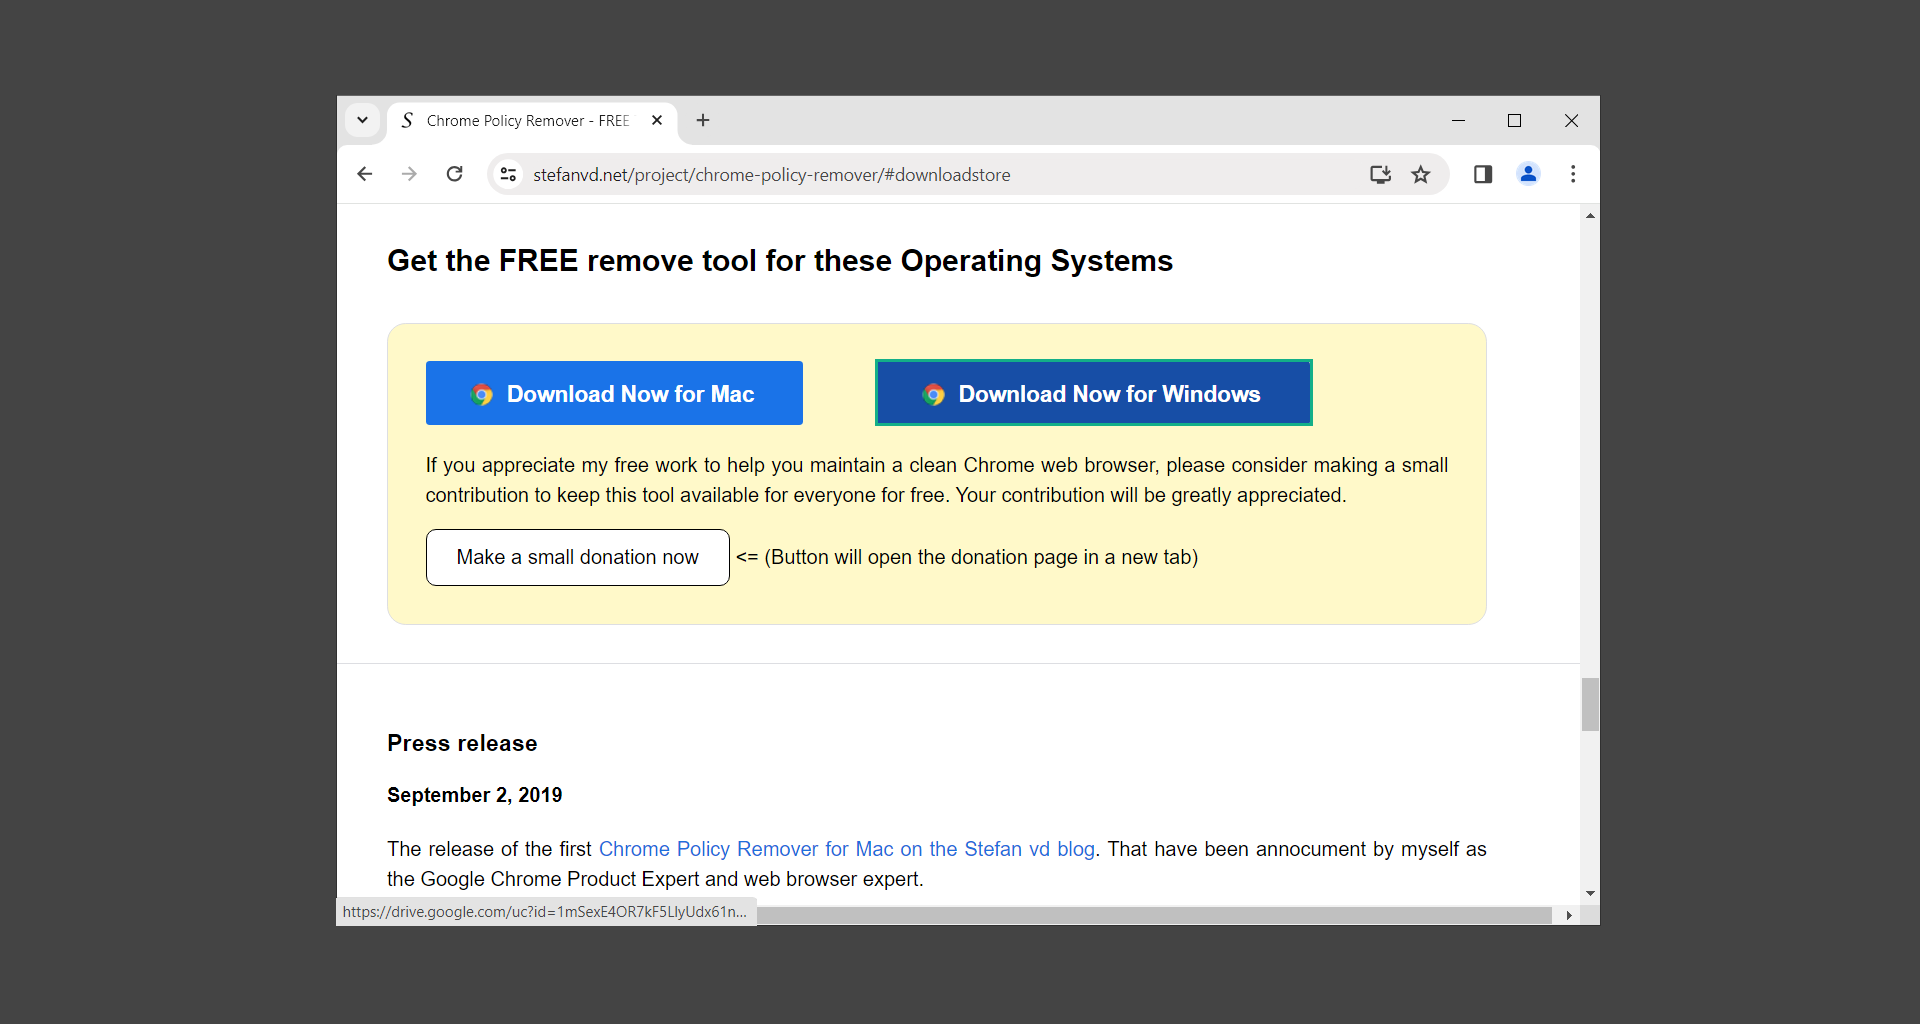
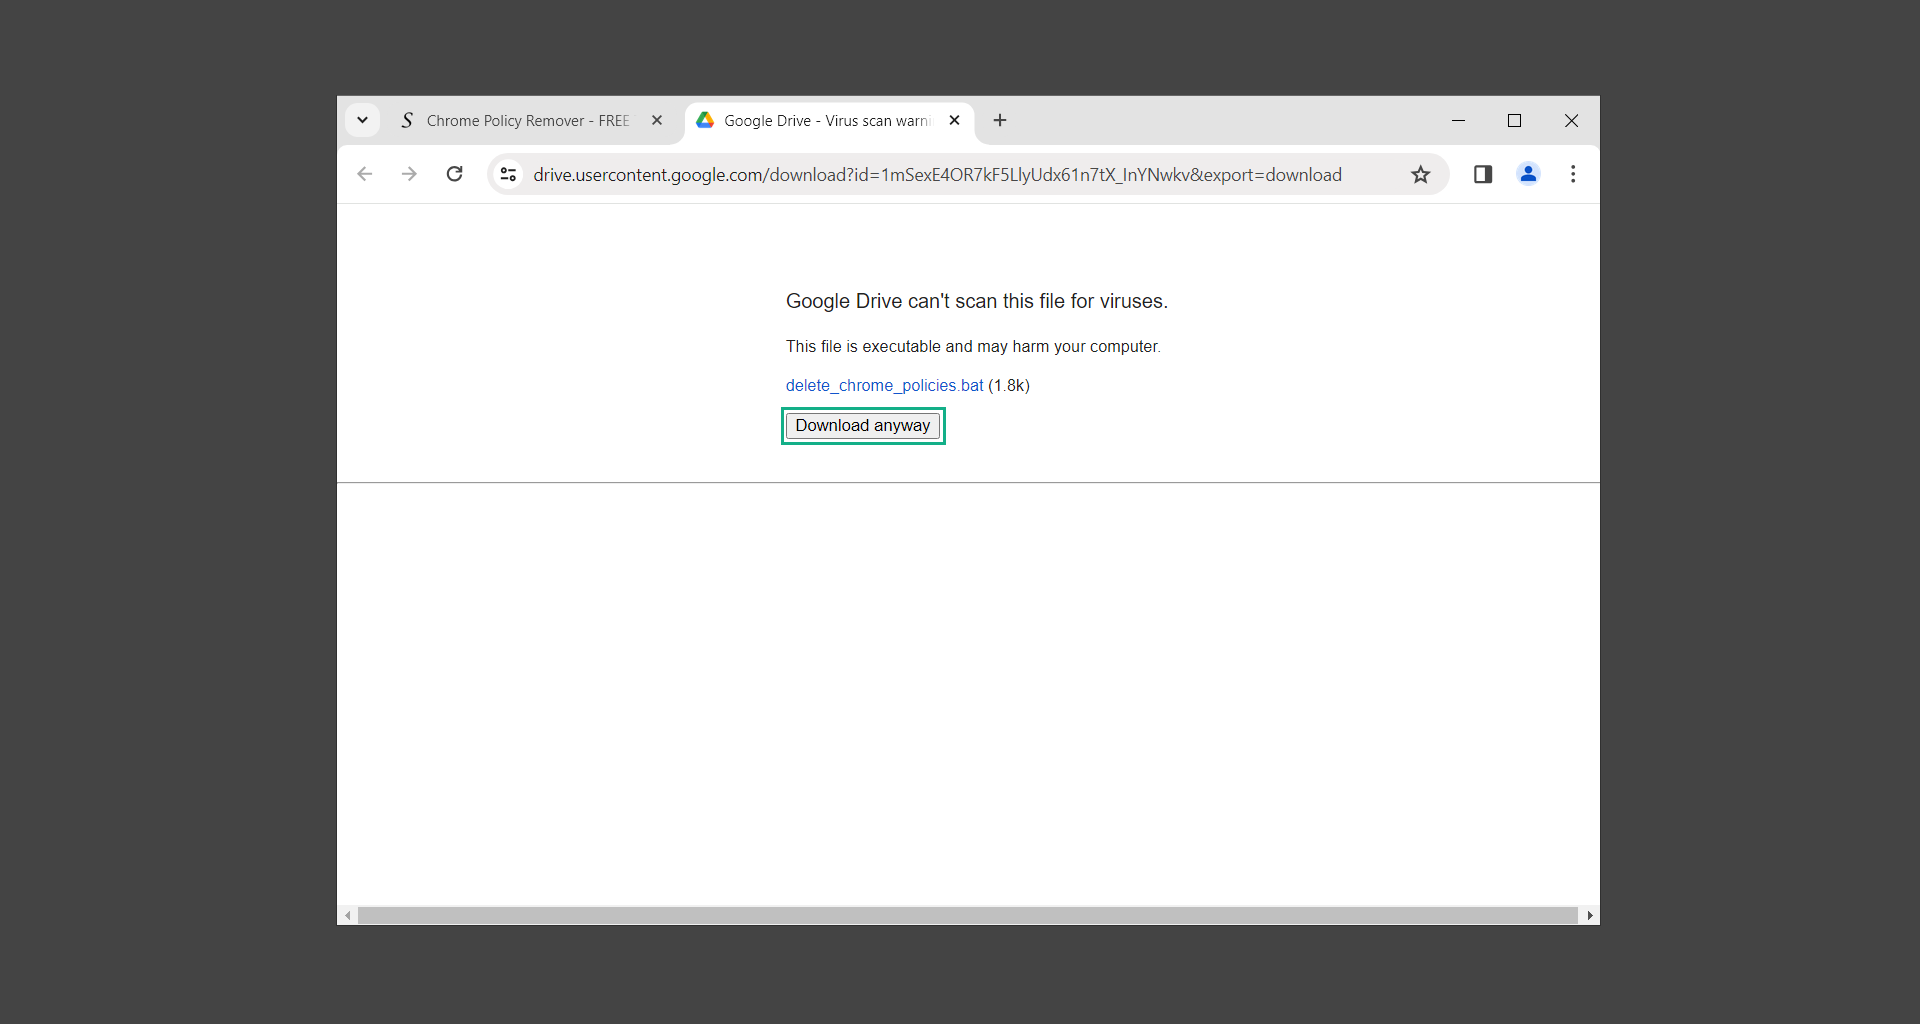
1. To do this, we will use Chrome Policy Remover. Download the Windows version from the official source. (If the file is broken or missing, here’s an alternative download link.)
2. Proceed to download delete_chrome_policies.bat by clicking Download anyway.
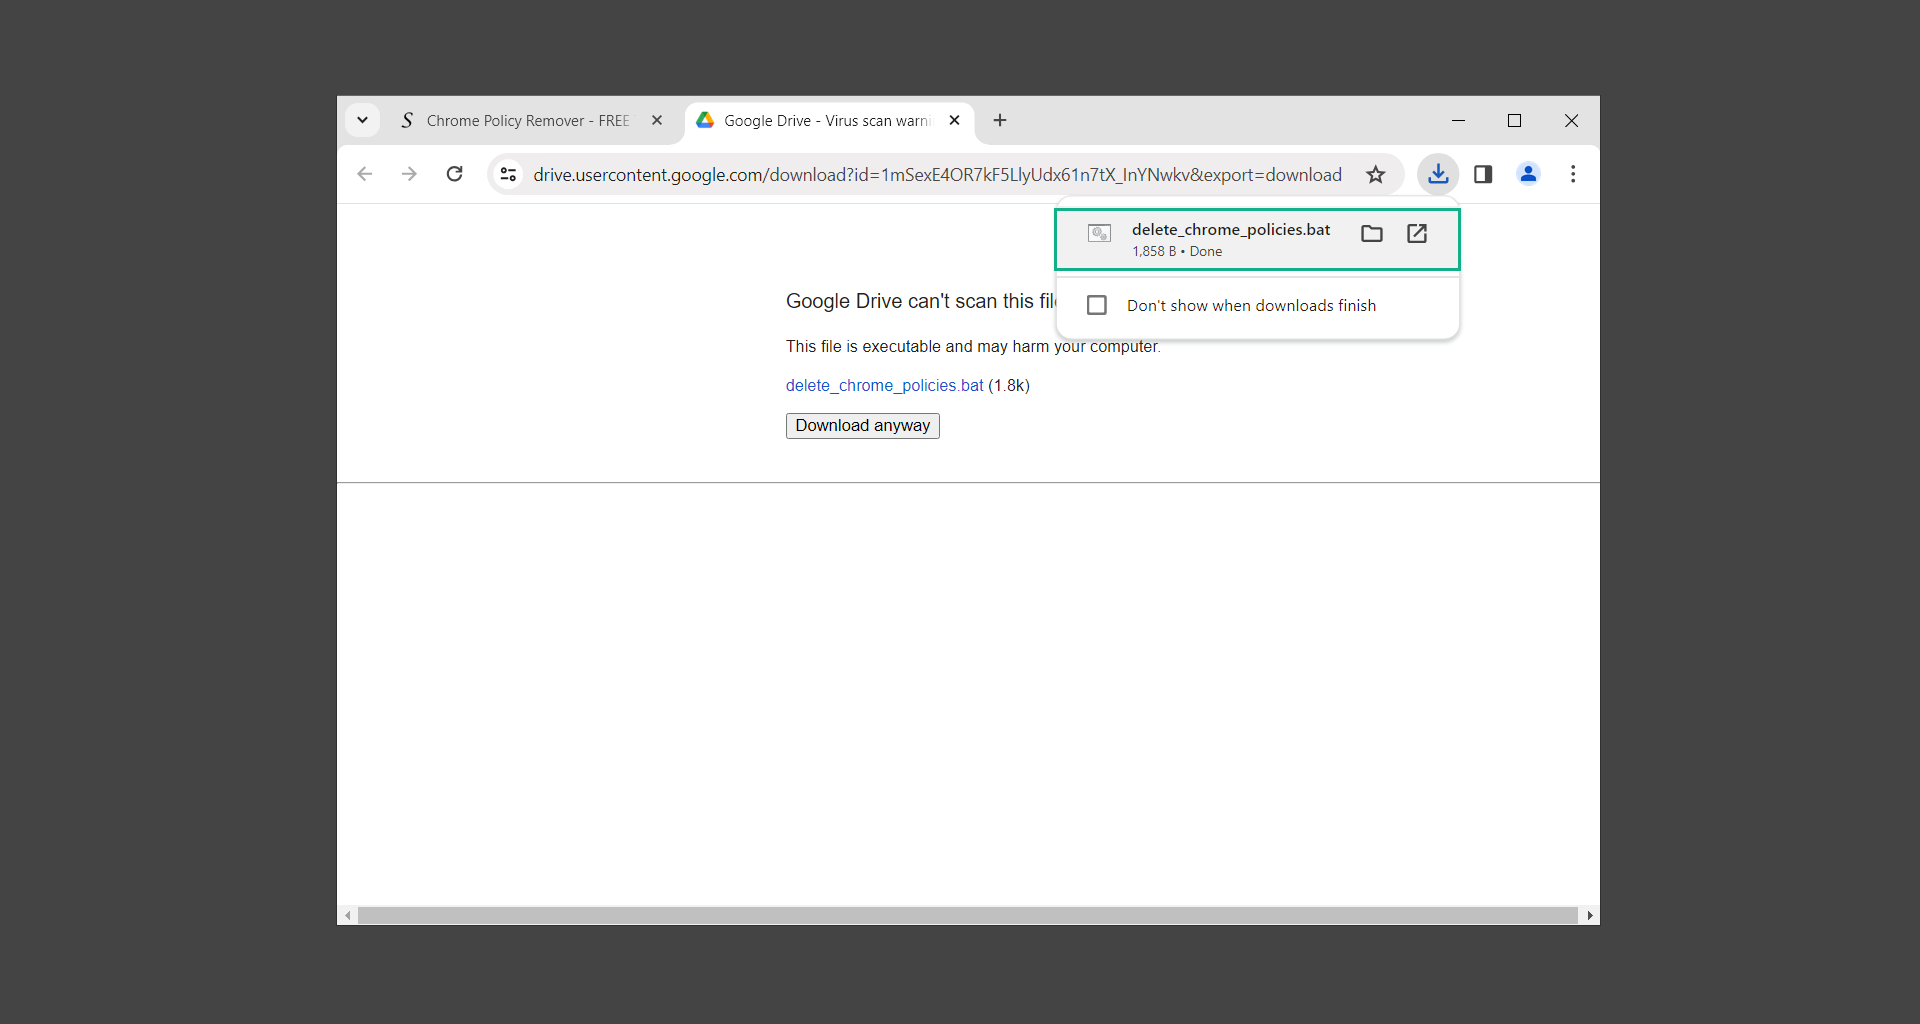
3. Once the bat file has finished downloading, run it as administrator to begin removing unwanted policies set by the malware.
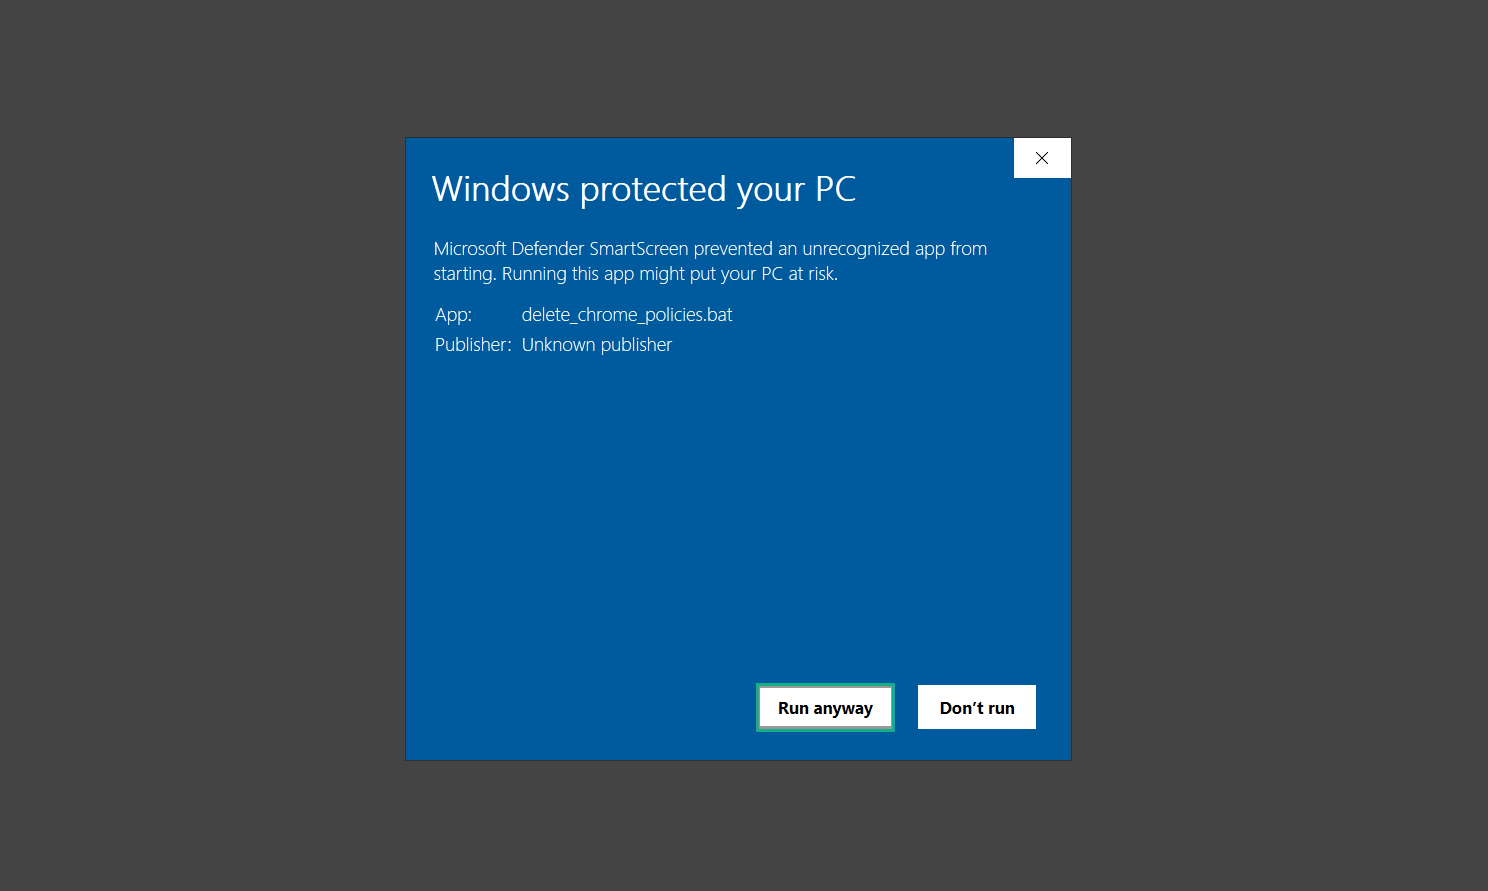
4. If the Microsoft Defender SmartScreen prevented it from running, click Run anyway. This tool has been recommended enough times in the Google Chrome community therefore we can vouch that it is safe to run. (VirusTotal results of the Policy Remover.)
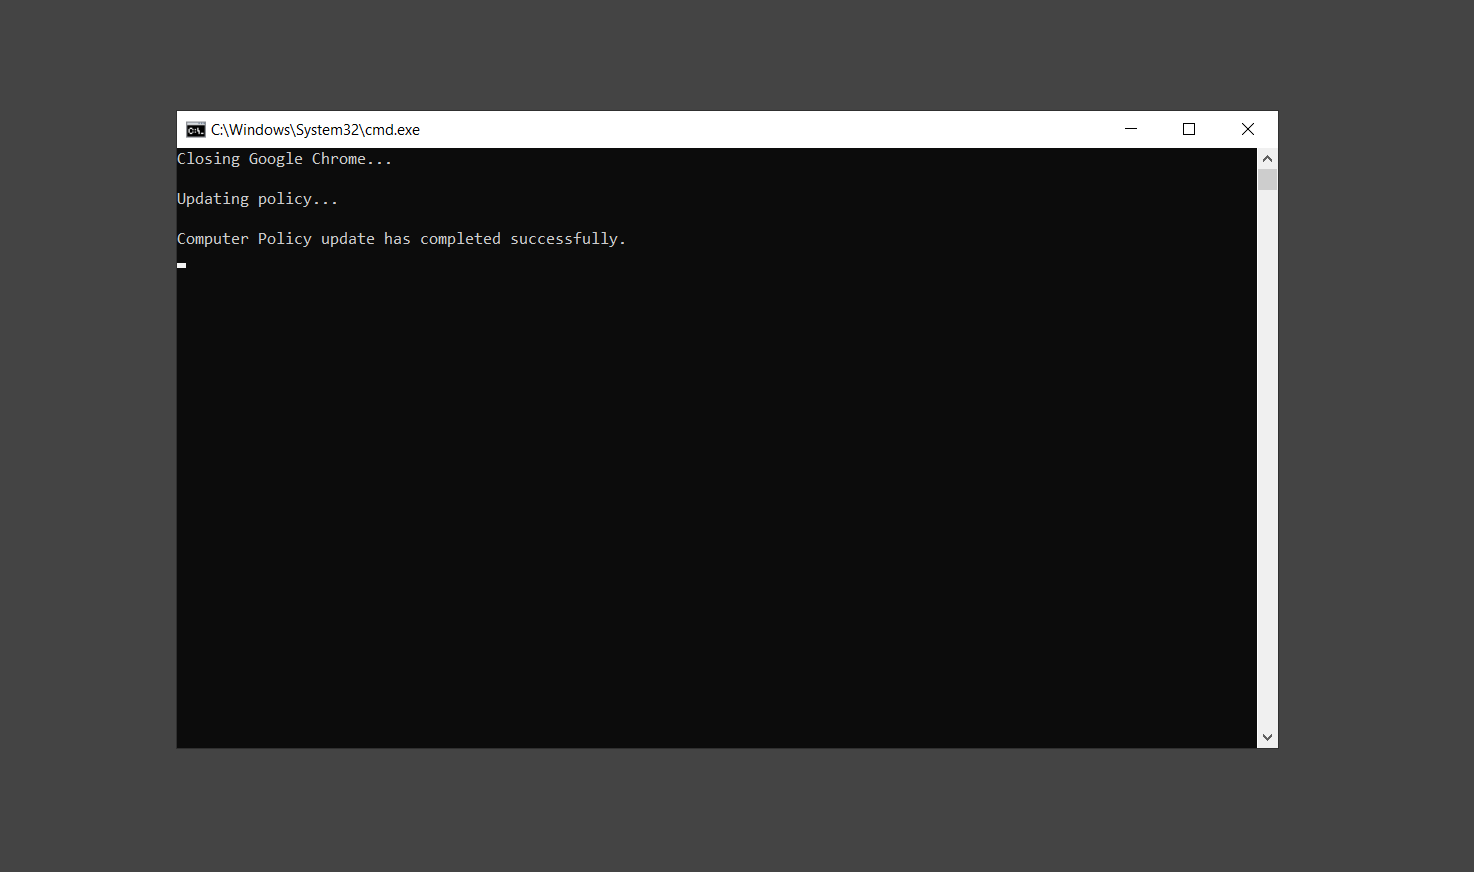
5. The command prompt will open up, it will close Chrome and delete certain malicious policies. Once the policies are removed, you can now close the command prompt and begin removing the extension.
How to delete unwanted extensions from Chrome:
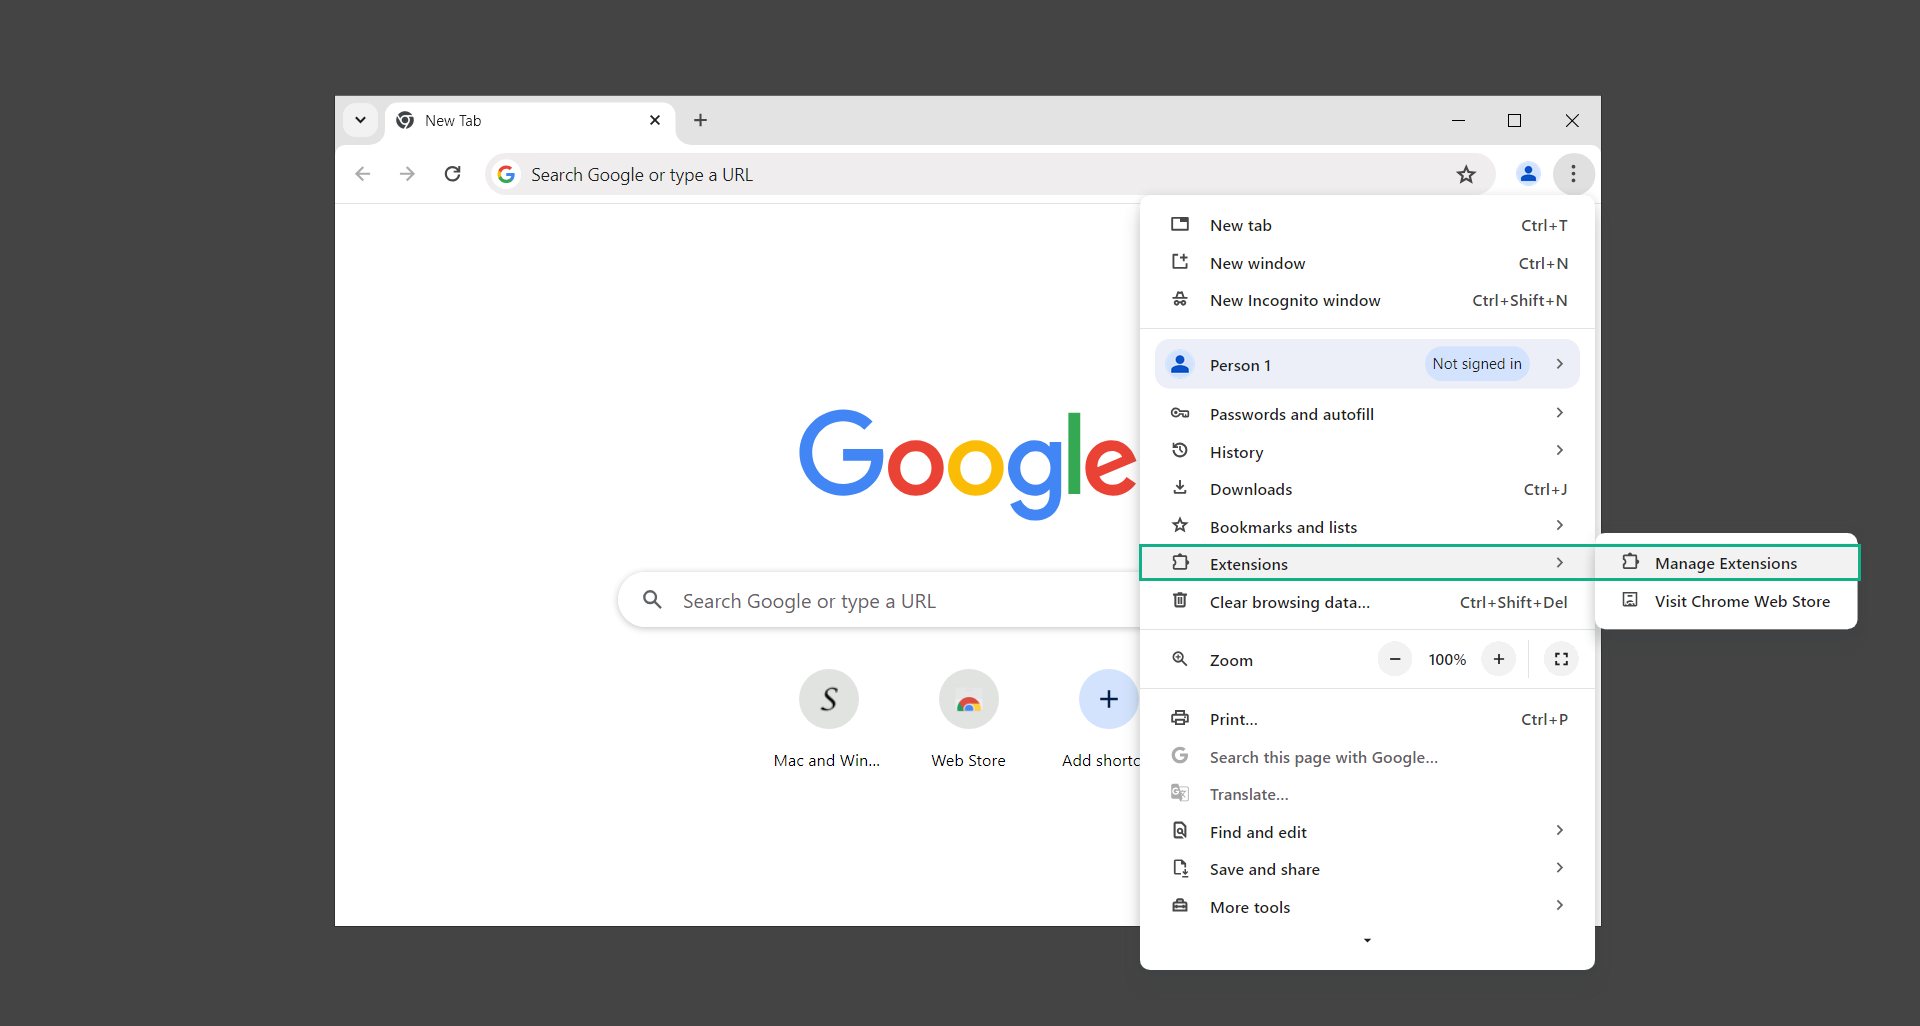
1. Open Google Chrome and click the three horizontal dots on the upper-right corner of the screen.

2. From the dropdown menu, select Extensions and click Manage Extensions.
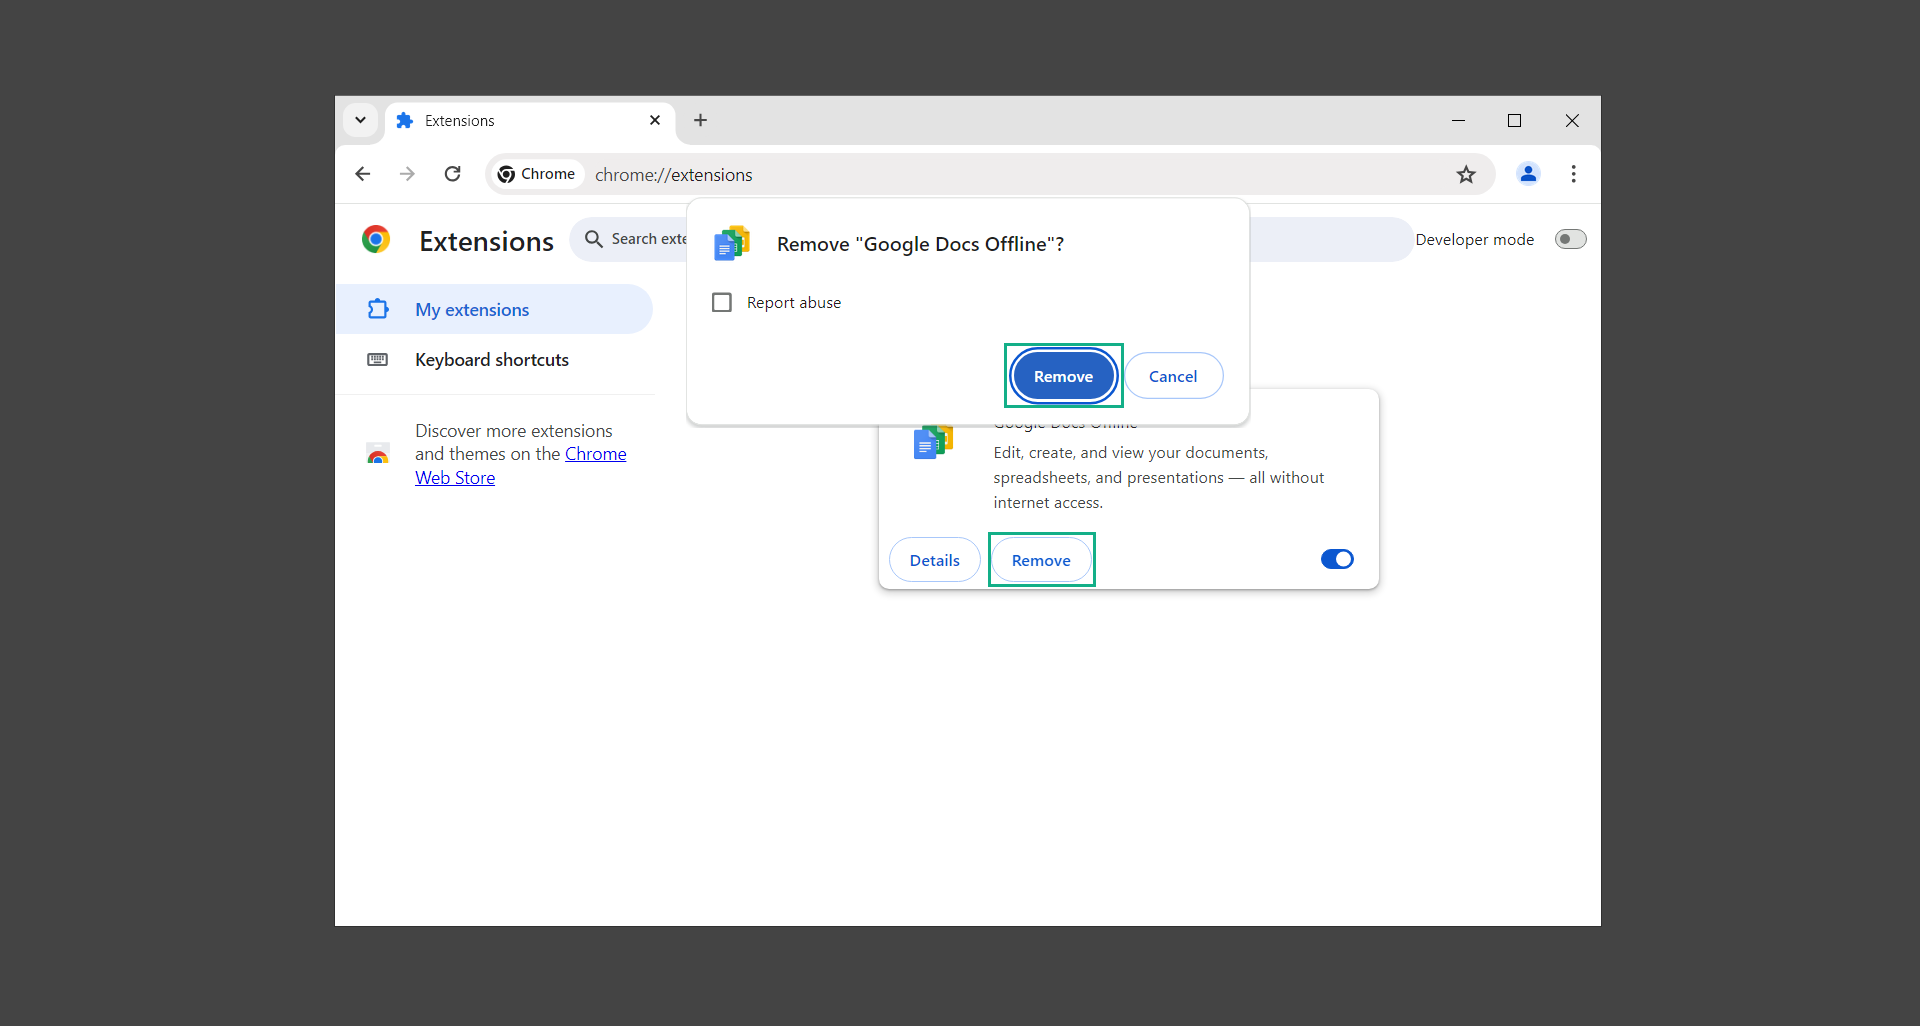
3. You should now be able to click the Remove button. Continue to do so in order to remove the unwanted extension from the browser. (For this example, we will be using Google Docs Offline.)
How to remove Mozilla Firefox browser policies:
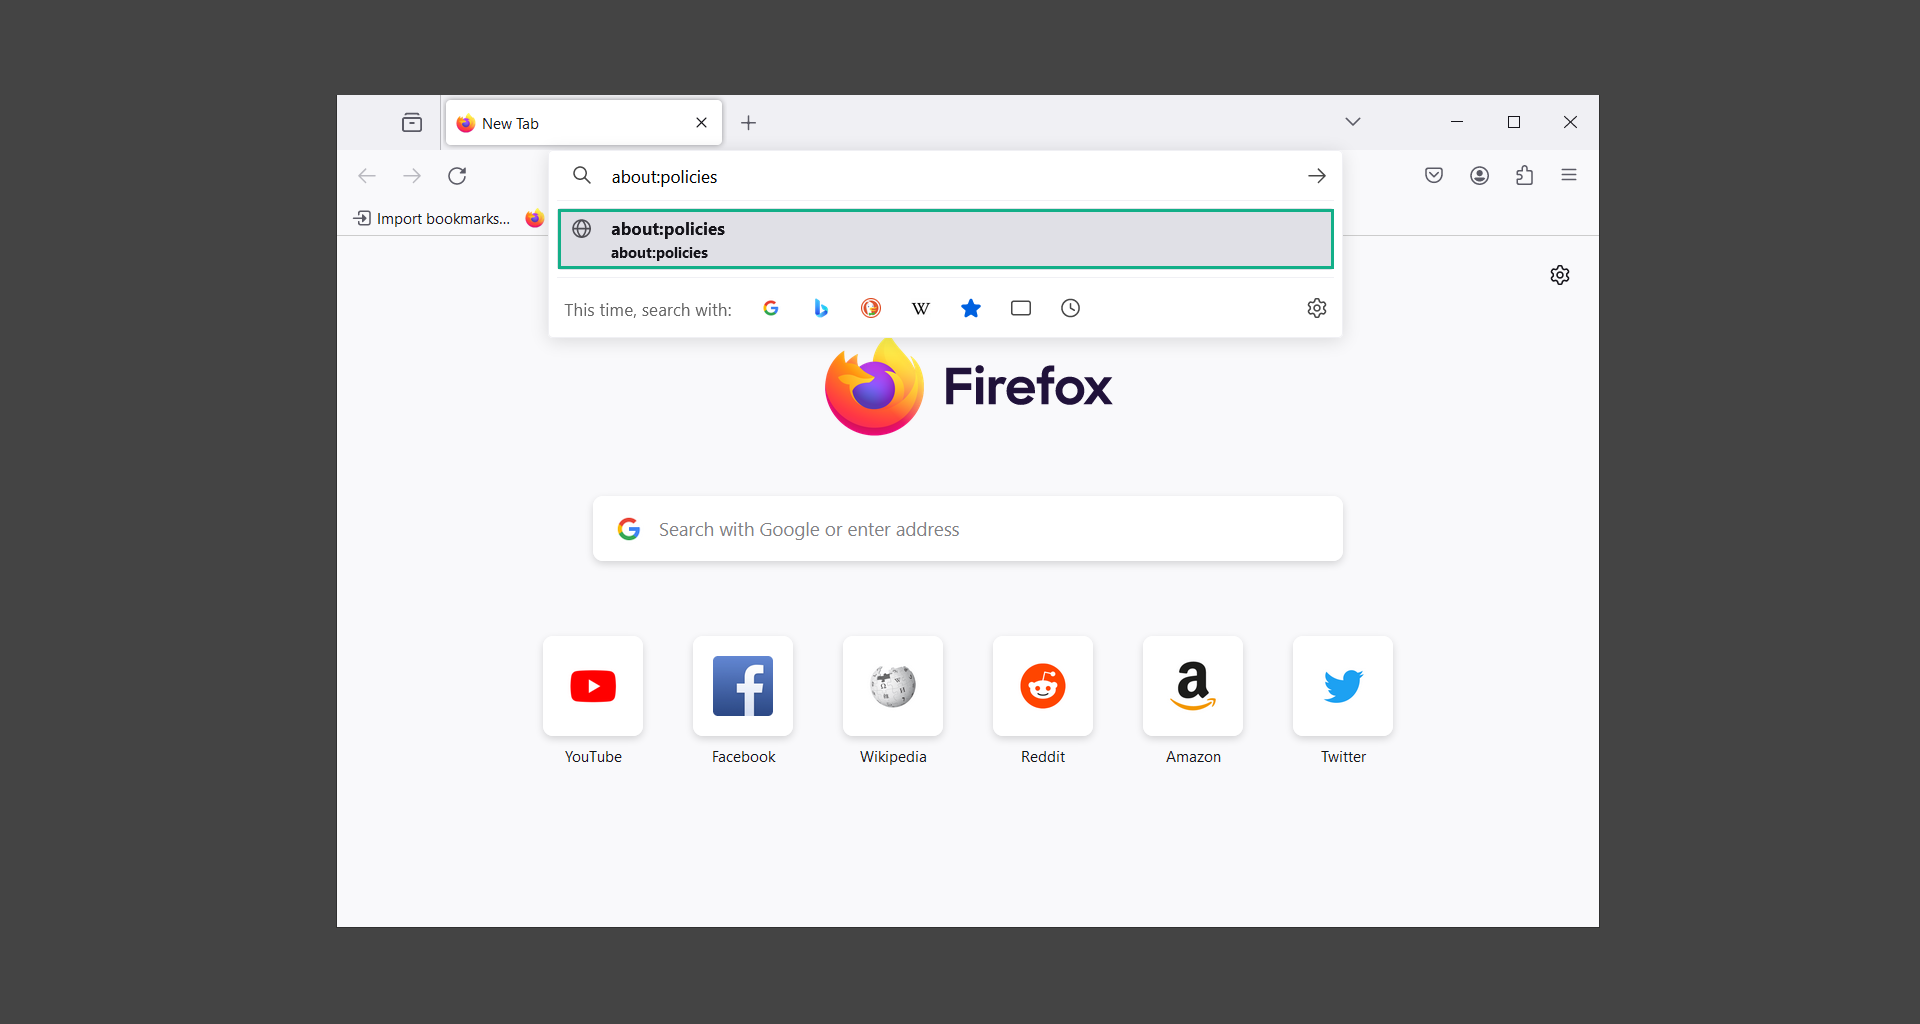
1. Open the browser and type about:policies in the address bar.
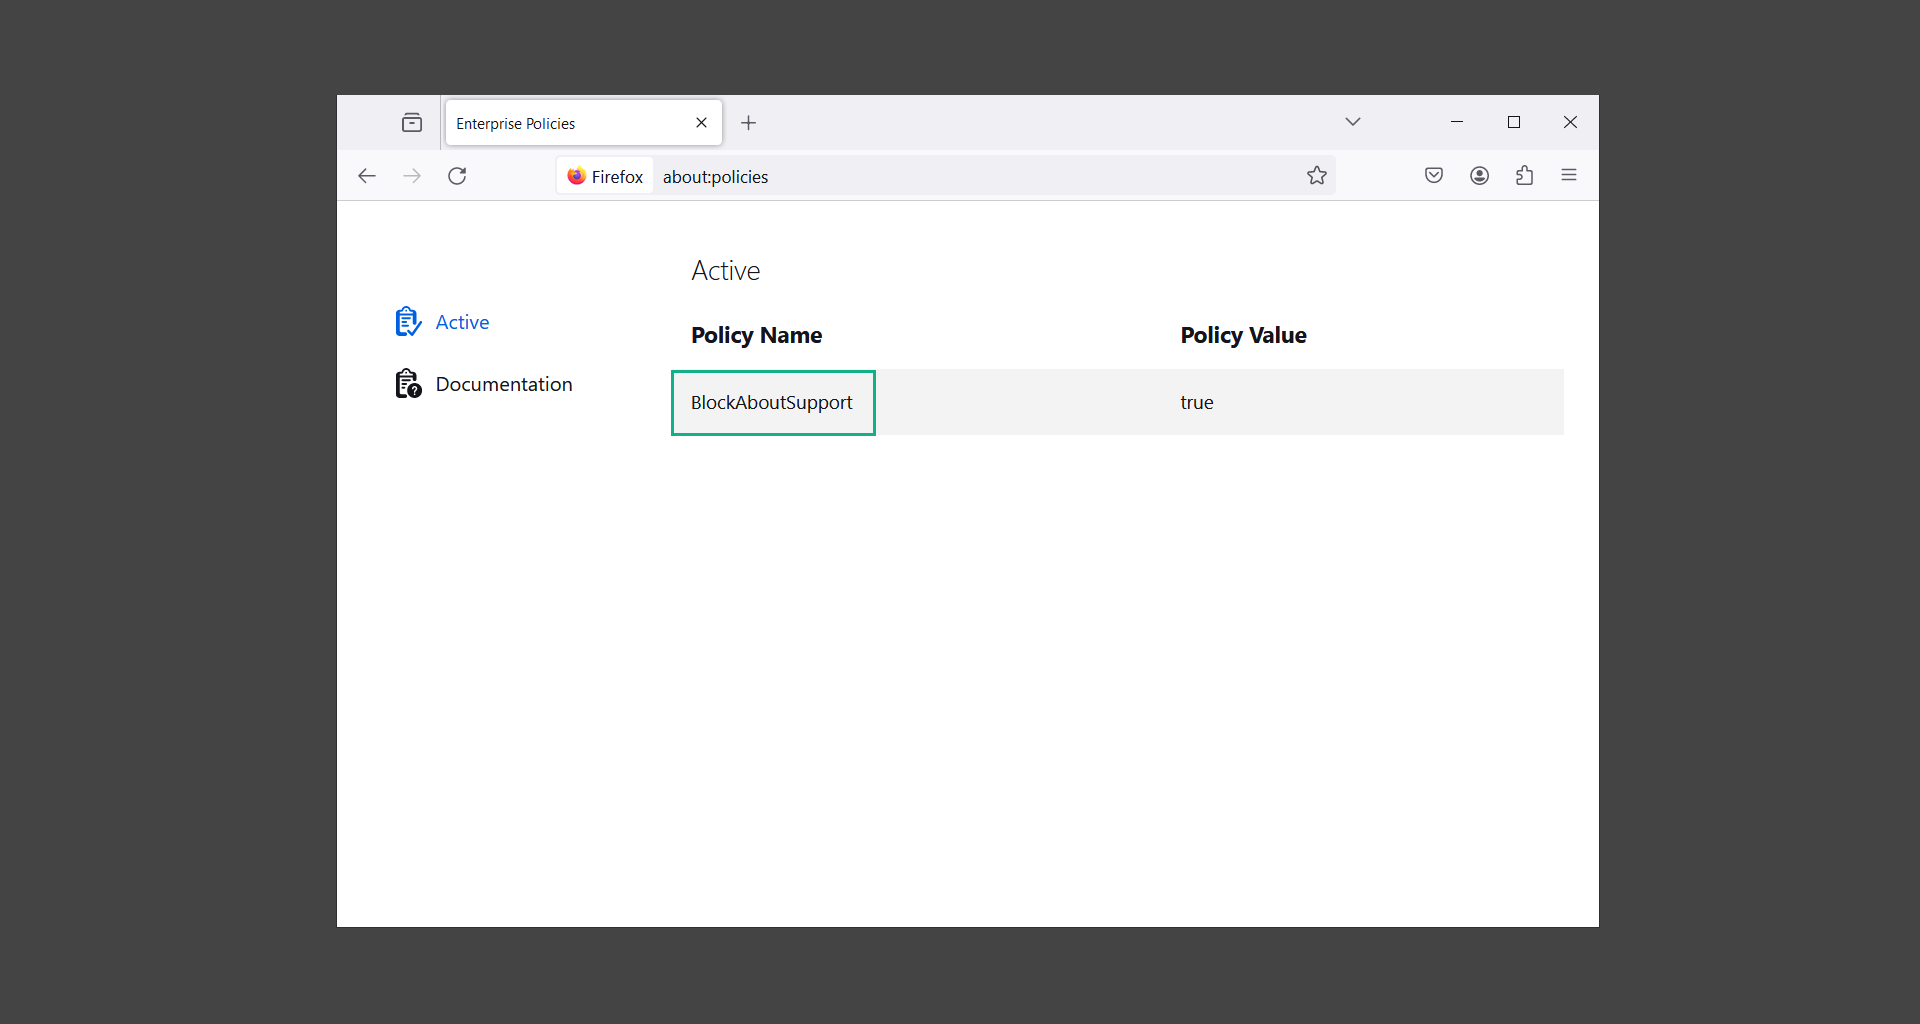
2. Take note of the active policy names as shown on the screen.
3. Press Windows Key + R to open the Run command.
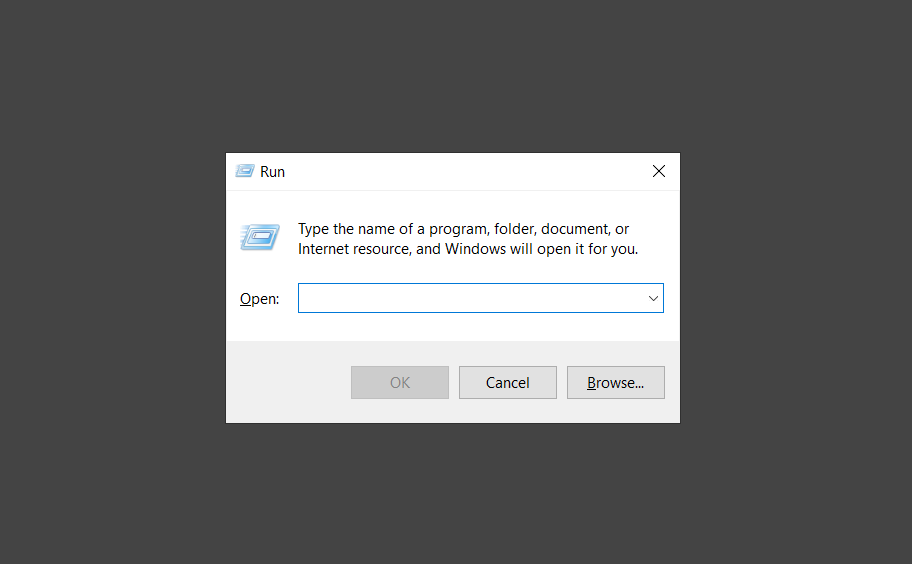
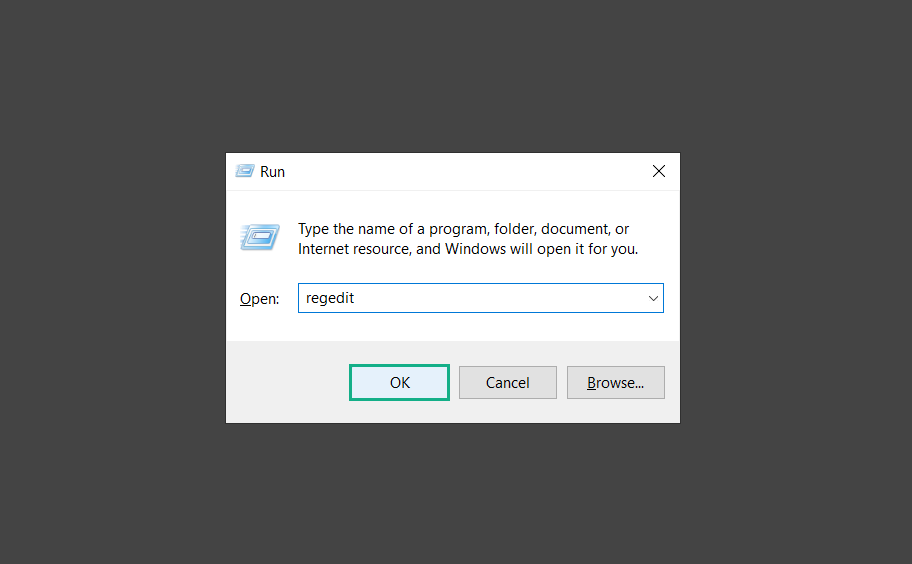
4. Type regedit and hit enter to open the Registry Editor.
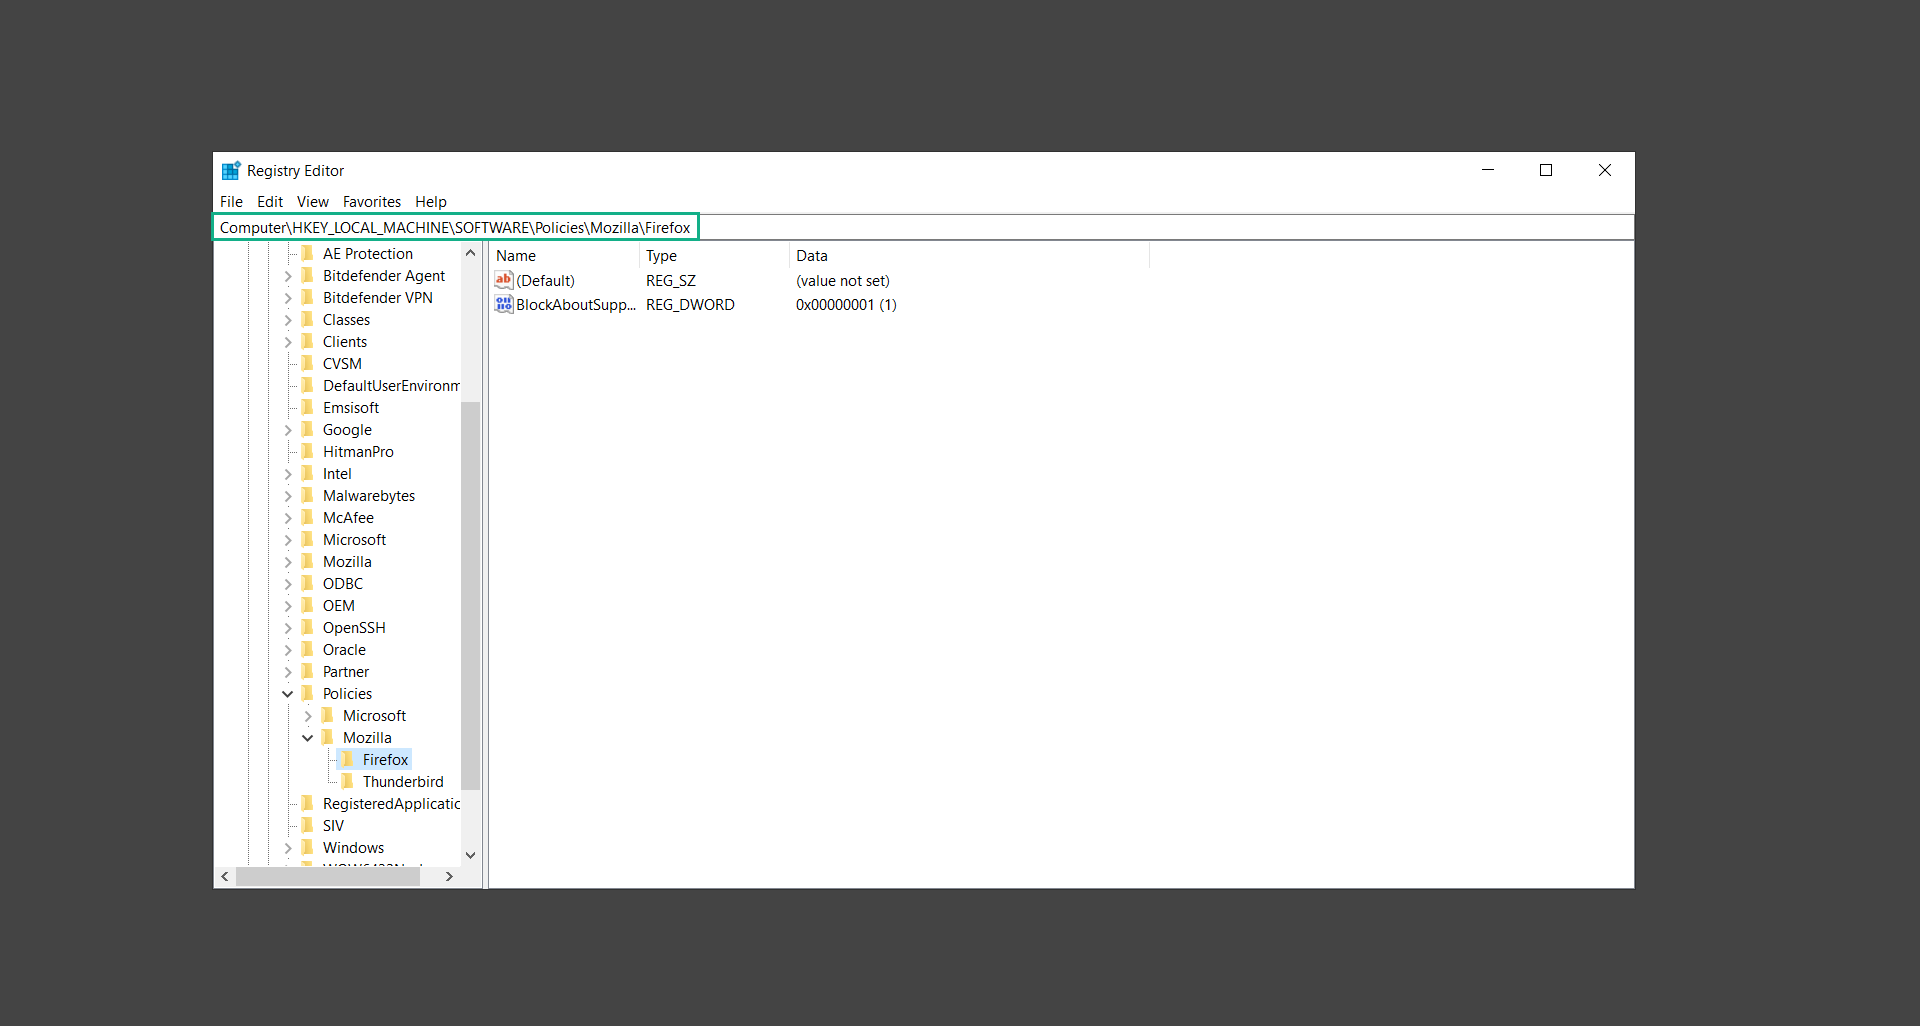
5. Go to the following directory: HKEY_LOCAL_MACHINE\SOFTWARE\Policies\Mozilla\Firefox
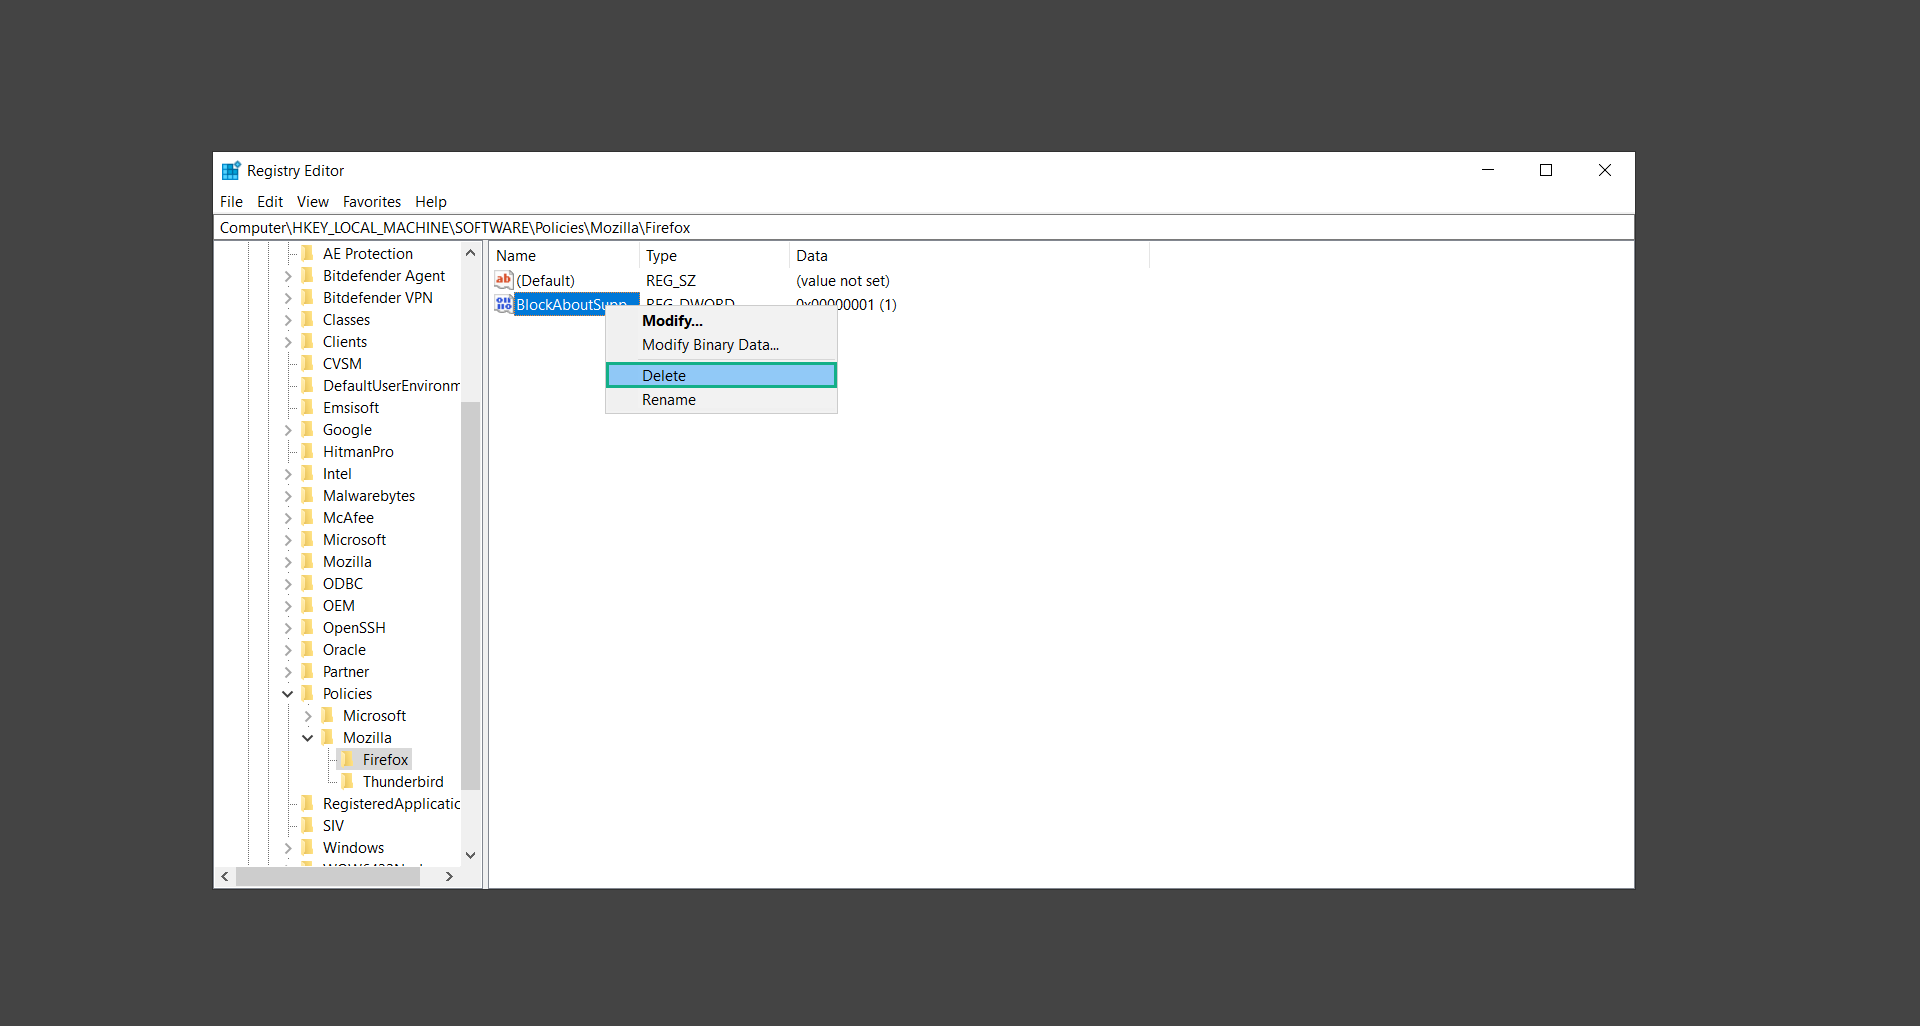
6. Delete the policies that matched the ones shown on the browser policy page earlier. With this, we can proceed with deleting the unwanted extension.
How to remove unwanted extensions from Firefox:
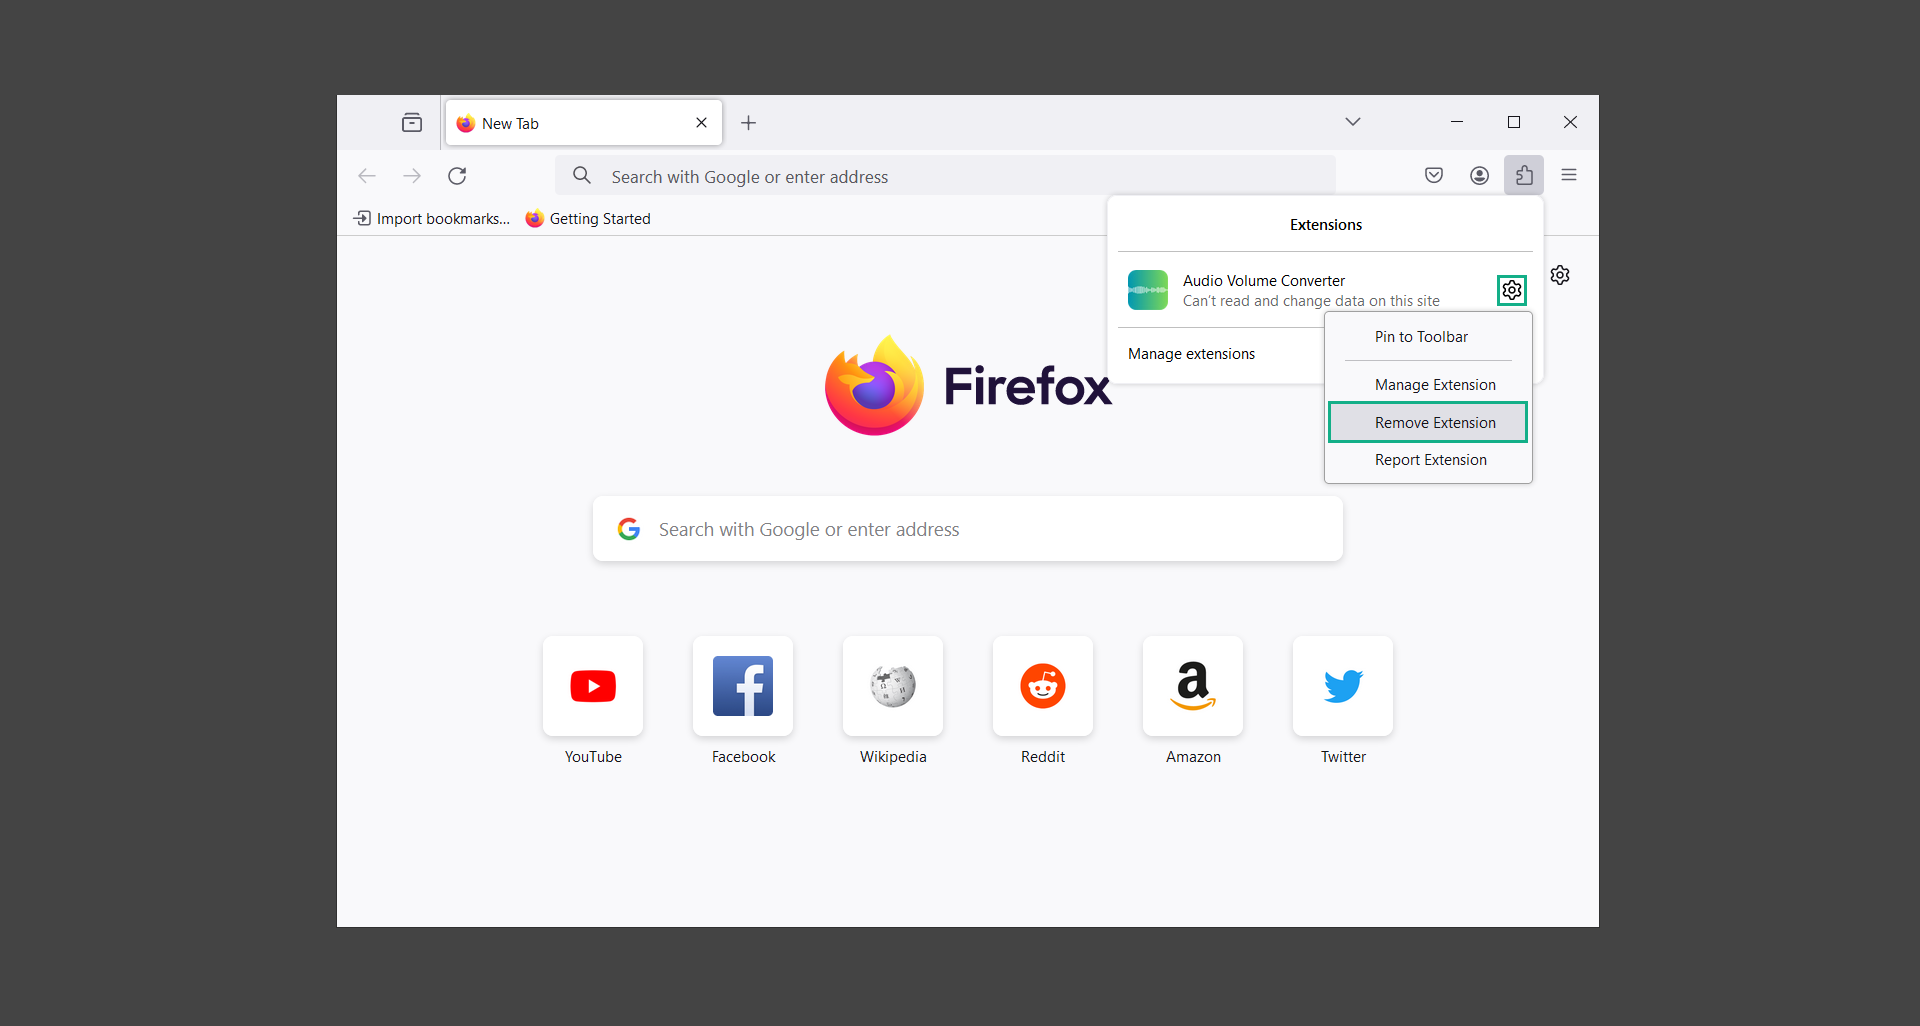
1. Open the Firefox browser and click the extension icon on the upper-right corner of the screen.

2. Click on the cog icon near the unwanted extension you want to install. From the dropdown menu, select Remove Extension. (We will be using a sample extension to demonstrate.)
How to delete browser policies set in Microsoft Edge:
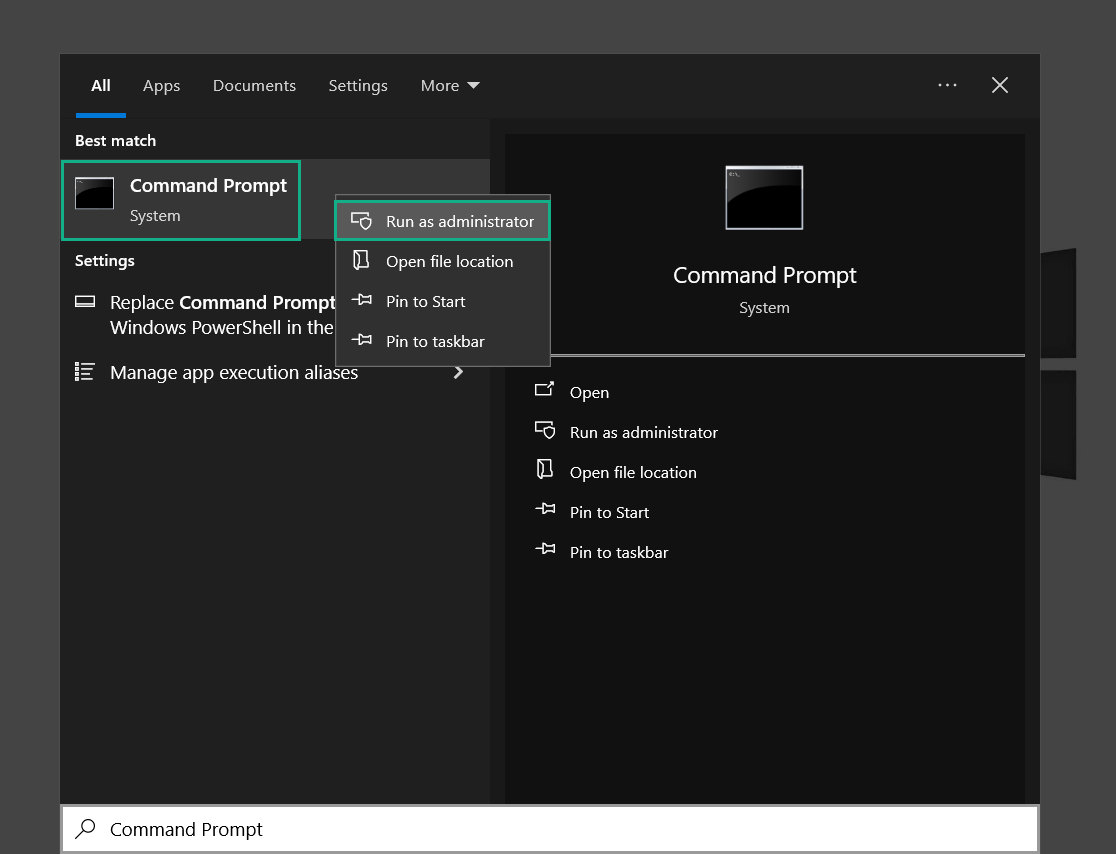
1. Open Command Prompt as administrator.
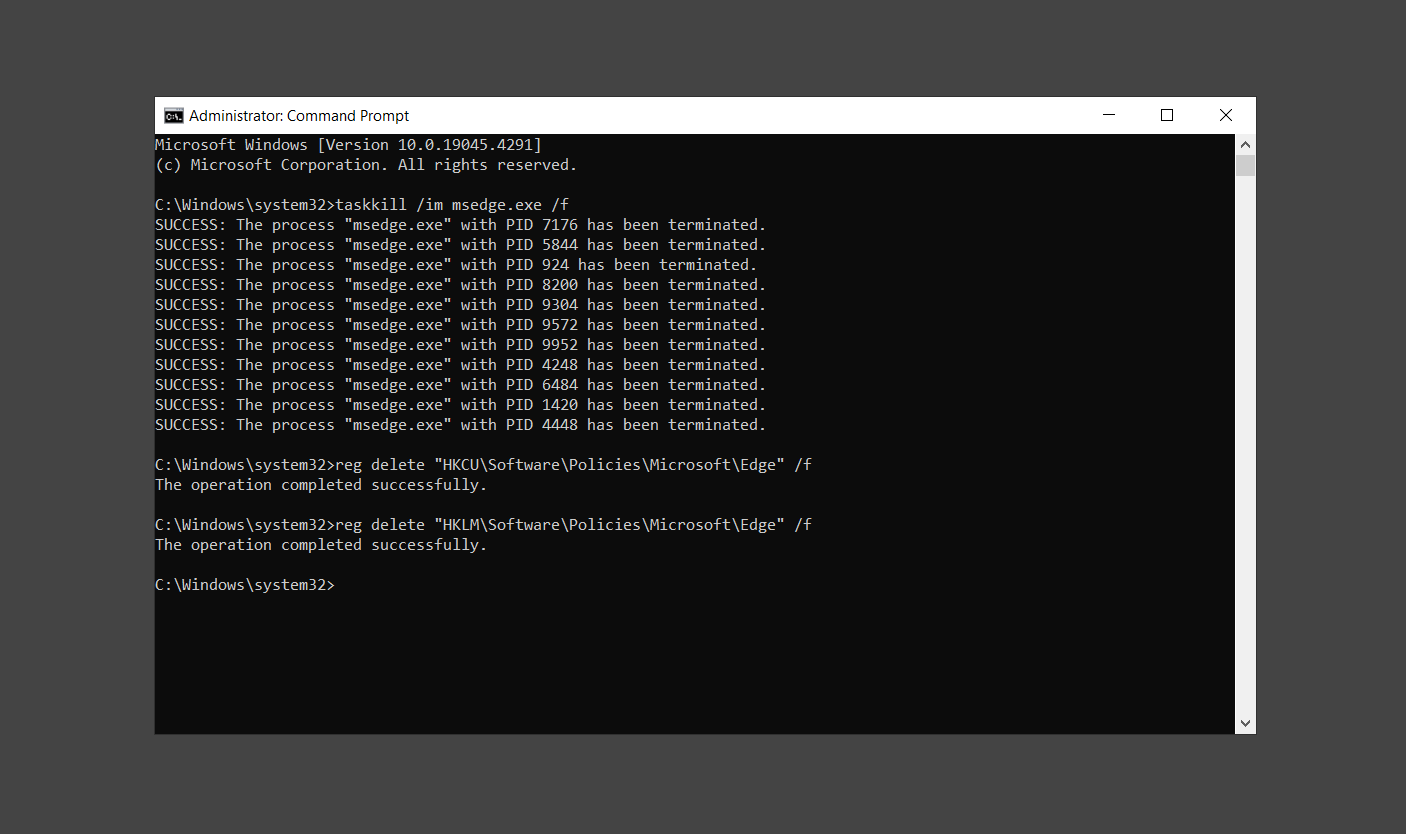
2. Type in the following code and enter each line separately.
taskkill /im msedge.exe /f
reg delete "HKCU\Software\Policies\Microsoft\Edge" /f
reg delete "HKLM\Software\Policies\Microsoft\Edge" /f
3. Once finished, close Command Prompt and we can begin removing the unwanted extension/s from the browser.
How to remove unwanted extensions from Microsoft Edge:
1. Open Microsoft Edge and click the Extensions icon on the top bar of the browser.

2. Click on Manage Extensions.
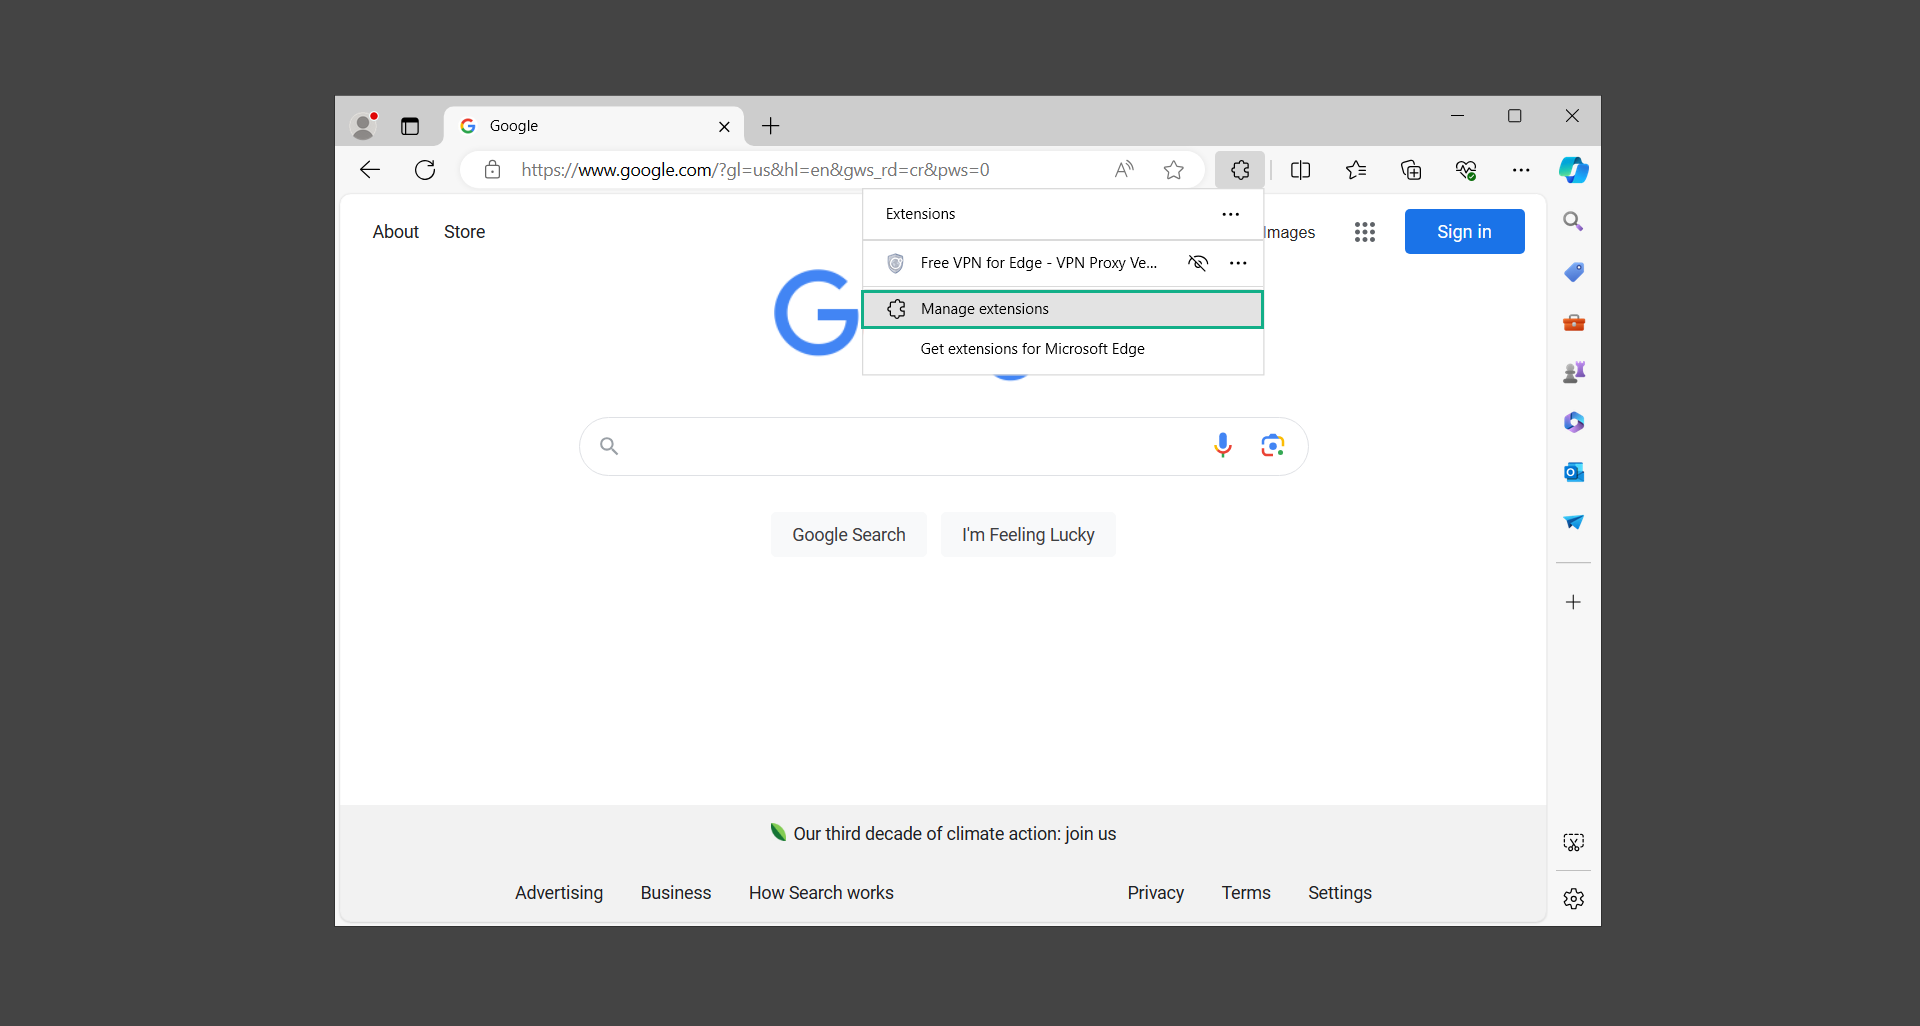
3. Find the unwanted extension and click Remove.
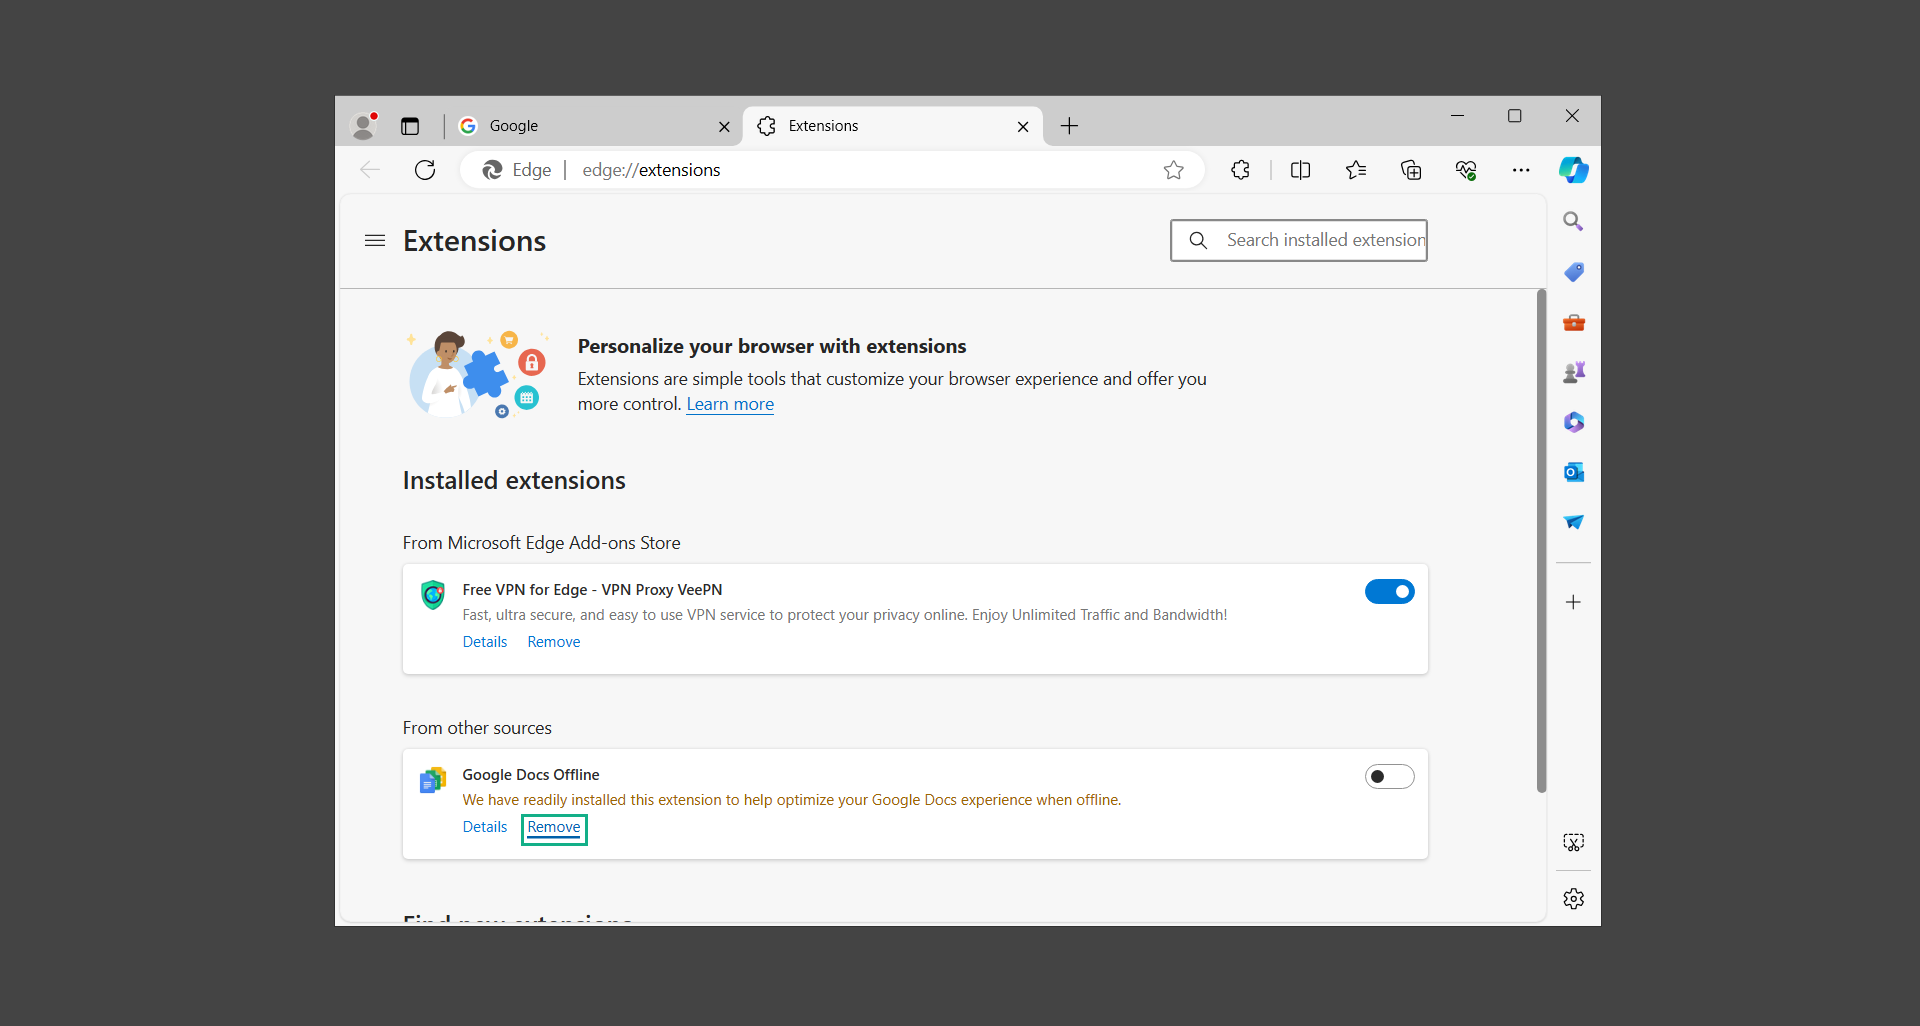
Malware should now be deleted from the browser after following the steps. But we are not done yet. There may be malware present on the computer that is directly responsible for installing the said extension to the browser.
Step 3: Remove browser malware with AdwCleaner
AdwCleaner is a utility tool that is primarily used for cleaning adware and potentially unwanted applications (PUP) from the computer. This program is also primarily used to find and remove malware that is targeted at the web browser.
Here’s how to install and use AdwCleaner:
1. Open your web browser and download a copy of the software by heading over to the official AdwCleaner download page.
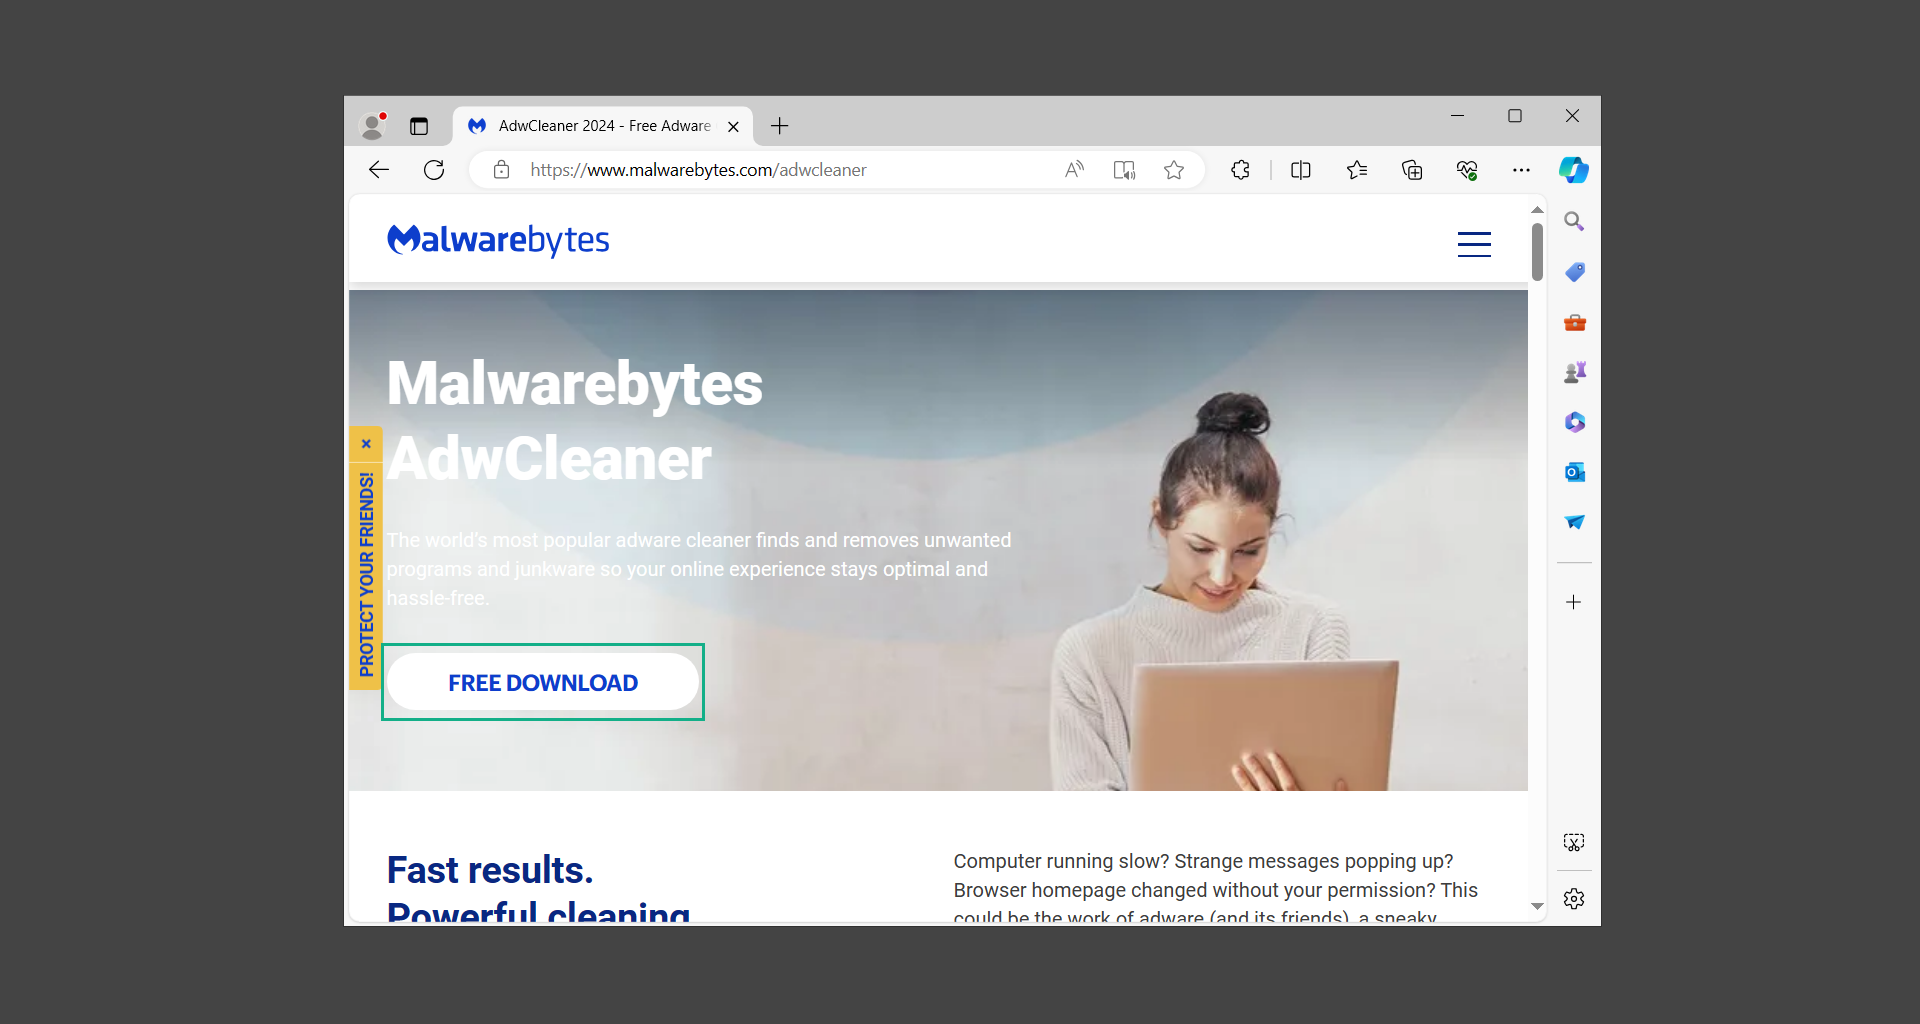
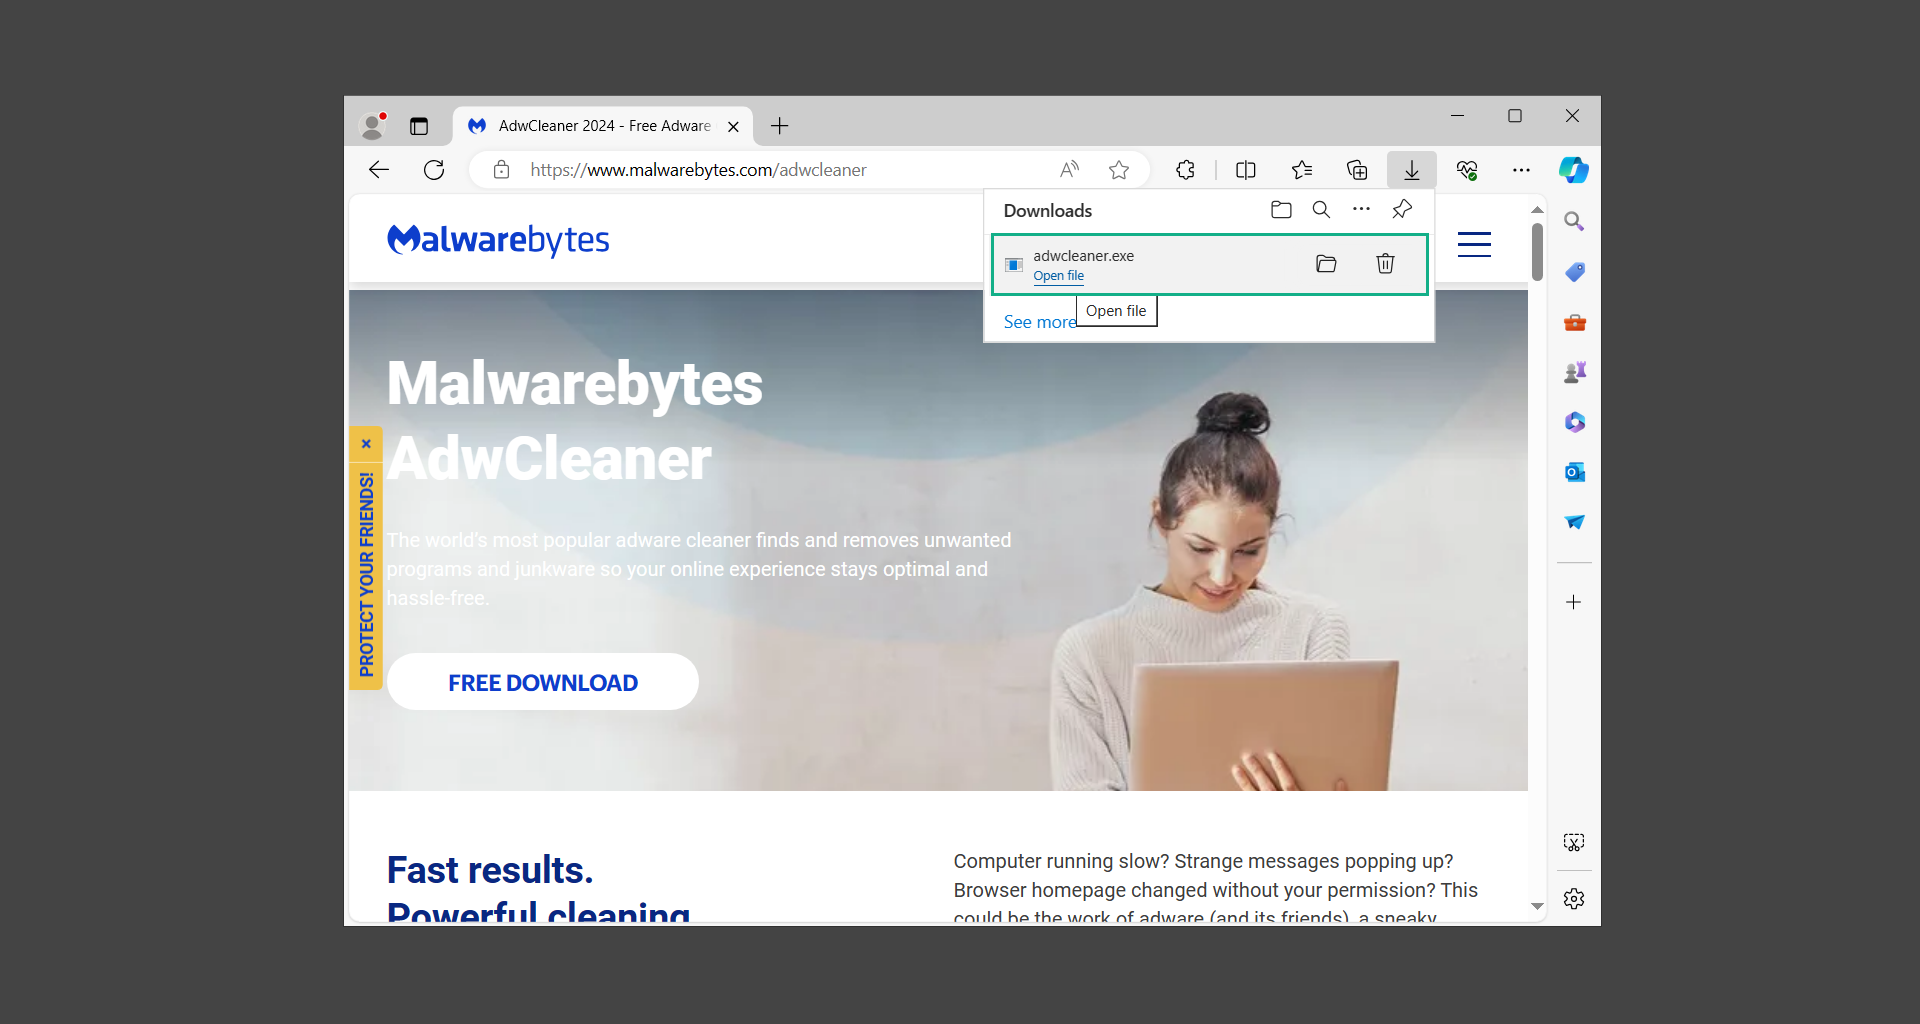
2. Once AdwCleaner has finished downloading (adwcleaner.exe), run the executable file.
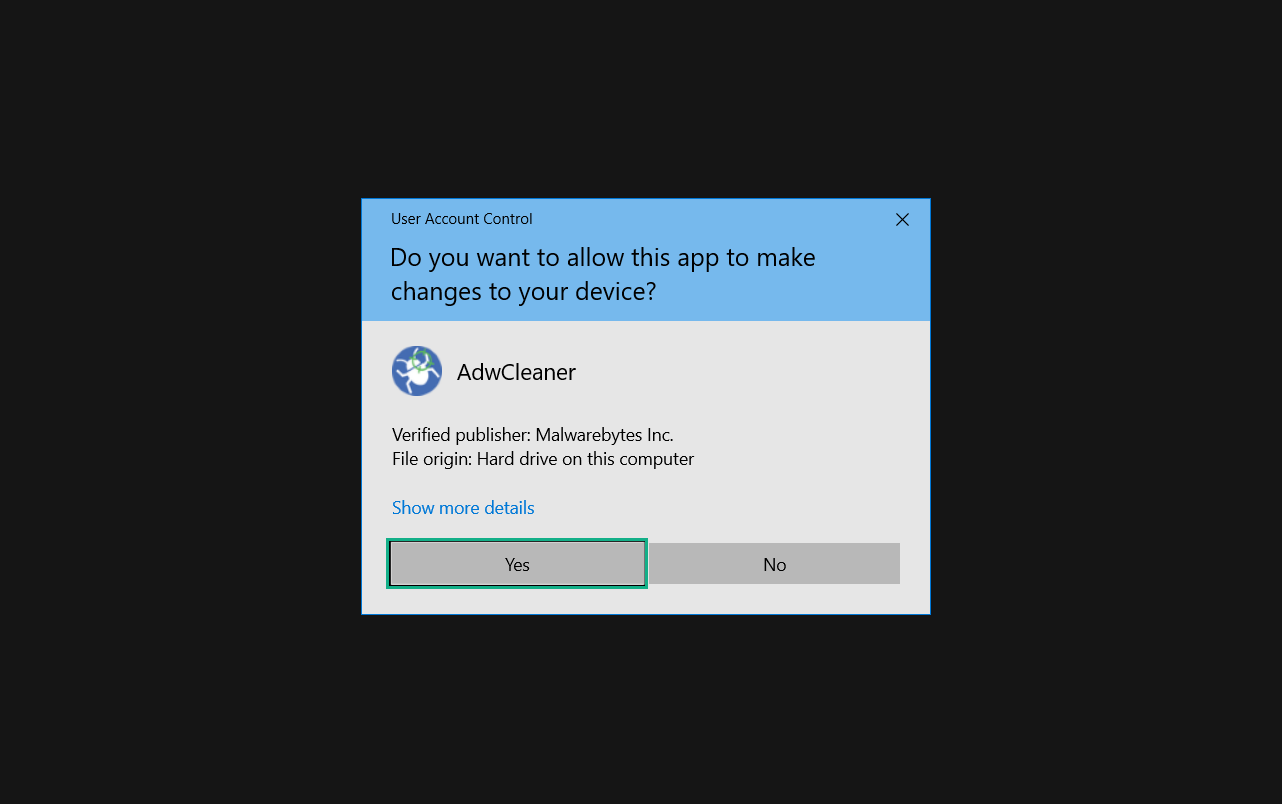
3. If the User Account Control window pops up, click Yes to proceed with running the program.
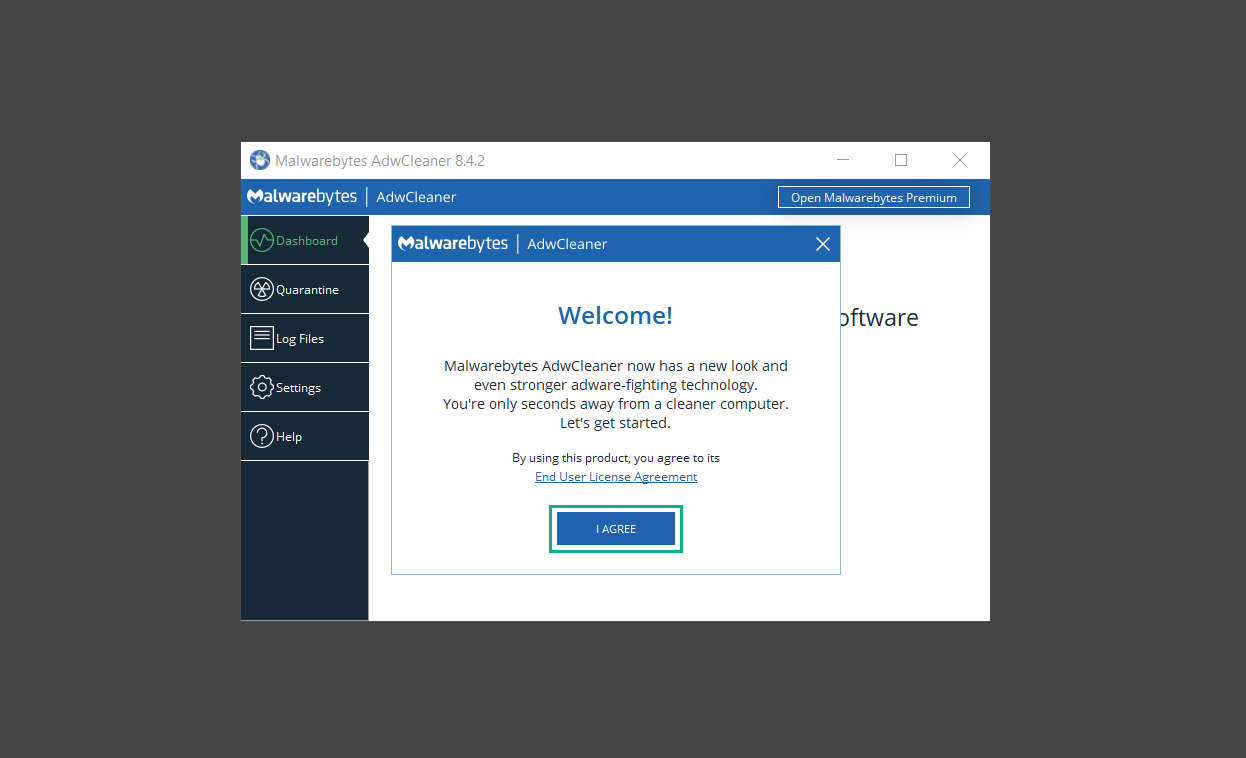
4. Once the program has launched, agree to the End User License Agreement by clicking the I Agree button.
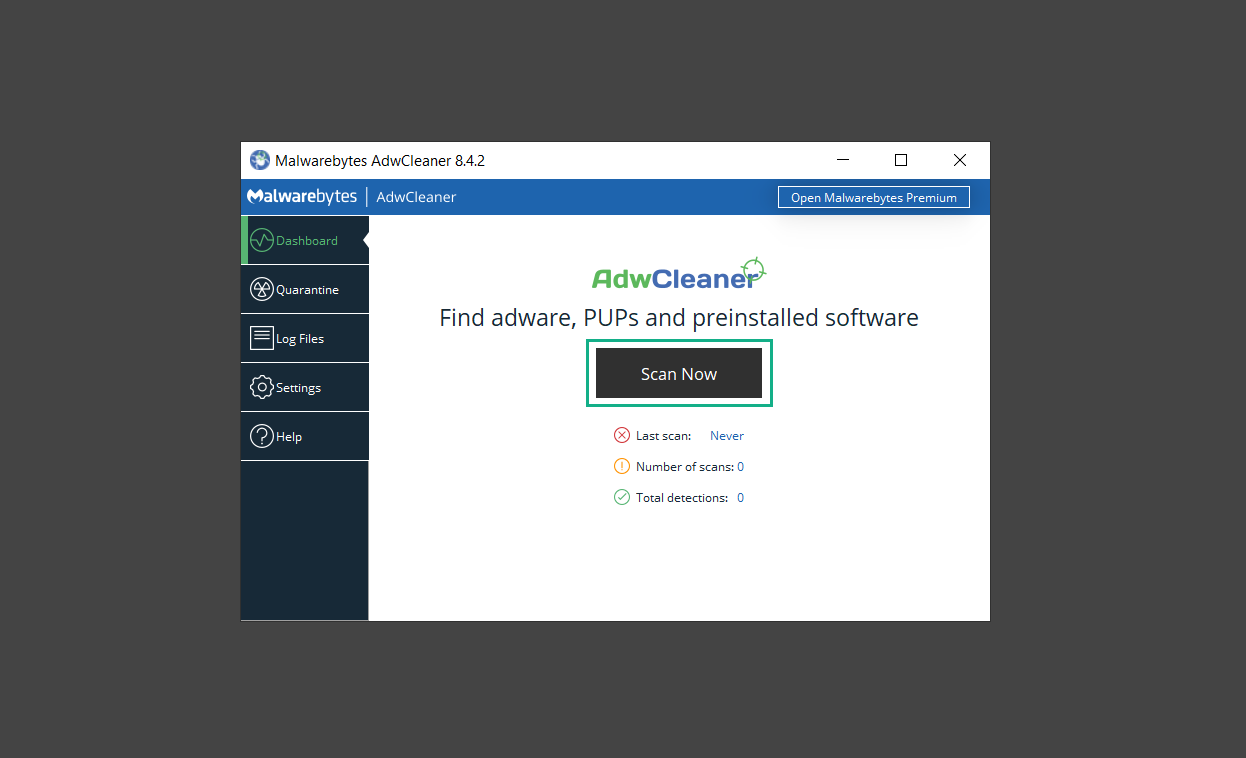
5. Click on the Scan Now button to begin scanning your computer for browser threats such as adware, PUPs, and more.
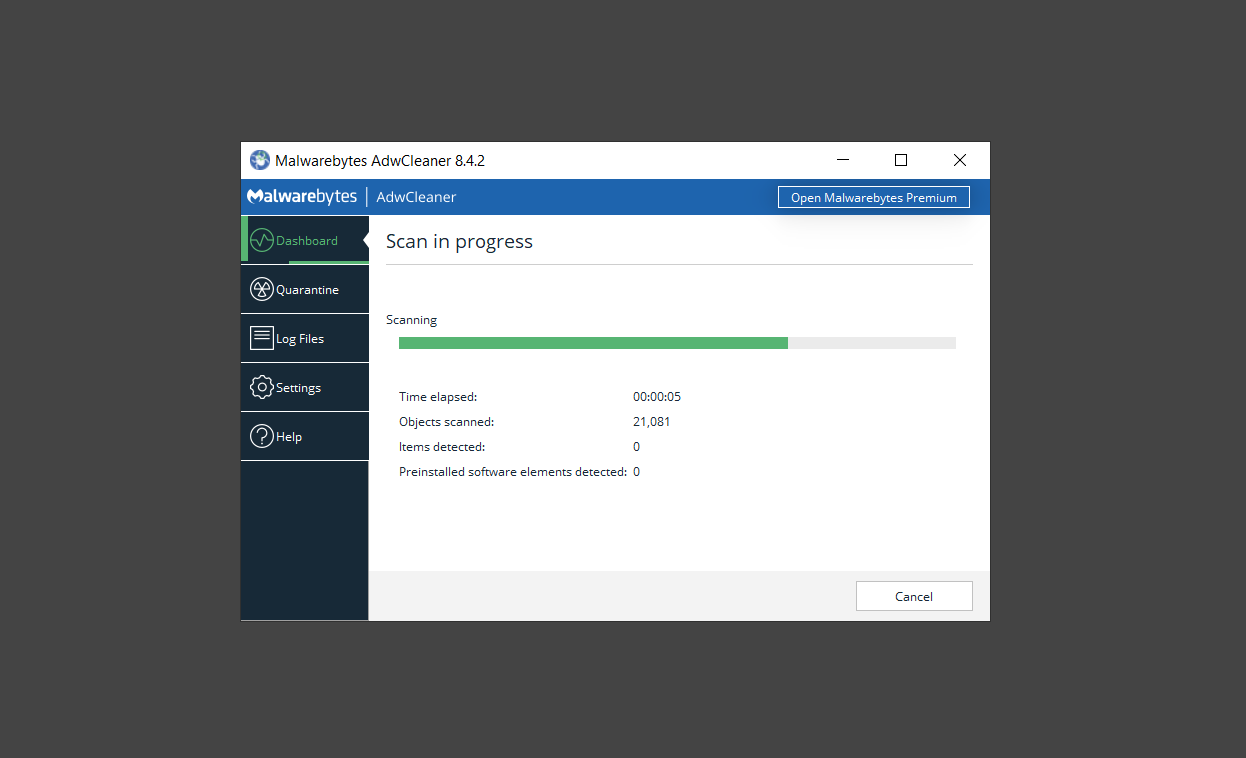
6. Wait for AdwCleaner to finish scanning the files on the system. This may take a while depending on how large the files on your device are, as well as your system’s hardware capabilities.
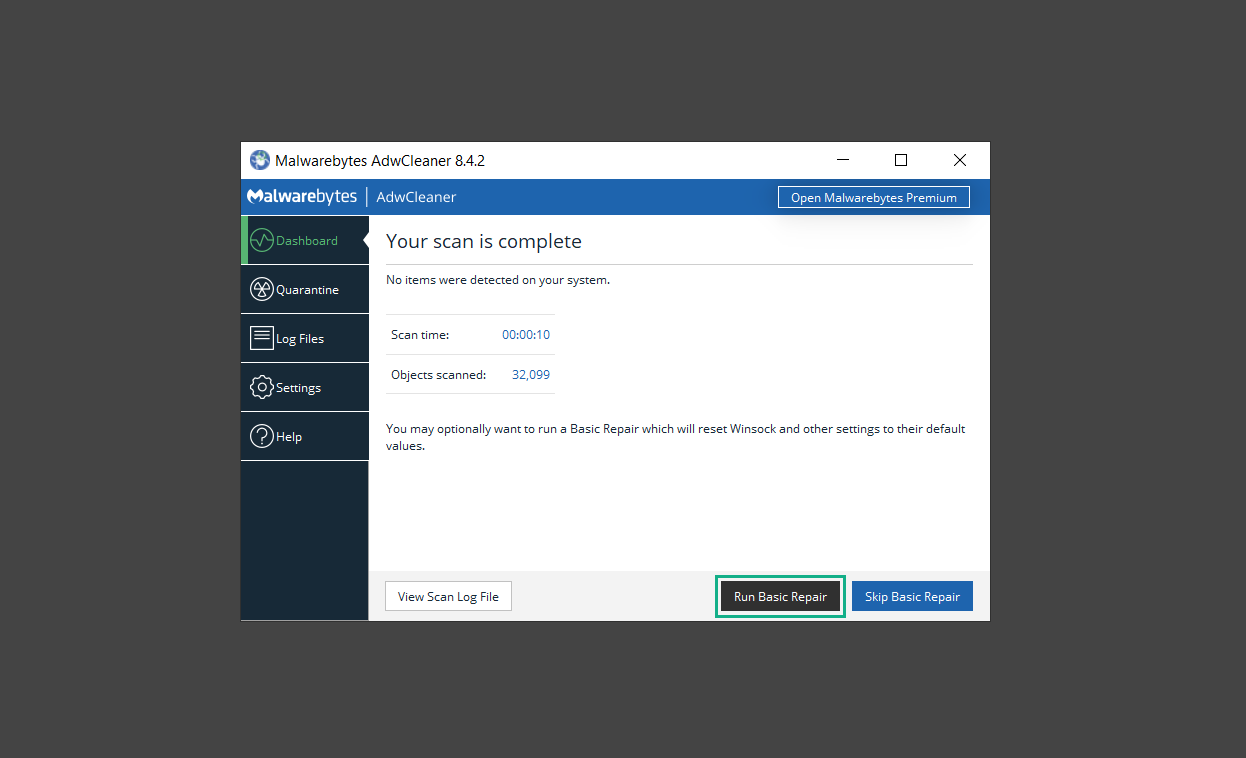
7. Once the scan is complete, proceed to take action by following the on-screen instructions. Otherwise, if the scan shows a clean result, click Run Basic Repair to reset Winsock and other settings before finishing the process.
Step 4: Uninstall suspicious programs installed in the system
Malicious software can also be the cause of the Findflarex.com browser hijacker. There are such programs that may have the ability to alter the browser configurations to promote the said browser threat. Therefore you should check your computer for unfamiliar programs you did not install.
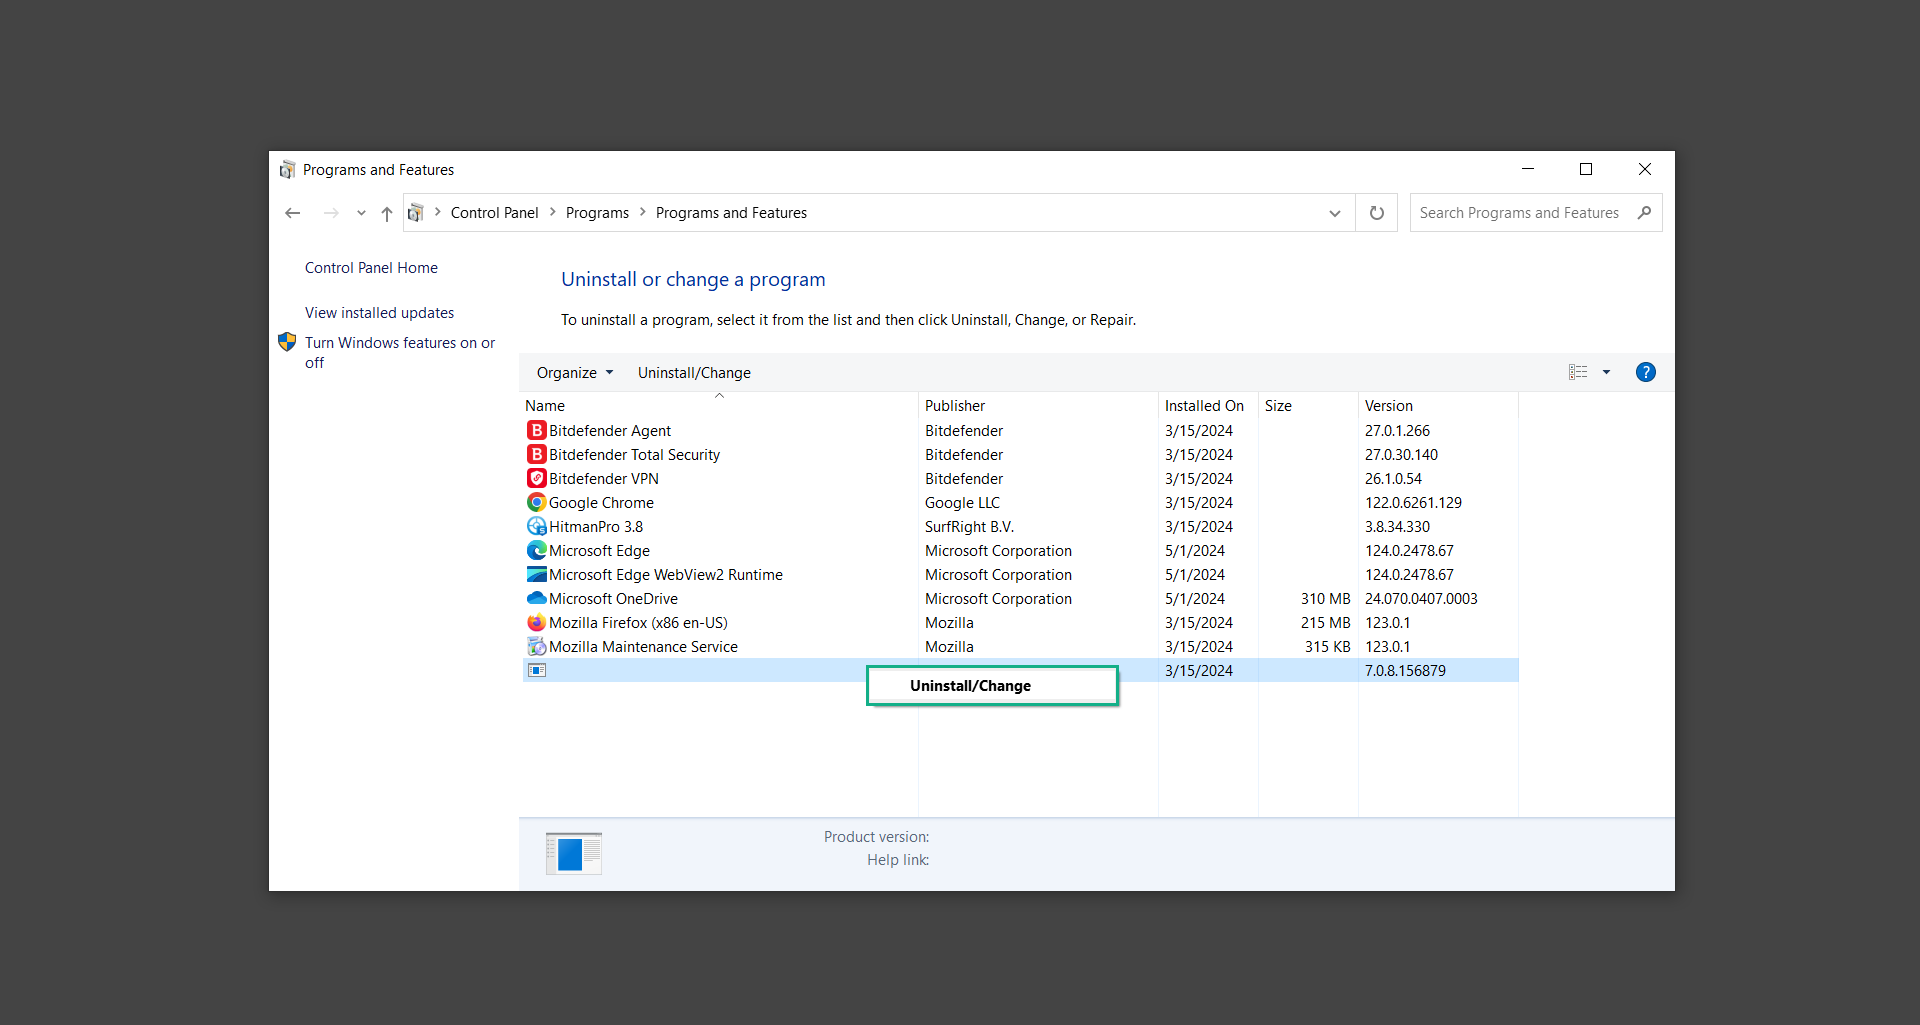
This can be done through the Add & Remove Programs section in the newer version of the Windows settings, but using the Control Panel’s Programs and Features page is still much easier.
It will be easier to find the malware because it will include information such as the publisher name, the date from when it was installed, and the version number all in one grid screen. Here’s how to do so:
1. Click on the Windows key to open the Start menu.
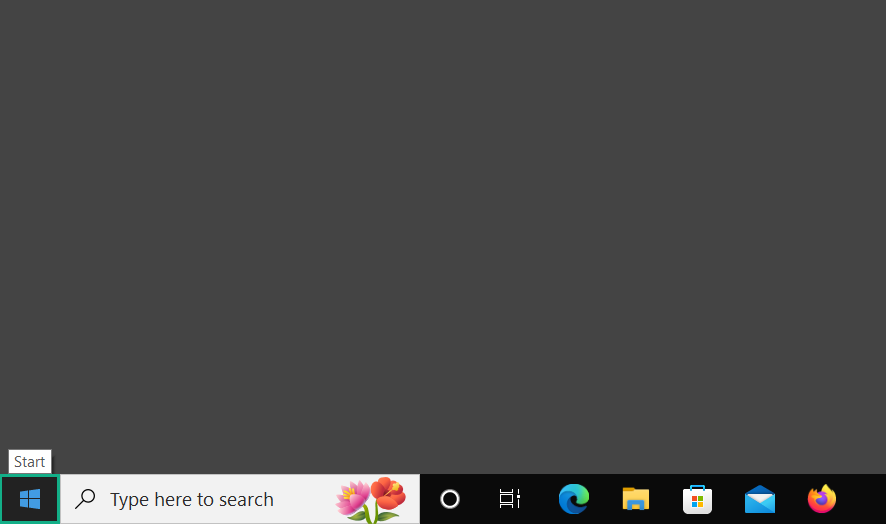
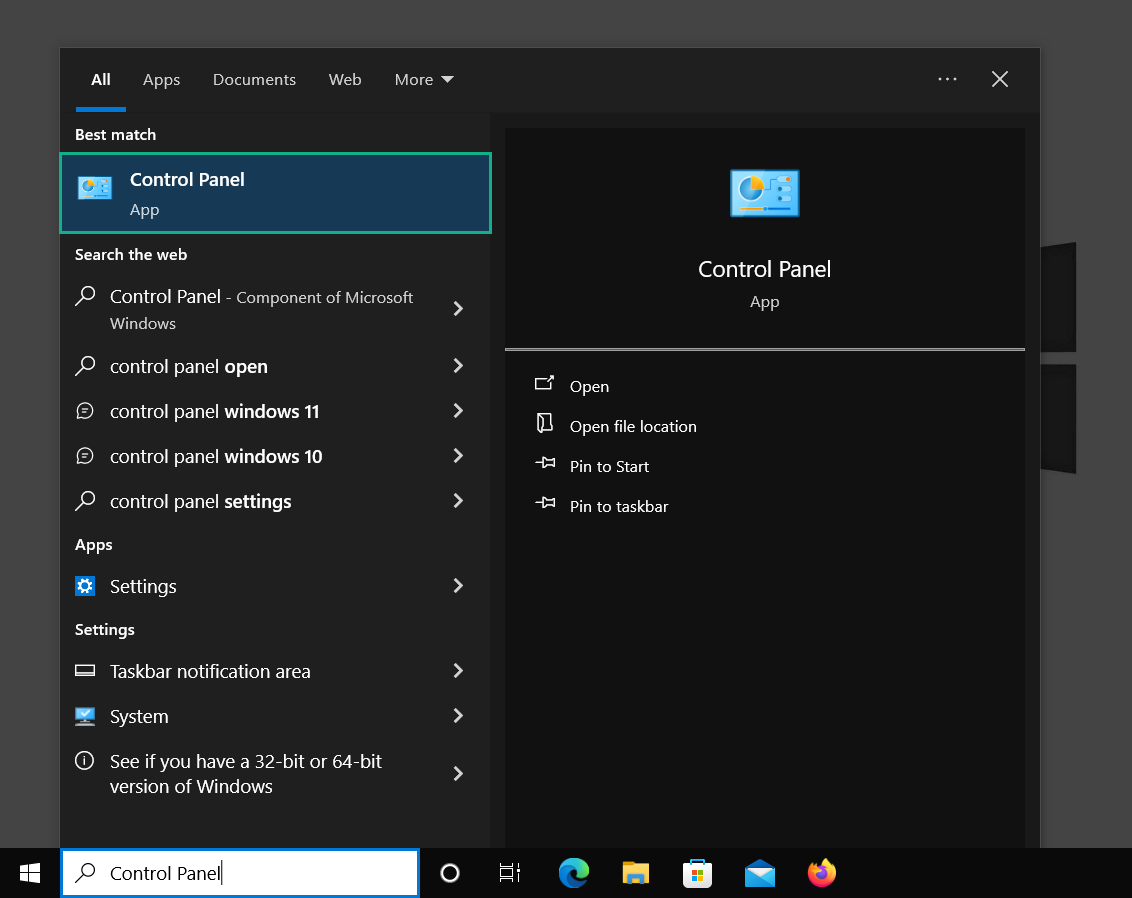
2. Type Control Panel in the provided search bar and select the first item from the search results.
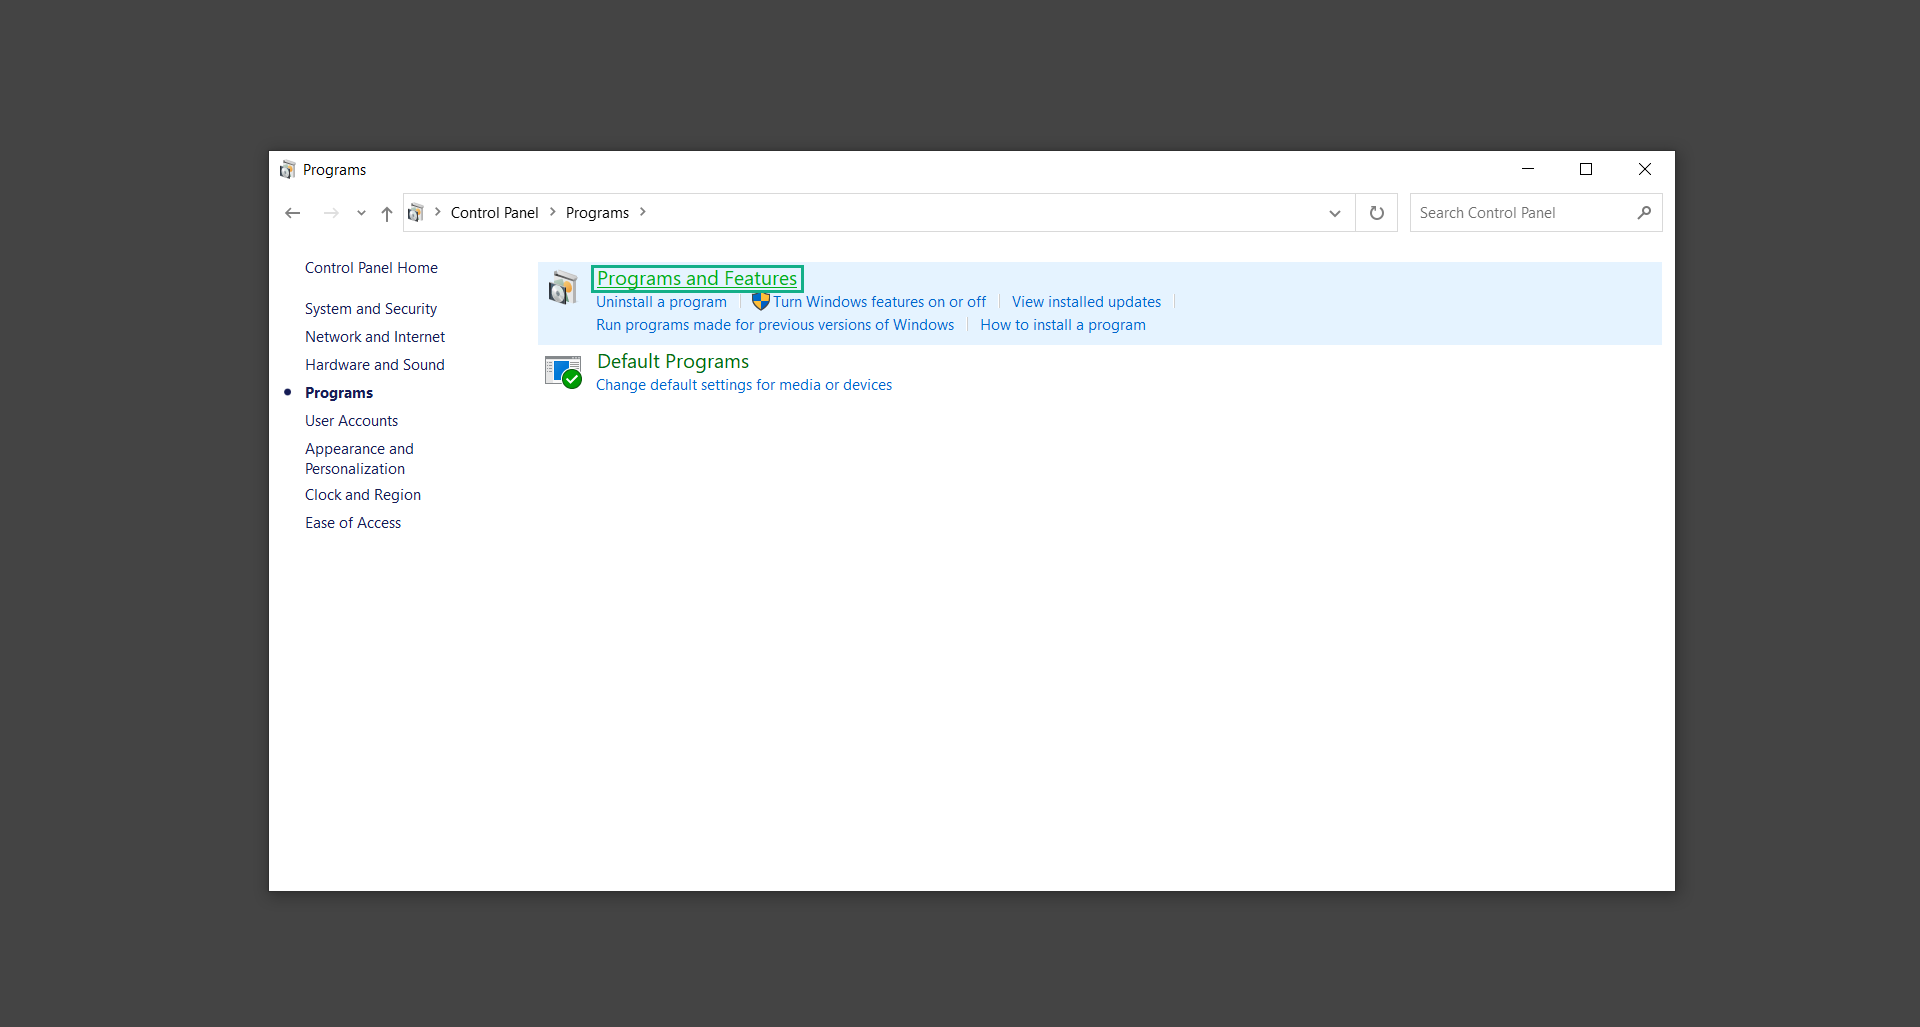
3. Click on Programs and inside, select Programs and Features.
4. You will be presented with a list of programs currently installed on your computer.
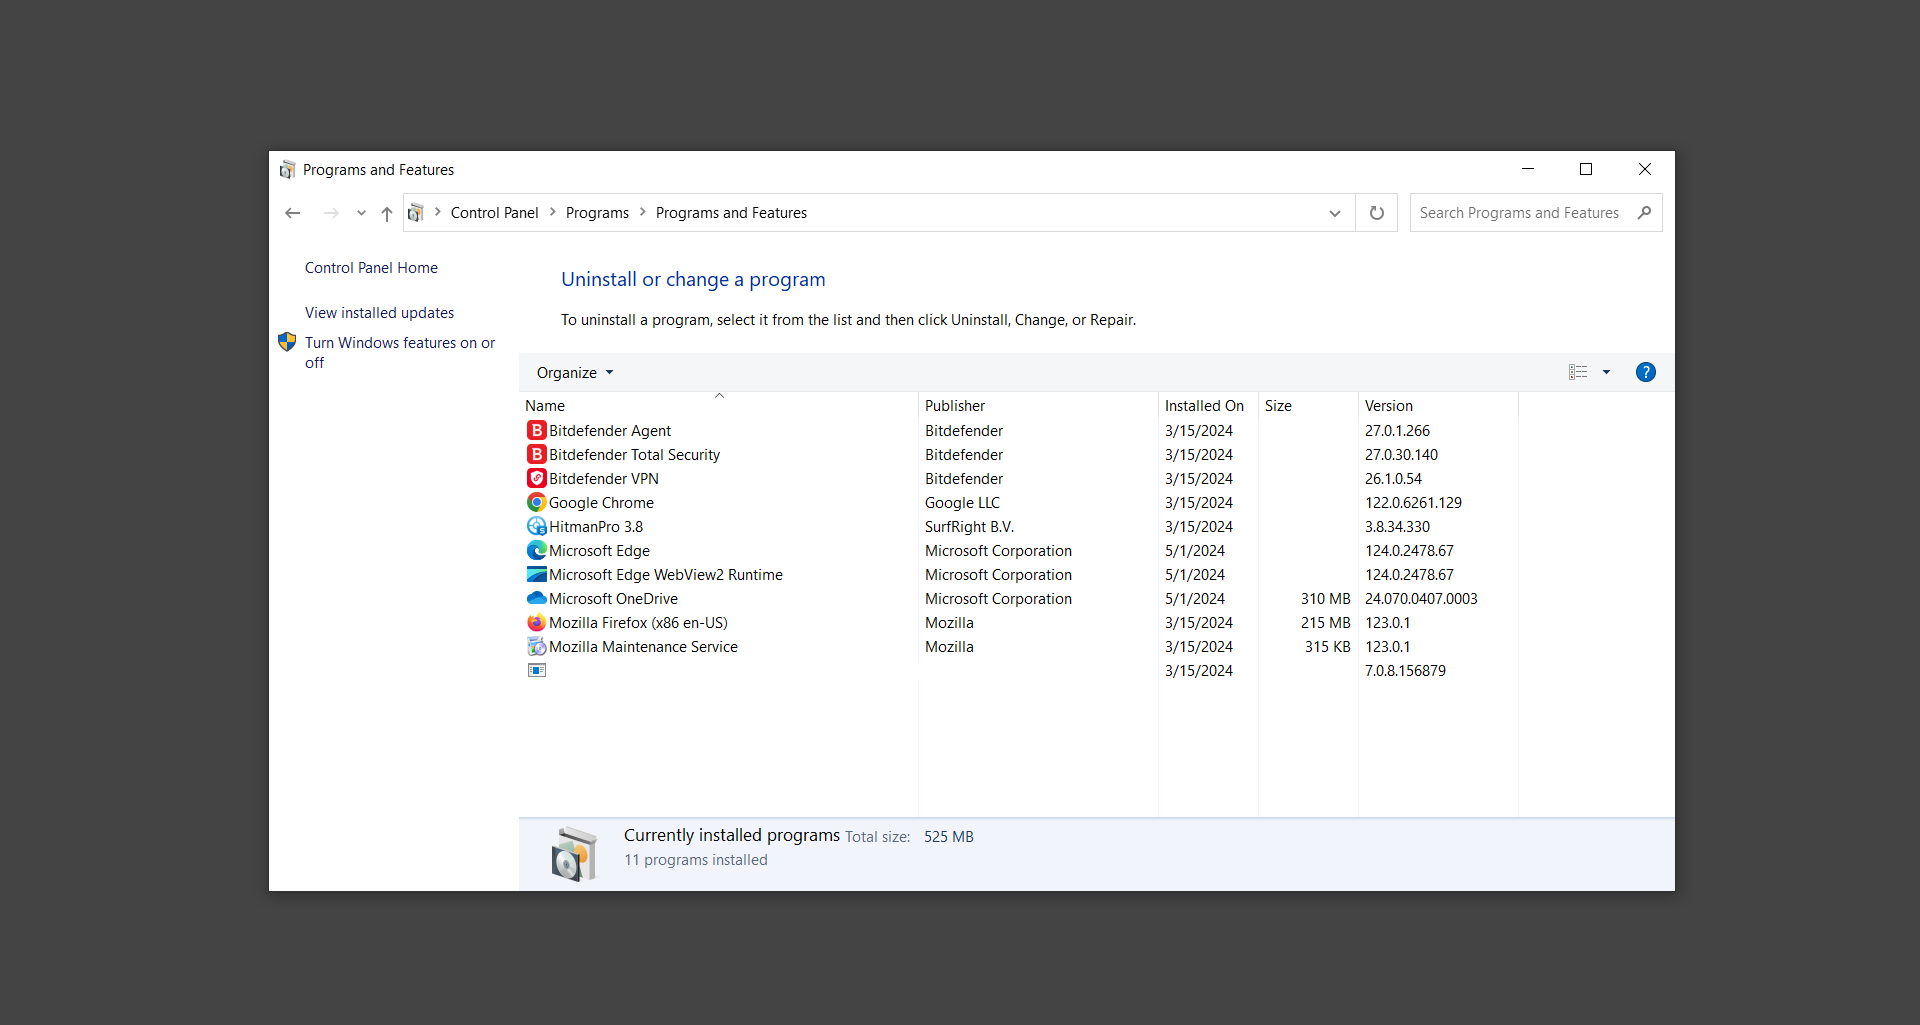
5. Find programs you do not recognize and right-click the item then select Uninstall/Change from the dropdown menu.
If the software is persistent and will not be removed using standard methods, we will need to use a sophisticated uninstaller to perform the heavy lifting for us.
Luckily, such applications exist; Revo Uninstaller is a completely free uninstaller program designed to tackle and erase uninstallable programs in one go.
 Uninstall malicious program/s using Revo Uninstaller
1. To start, download Revo Uninstaller from the official Revouninstaller.com website. Avoid downloading from third-party sources as they may contain additional bloatware upon installation.
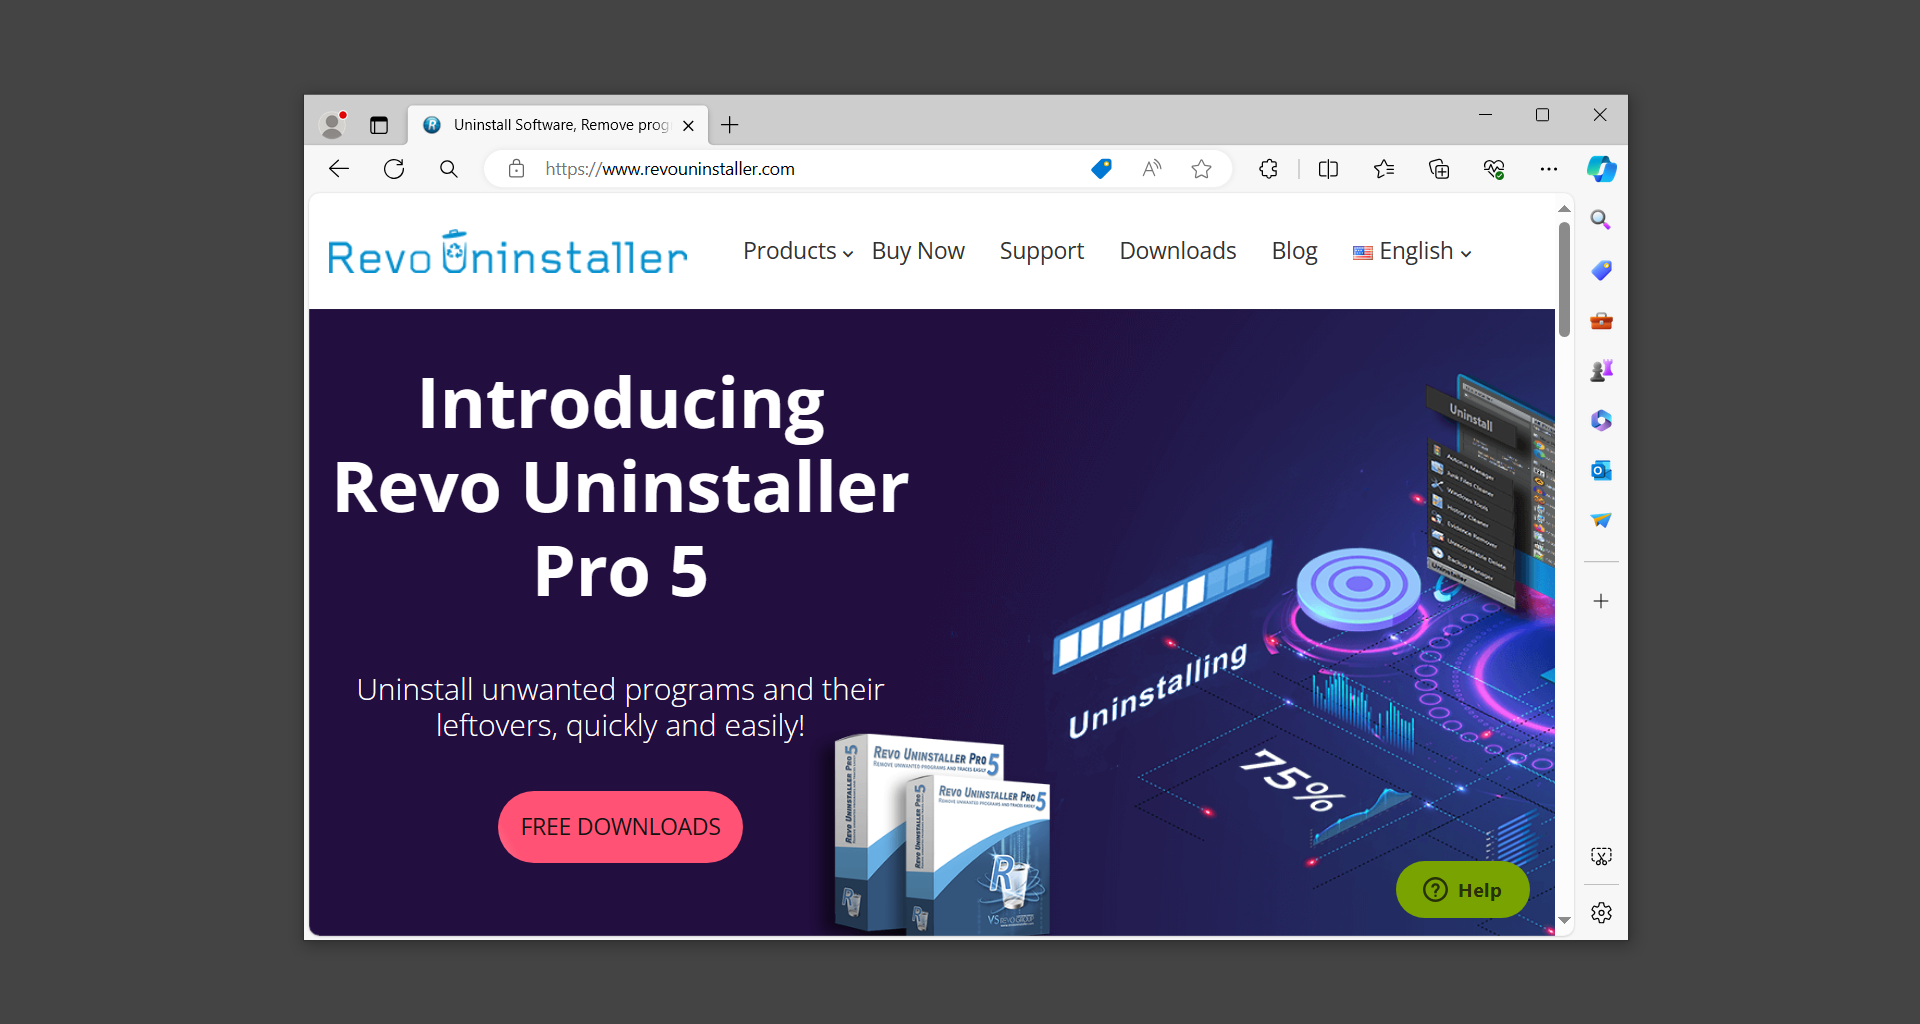
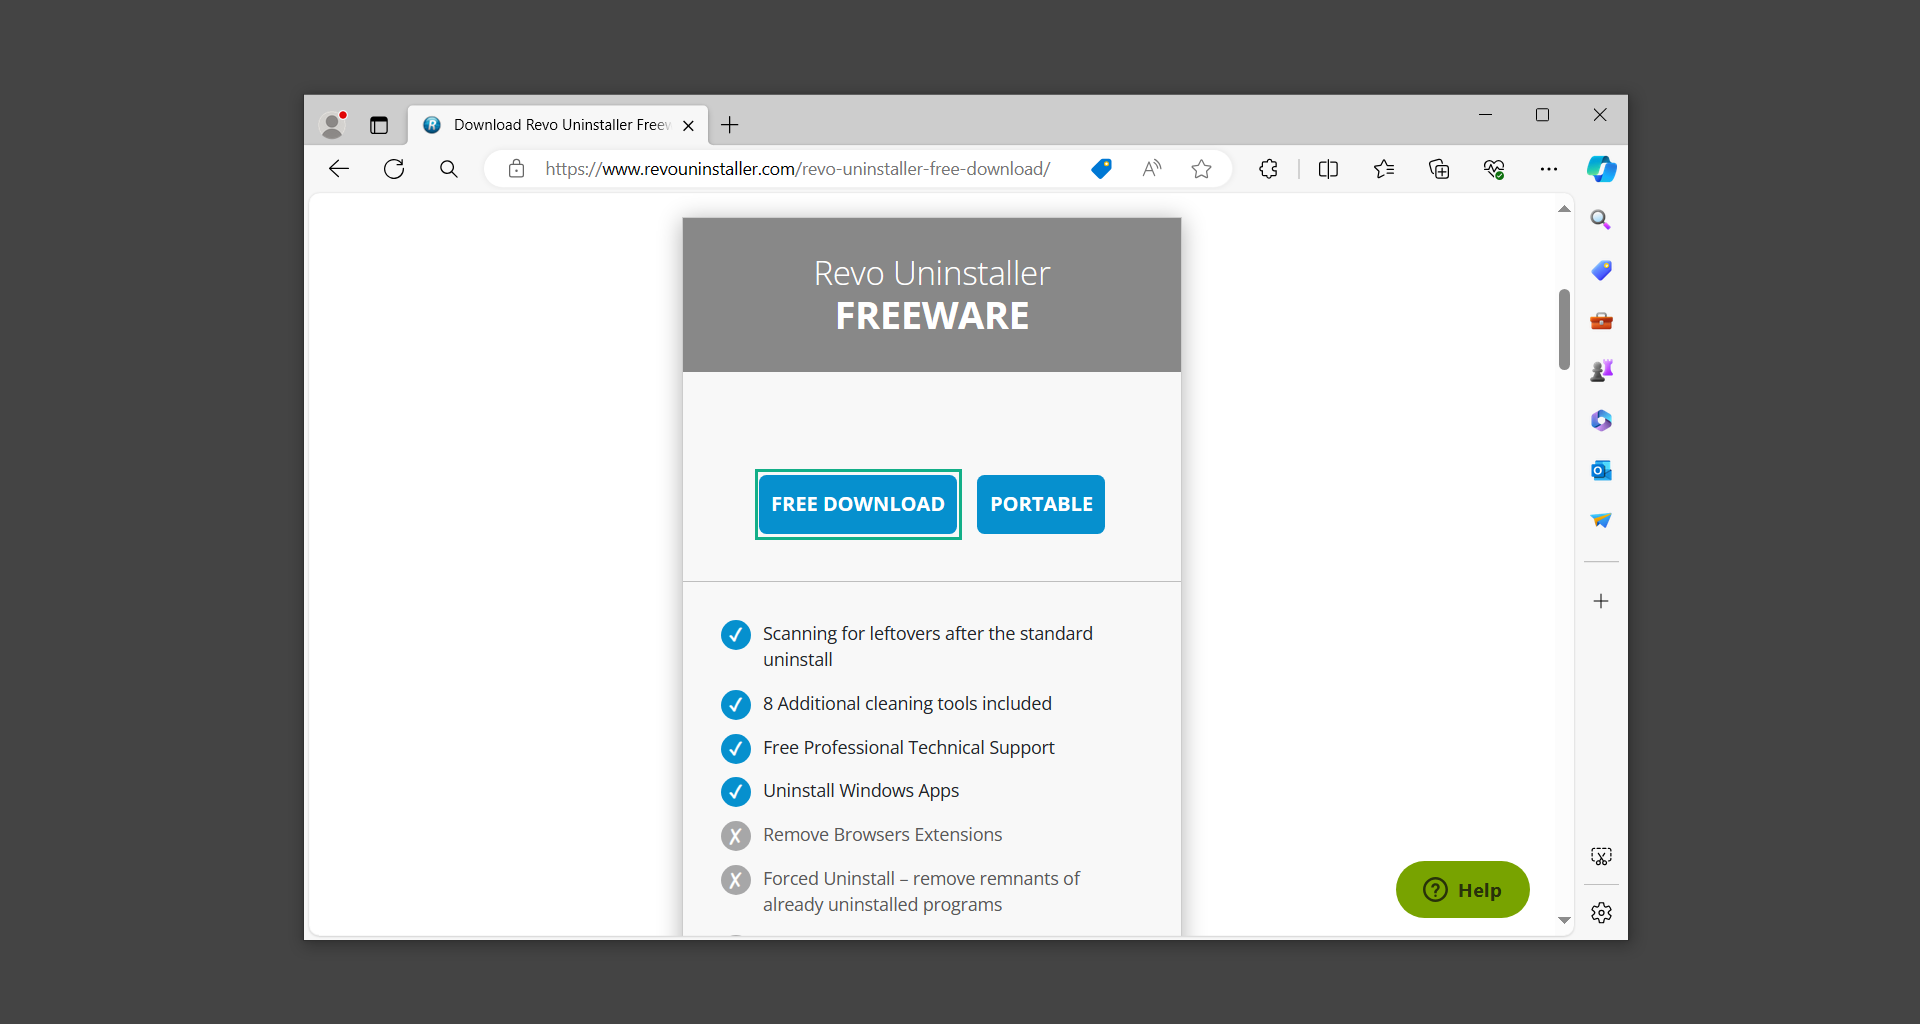
2. On the download page, opt for the free version of Revo Uninstaller as it has all the features we need. Click on Free Download to begin downloading the setup file.
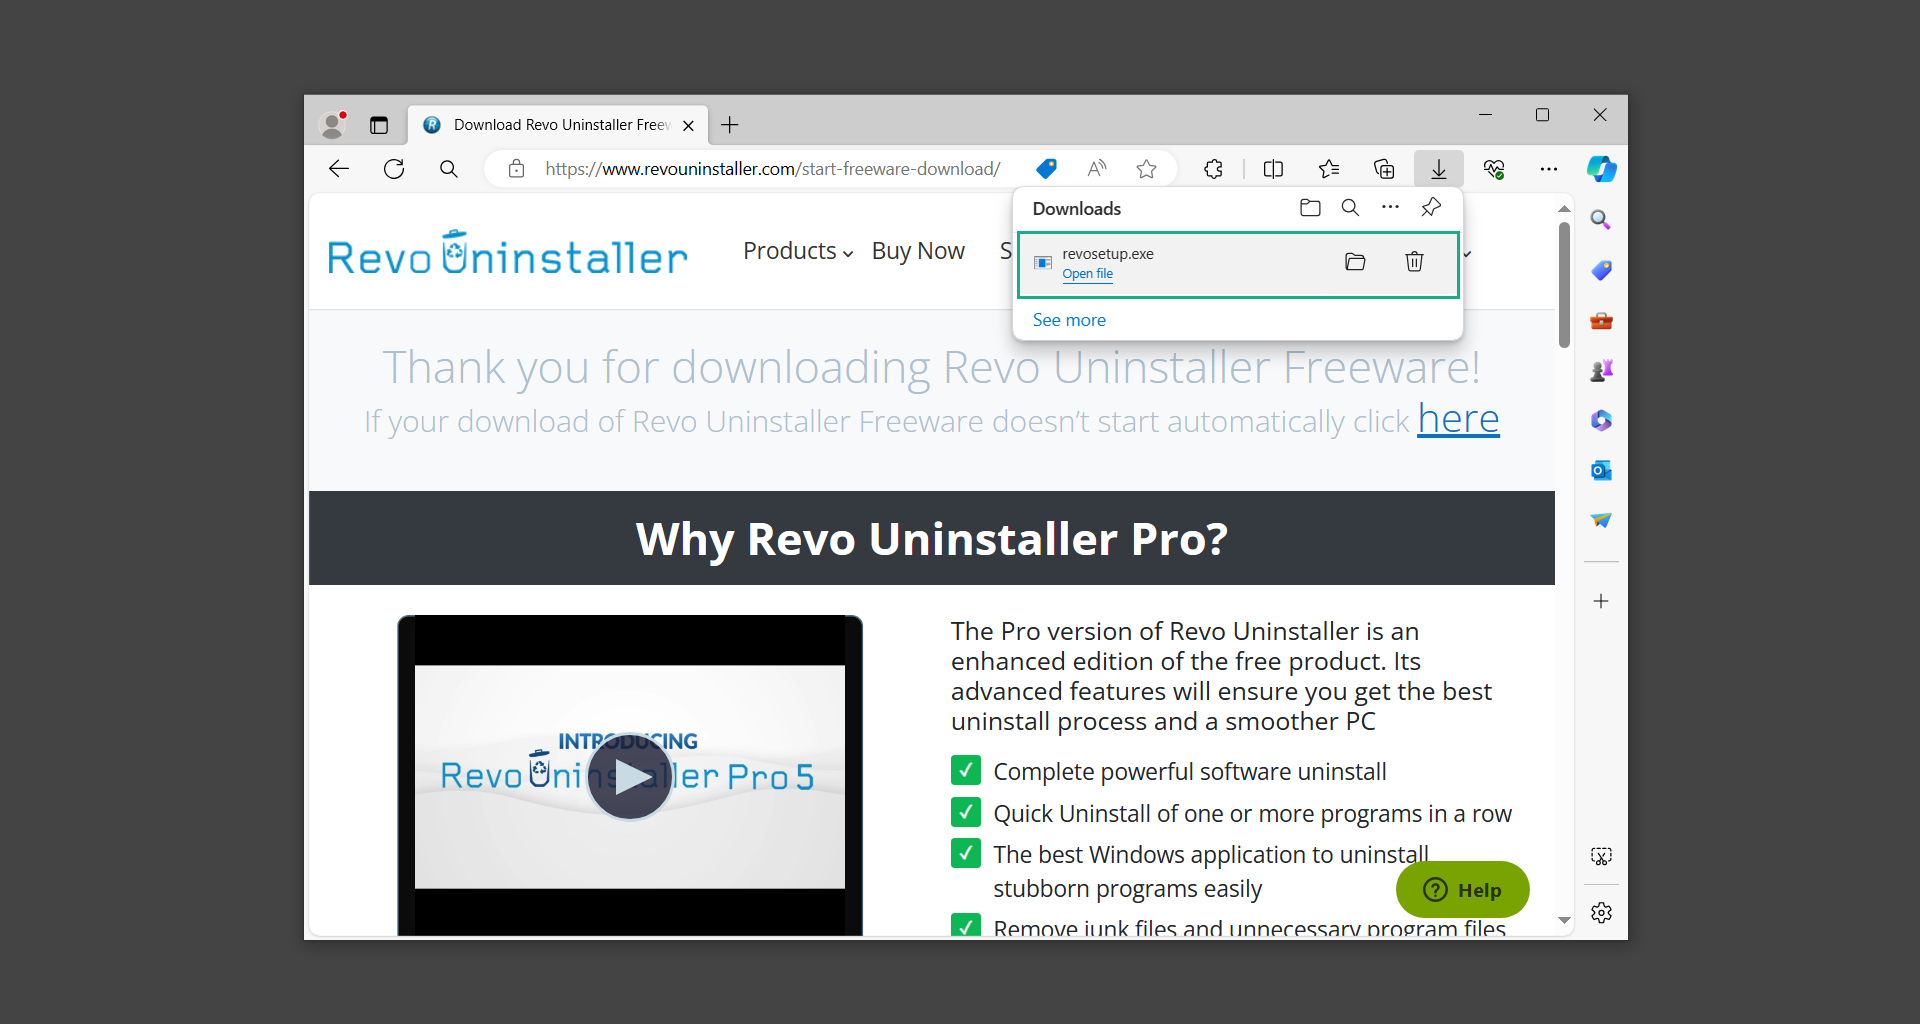
3. The revosetup.exe file would have started downloading. Click on it to start installing the software.
4. Revo Uninstaller setup would now begin and follow the typical setup procedure such as selecting your setup language, accepting the license agreement, and selecting the installation location. Once setup is ready click Install.
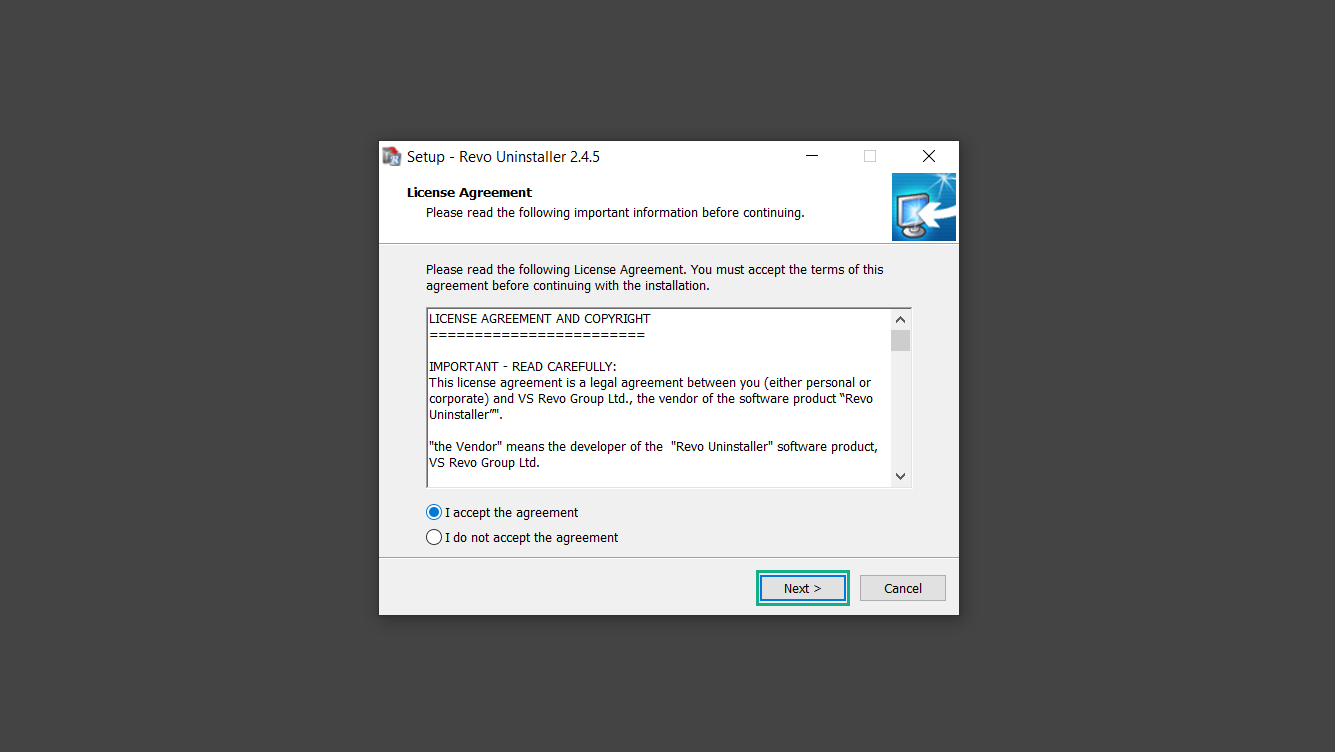
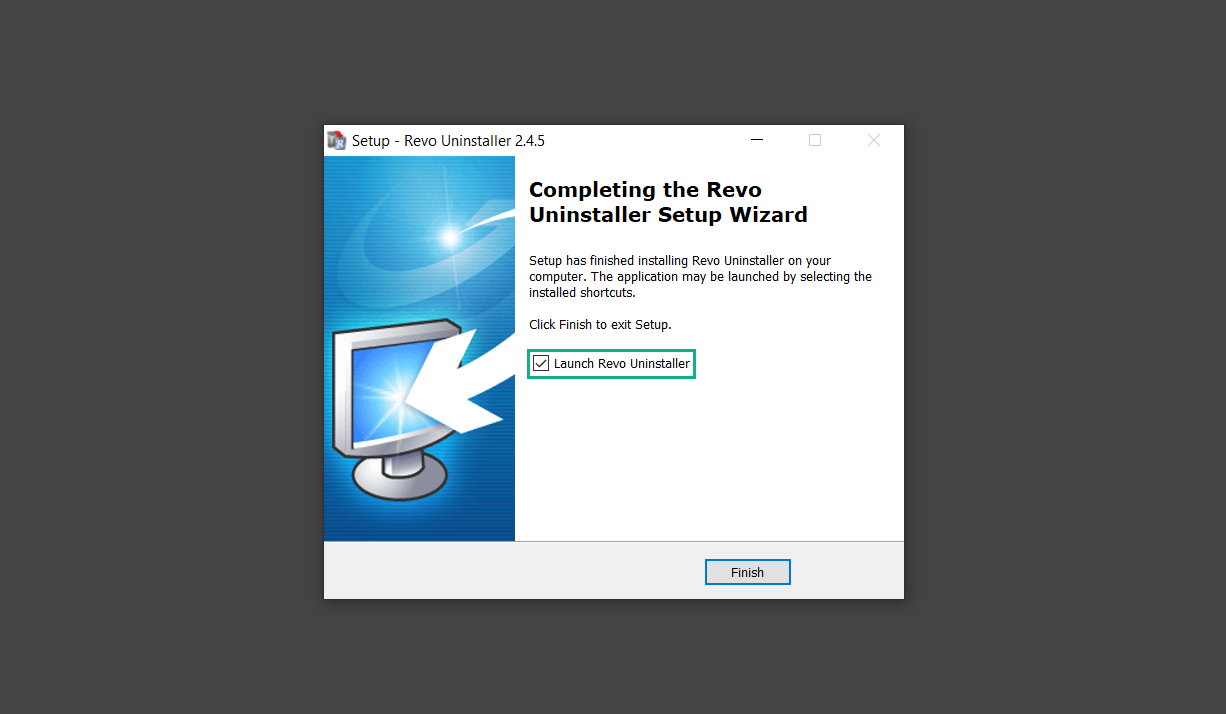
5. After the setup is finished, check the Launch Revo Uninstaller option to open the program upon closing the installer.
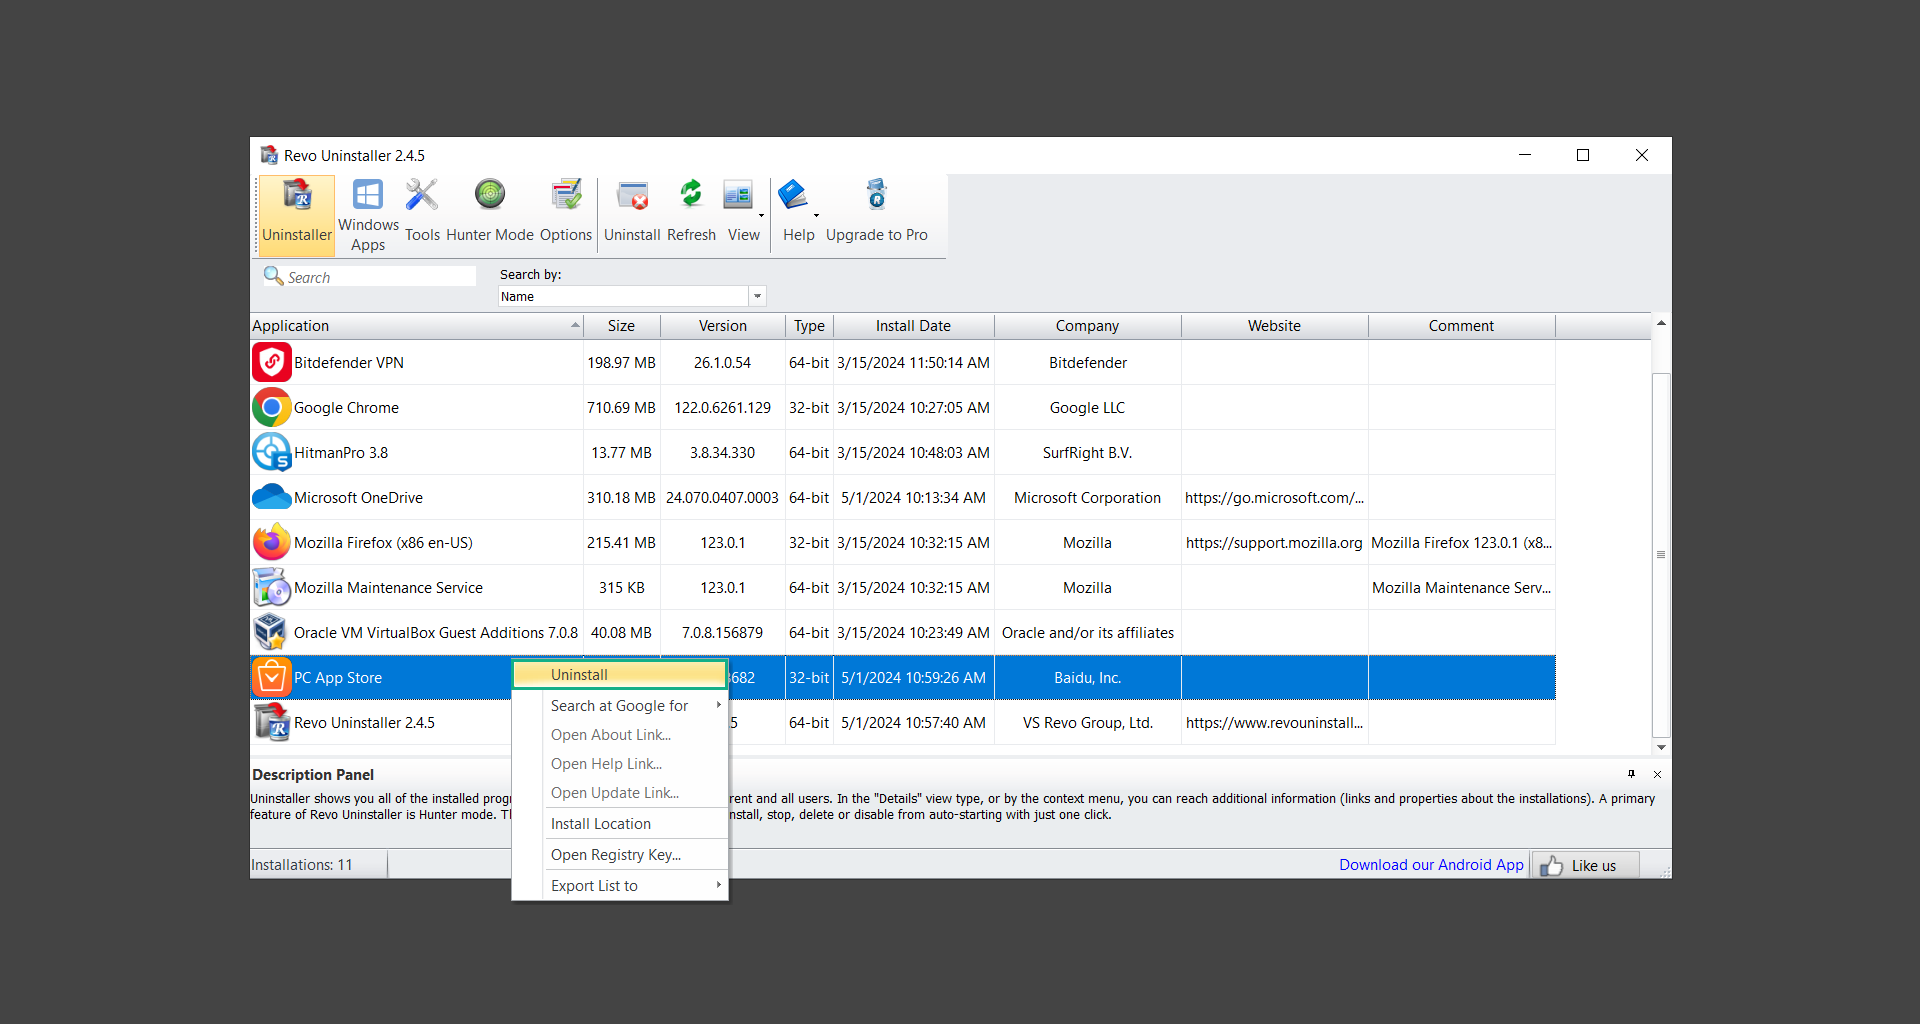
6. Once Revo Uninstaller has opened, it will show you the list of applications currently installed on the computer. Find the unwanted program/s, right-click it, and select Uninstall from the drop-down menu. (We will be using PC App Store to demonstrate.)
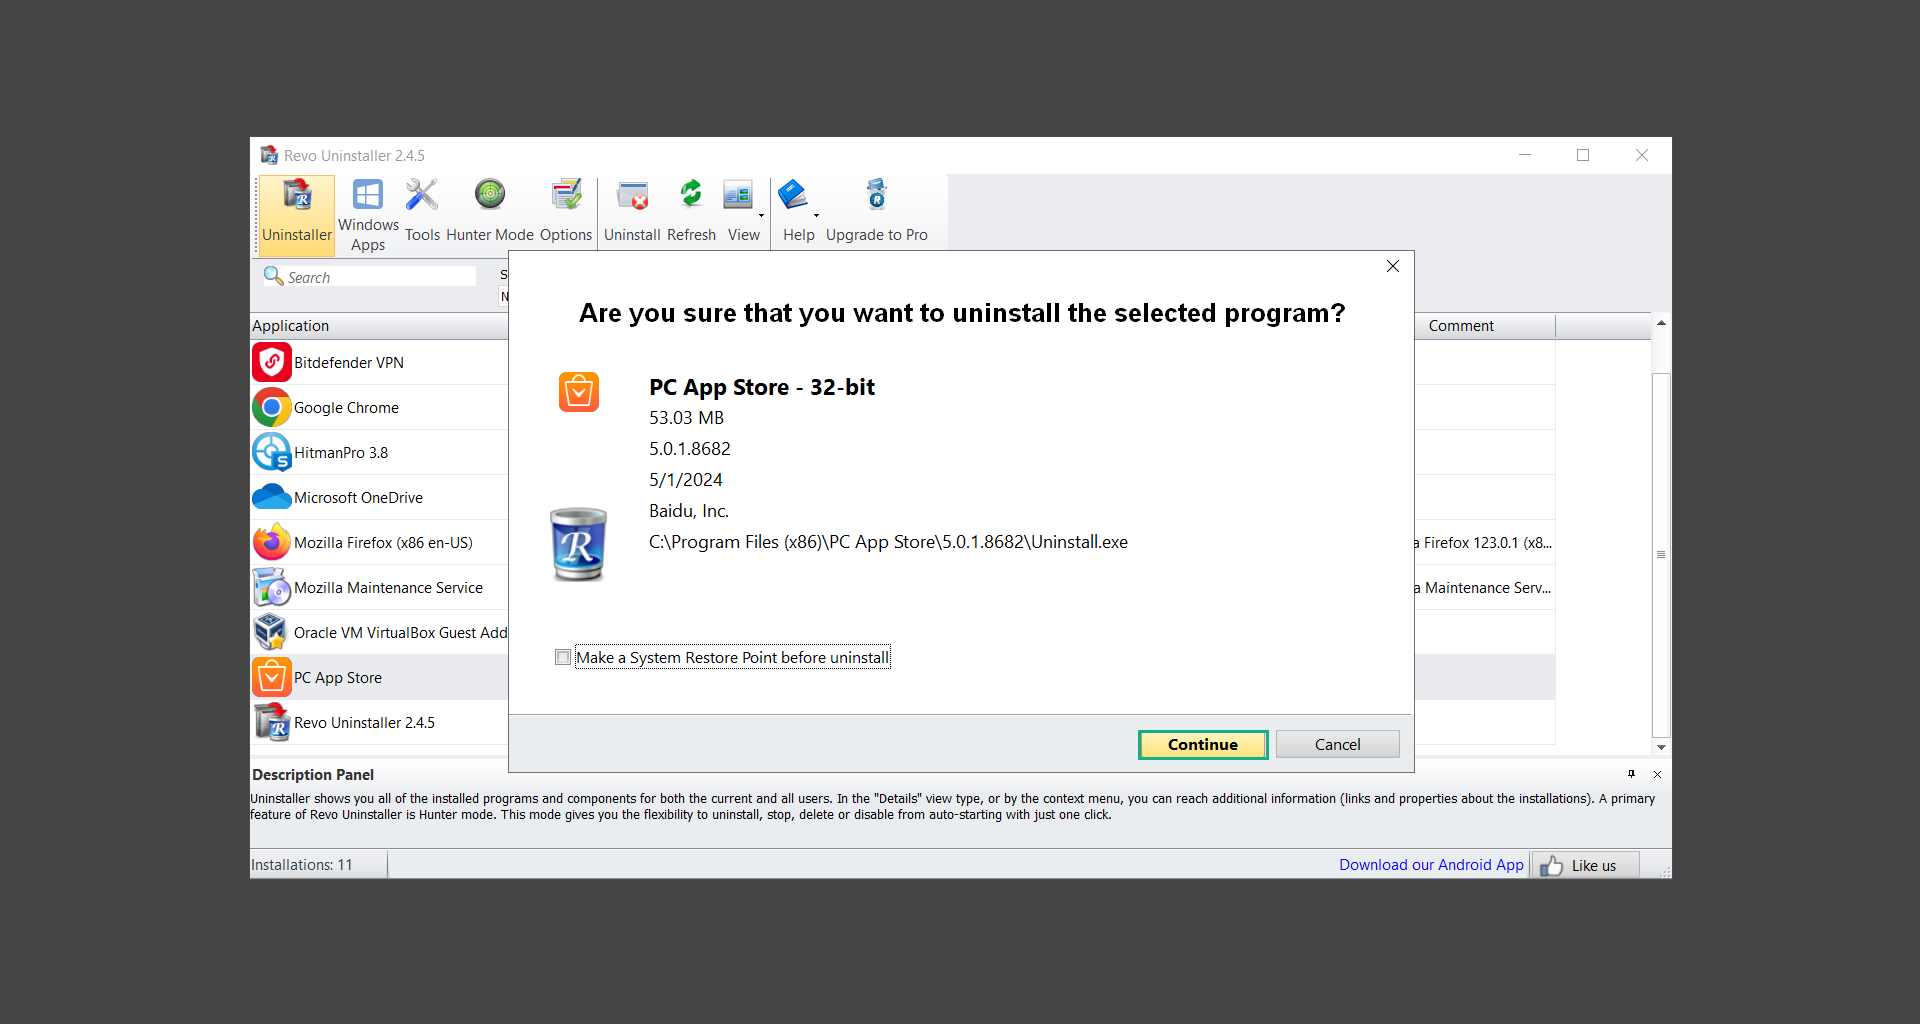
7. A confirmation message stating if you are sure you want to uninstall the said program, click Continue.
8. Follow the uninstallation instructions and this time, Revo Uninstaller would have forced the program to continue with the uninstallation compared to the previous attempt via Control Panel.
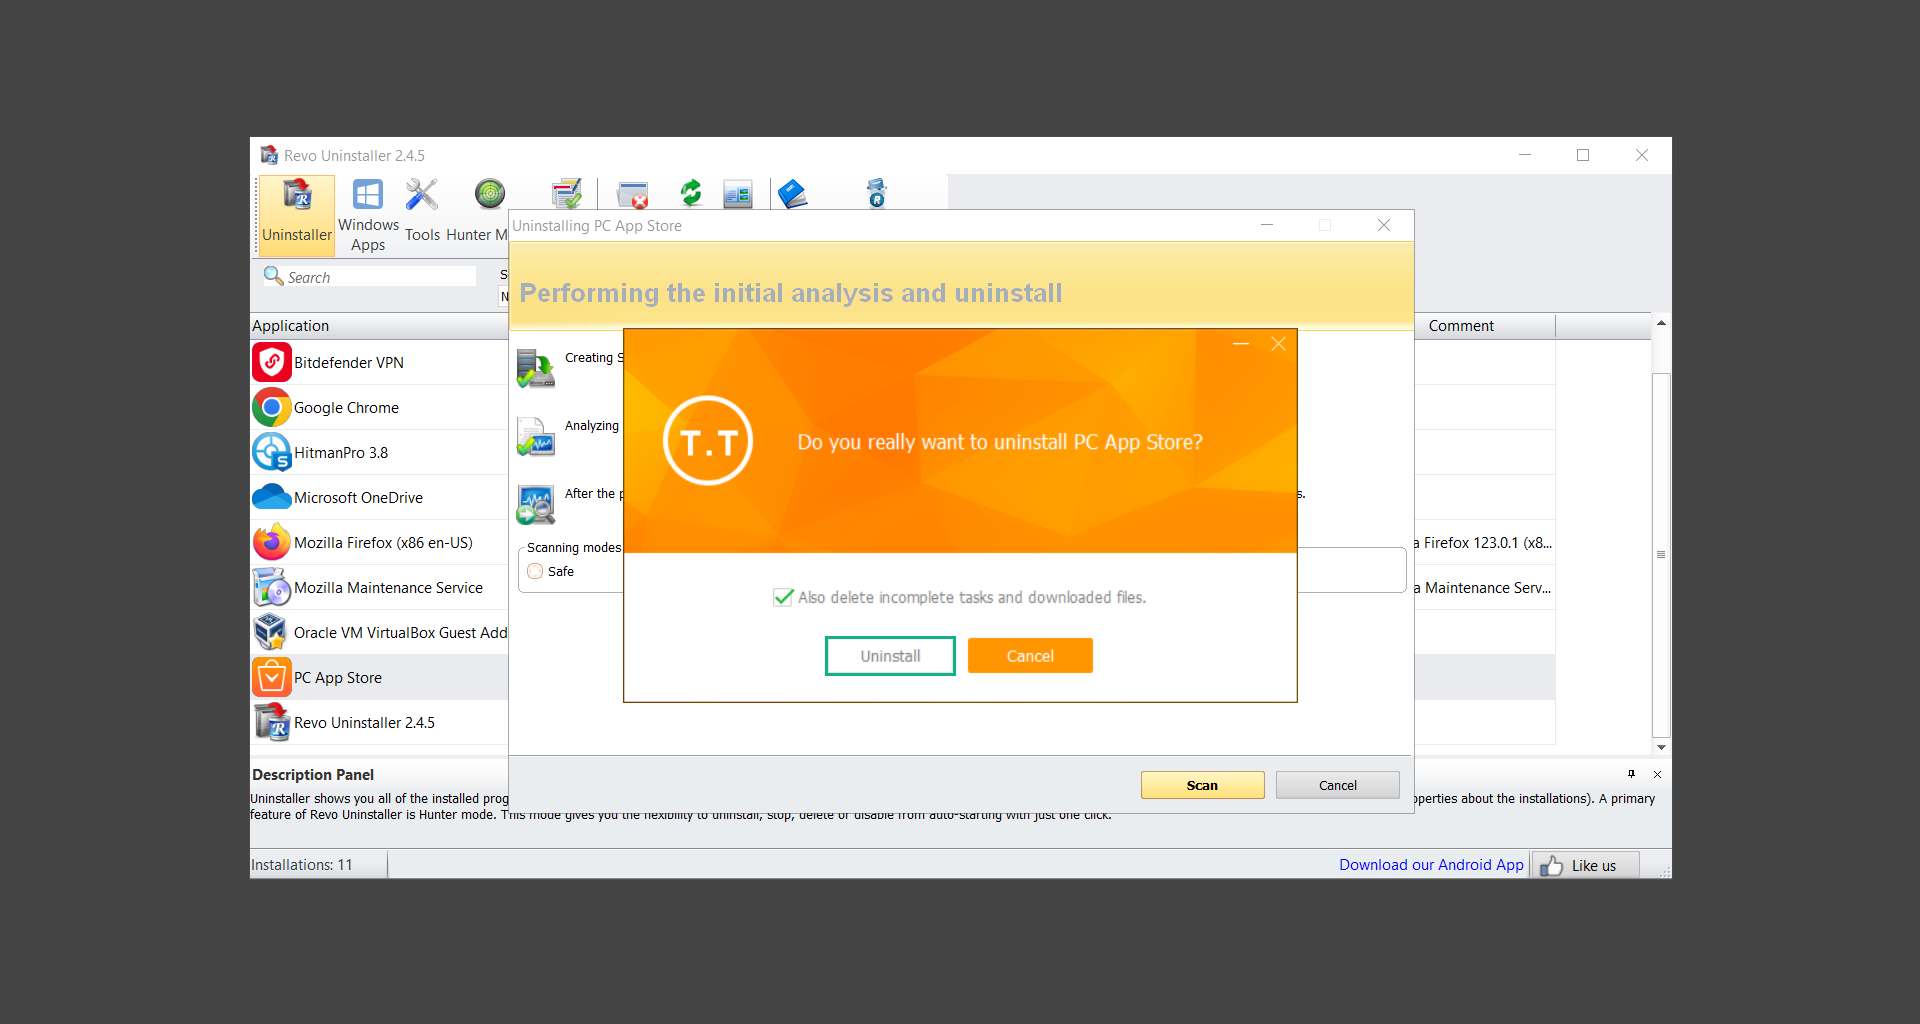
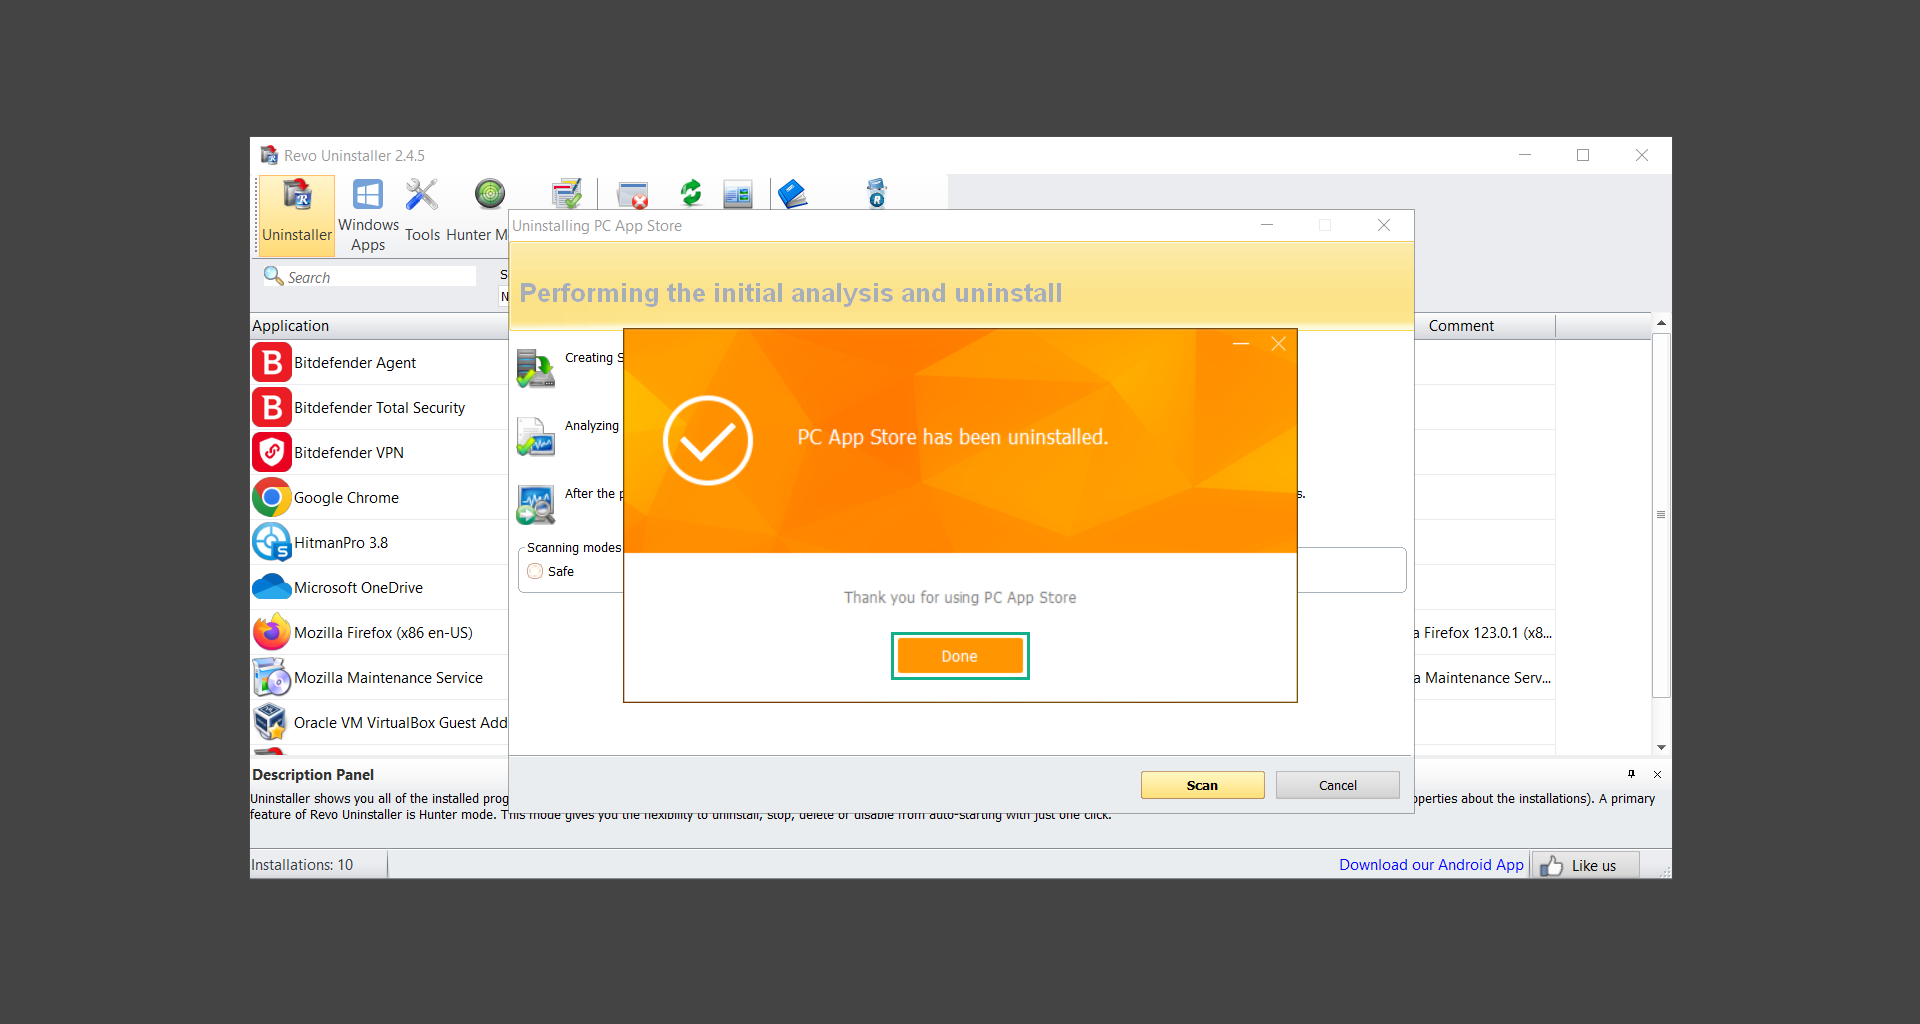
9. You will be notified that the software has been uninstalled, Revo Uninstaller will now conduct a preliminary examination and get rid of additional files and registries related to the unwanted program.
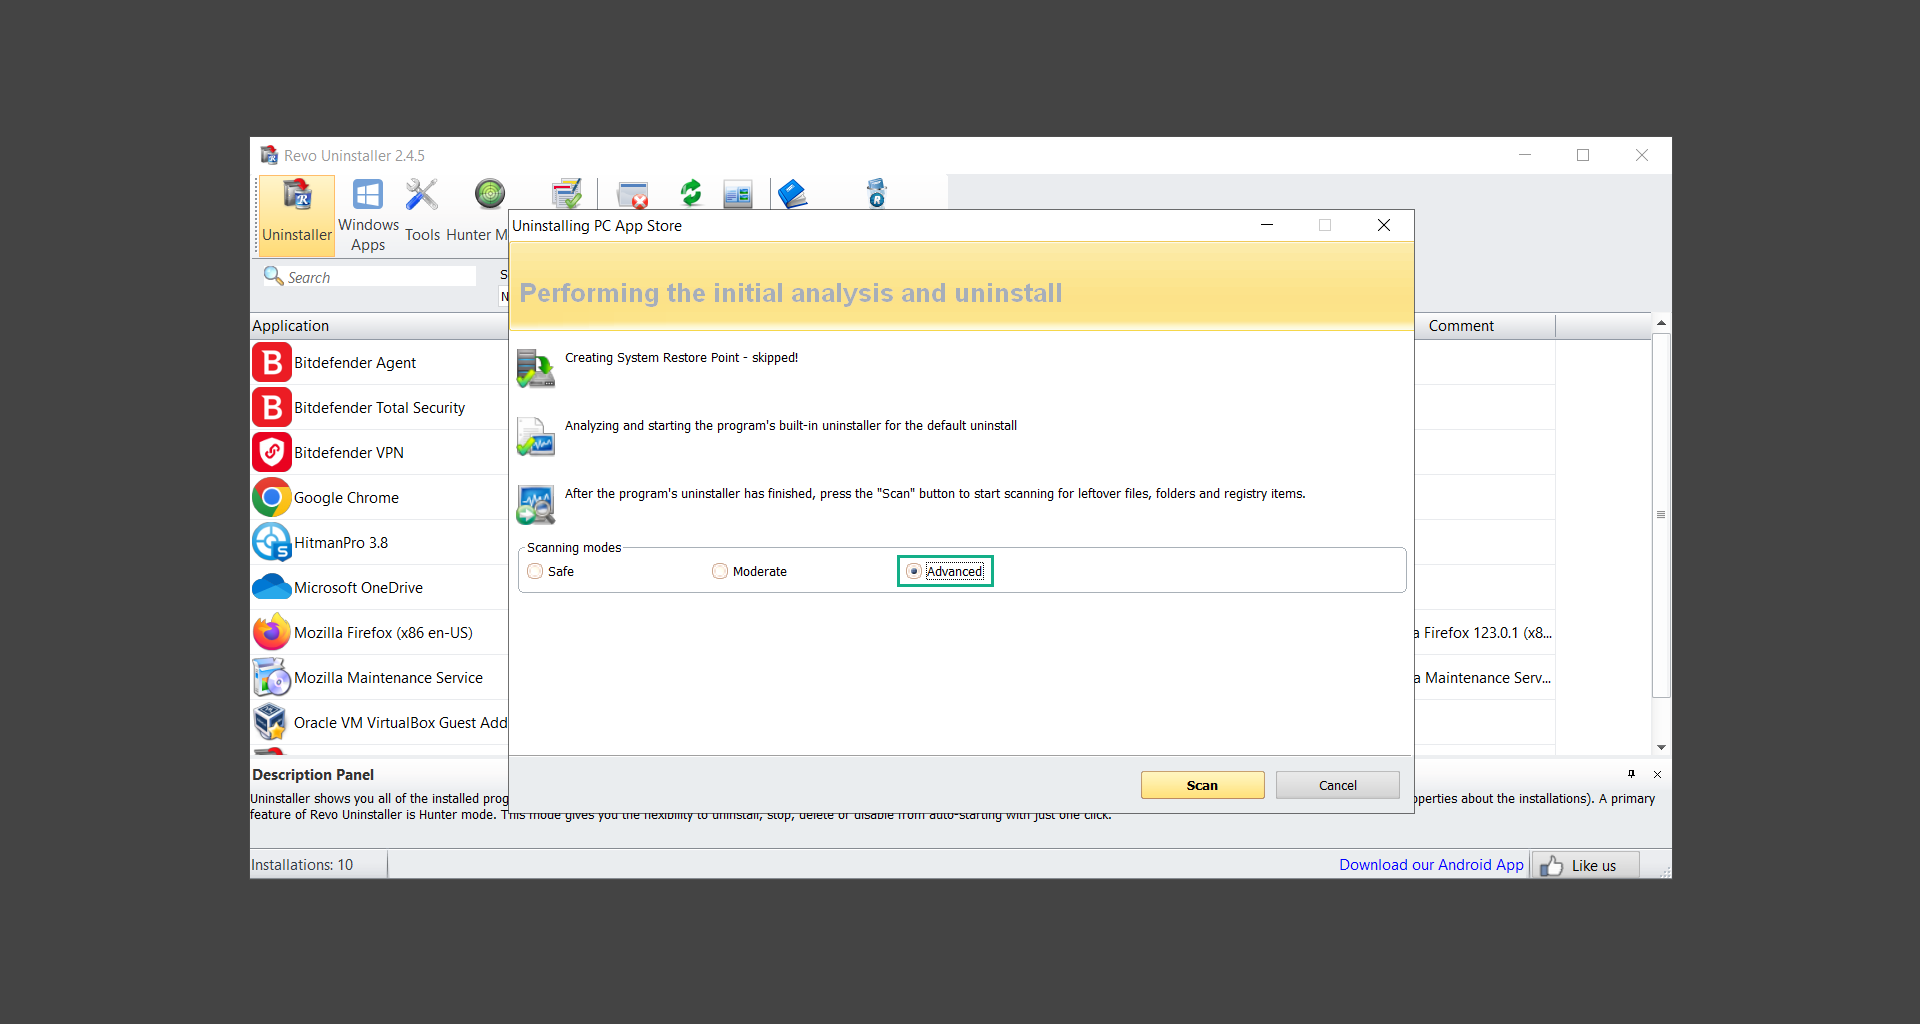
10. On the selection of Scanning modes, select Advanced to make sure everything is scanned without leaving a single directory unnoticed.
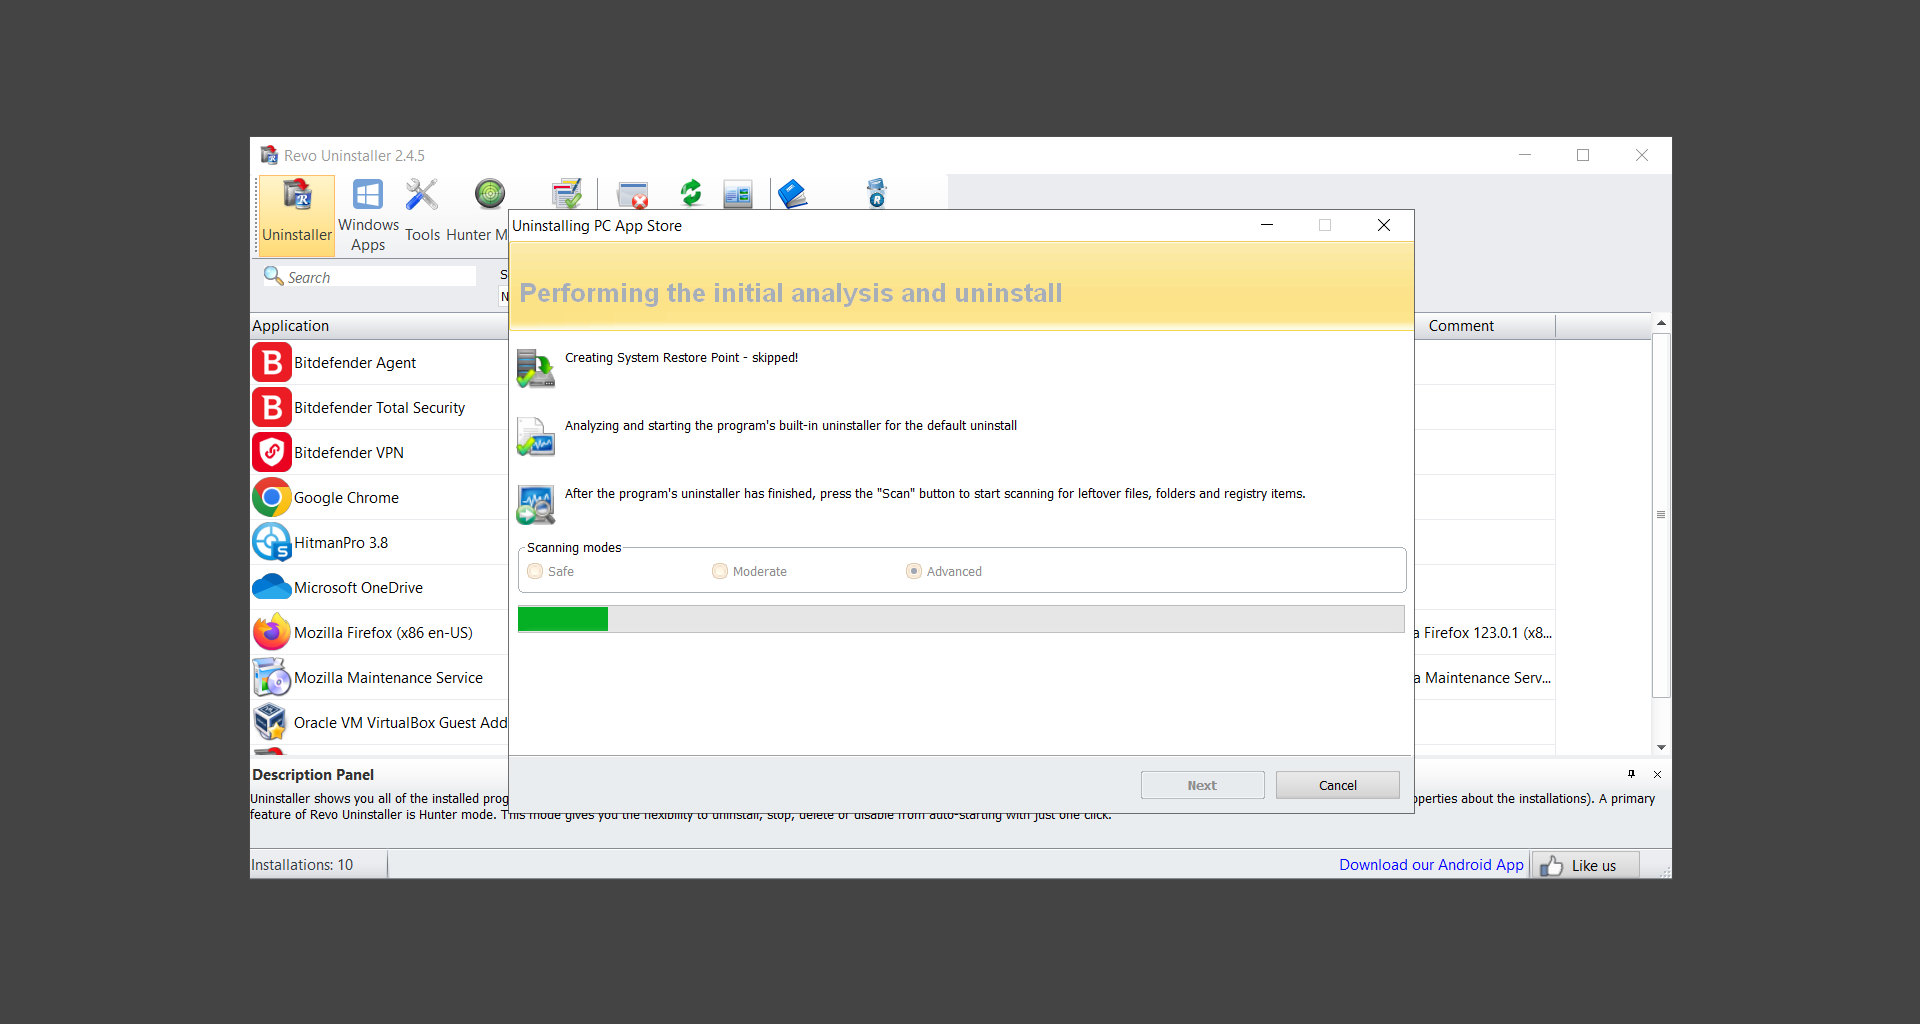
11. Wait for the scan to finish as Revo Uninstaller is checking for residual files and registries related to the suspicious program.
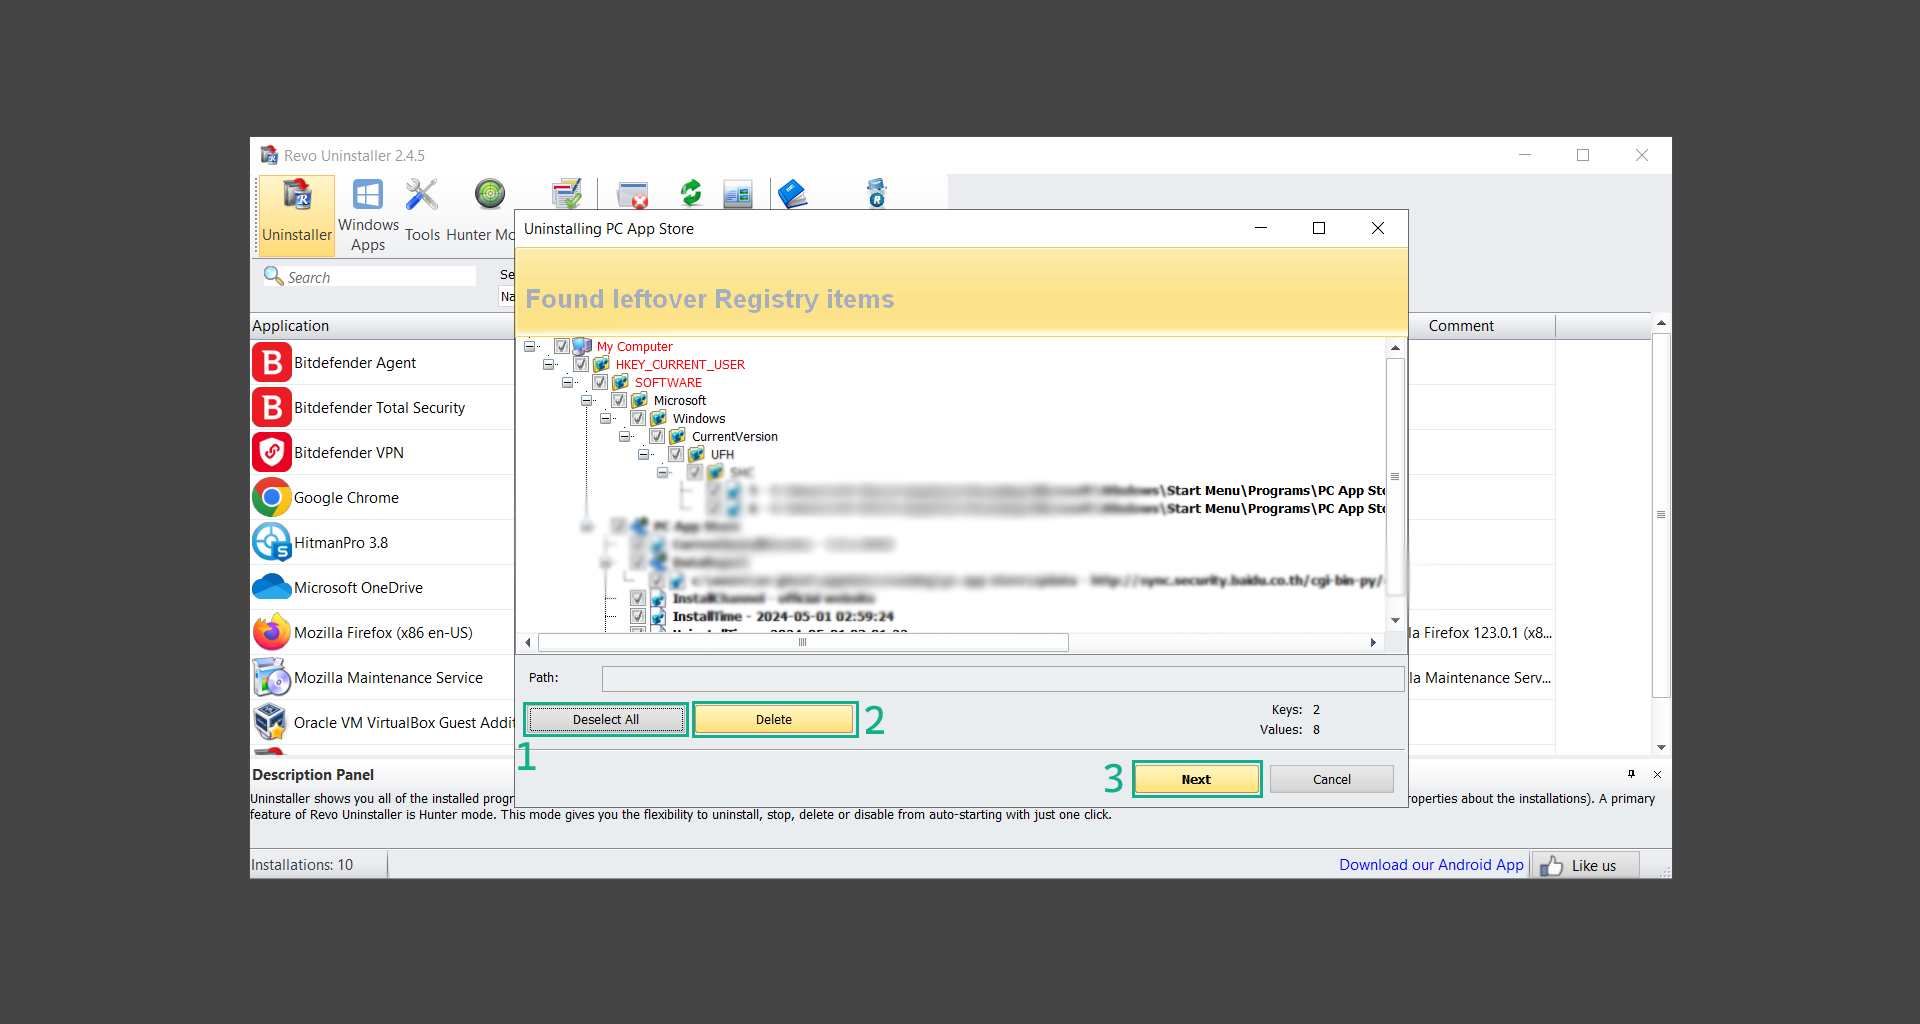
12. Revo Uninstaller may have found leftover Registry items, click Select All and proceed to delete them by clicking the Delete button next to it. After that, click Next.
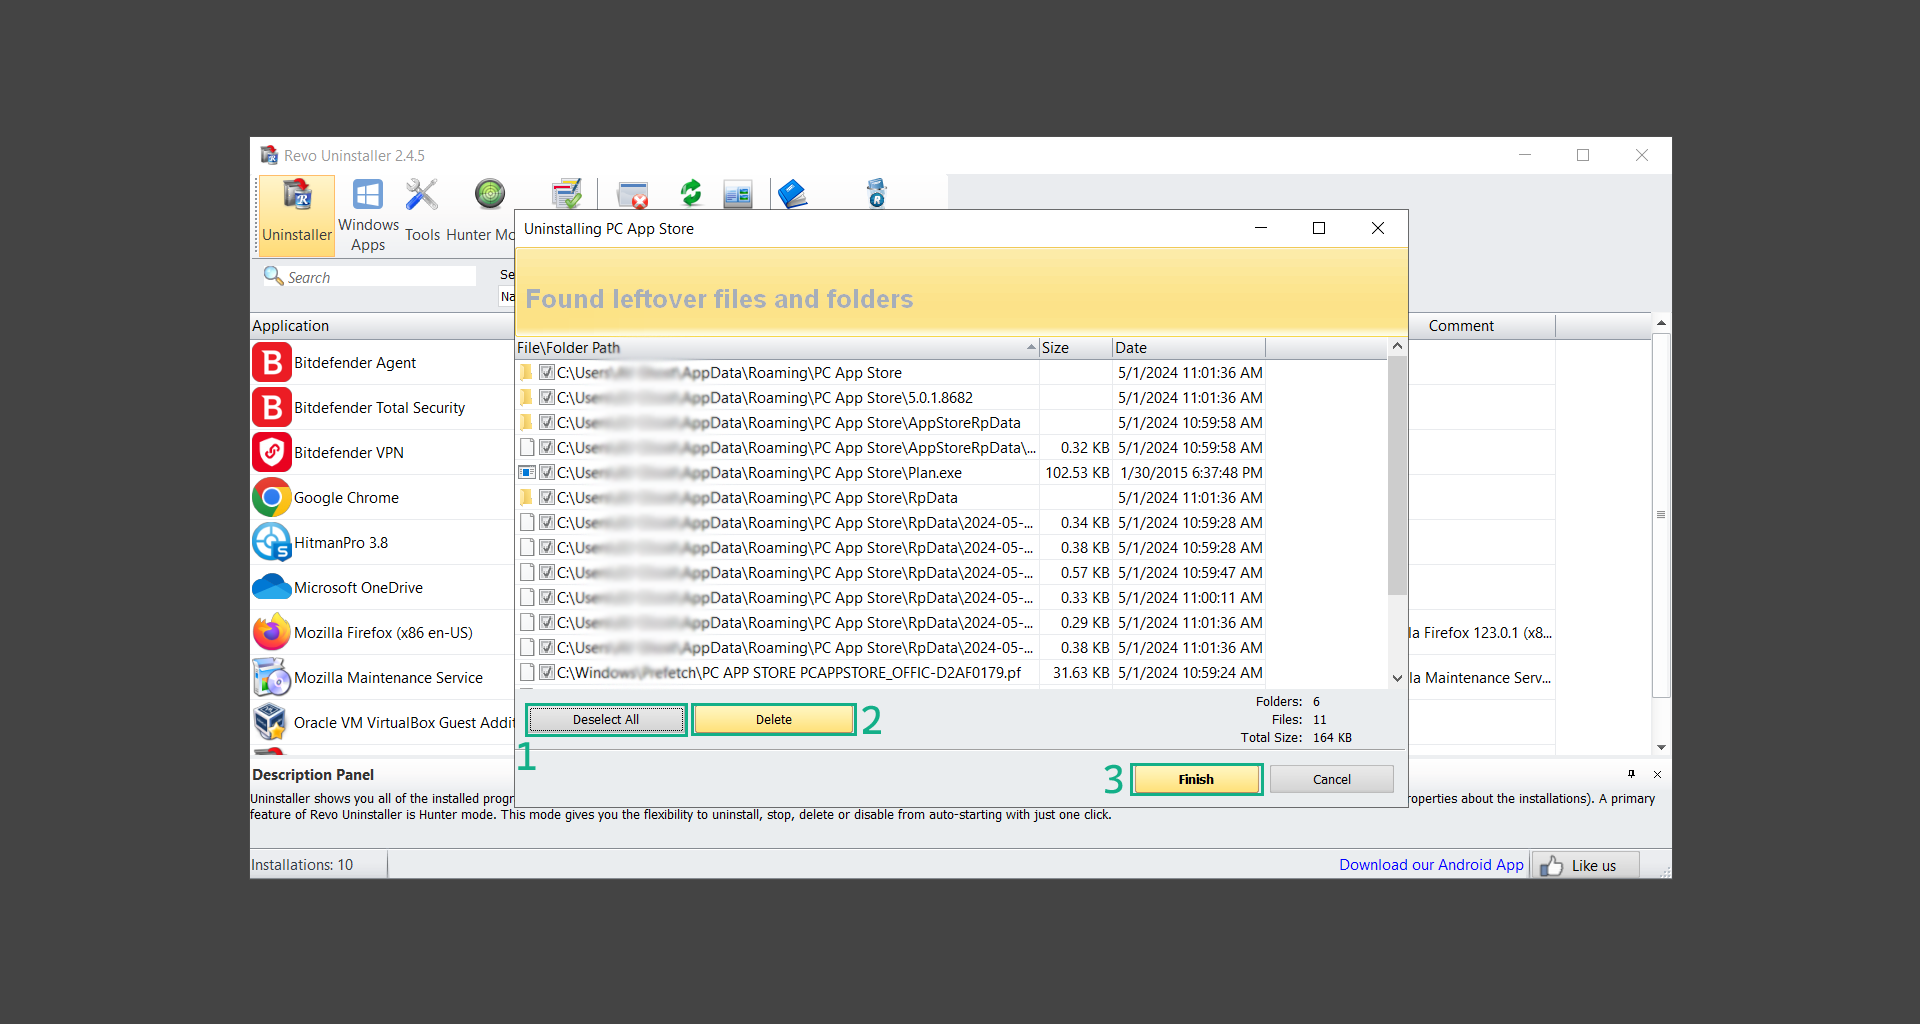
13. It may have also found some leftover files and folders, simply do the same by clicking Select All and deleting them. Now click Finish and the uninstallation of the program is done.
Step 5: Run several malware & virus scans
Cybercriminals may think that they can fly under the radar of a malware scan. However, if we scan the computer using several scanners, the browser hijacker they developed will never see the light of day.
Here’s why it’s necessary…
As full-time security professionals, we’ve seen security programs like antivirus and malware removal solutions with their vast and extensive database of threat signatures that they use to find malware.
However, newly developing threats may not be recognized in the early days of infection since the threat signatures are not yet researched and added to the detection database. It may eventually get found, but it might be too late for the infected machines.
Upon research, newer malware variants often have identical strings and signatures similar to older malware in certain security software’s databases, which is why certain antivirus software can detect such malware while others cannot.
Since identifying the infection may be difficult for non-tech-savvy individuals, we will need the help of multiple security software to do the work for us.
Please run each security software individually. You may do so in any order.
- Removal Tool
- Emergency Kit
- ESET Scanner
- Malwarebytes
Kaspersky Virus Removal Tool is an excellent tool for scanning and disinfecting malware-infected computers. Please note that this tool is separate from the mainstream Kaspersky security applications, so worry not about the company’s controversies.
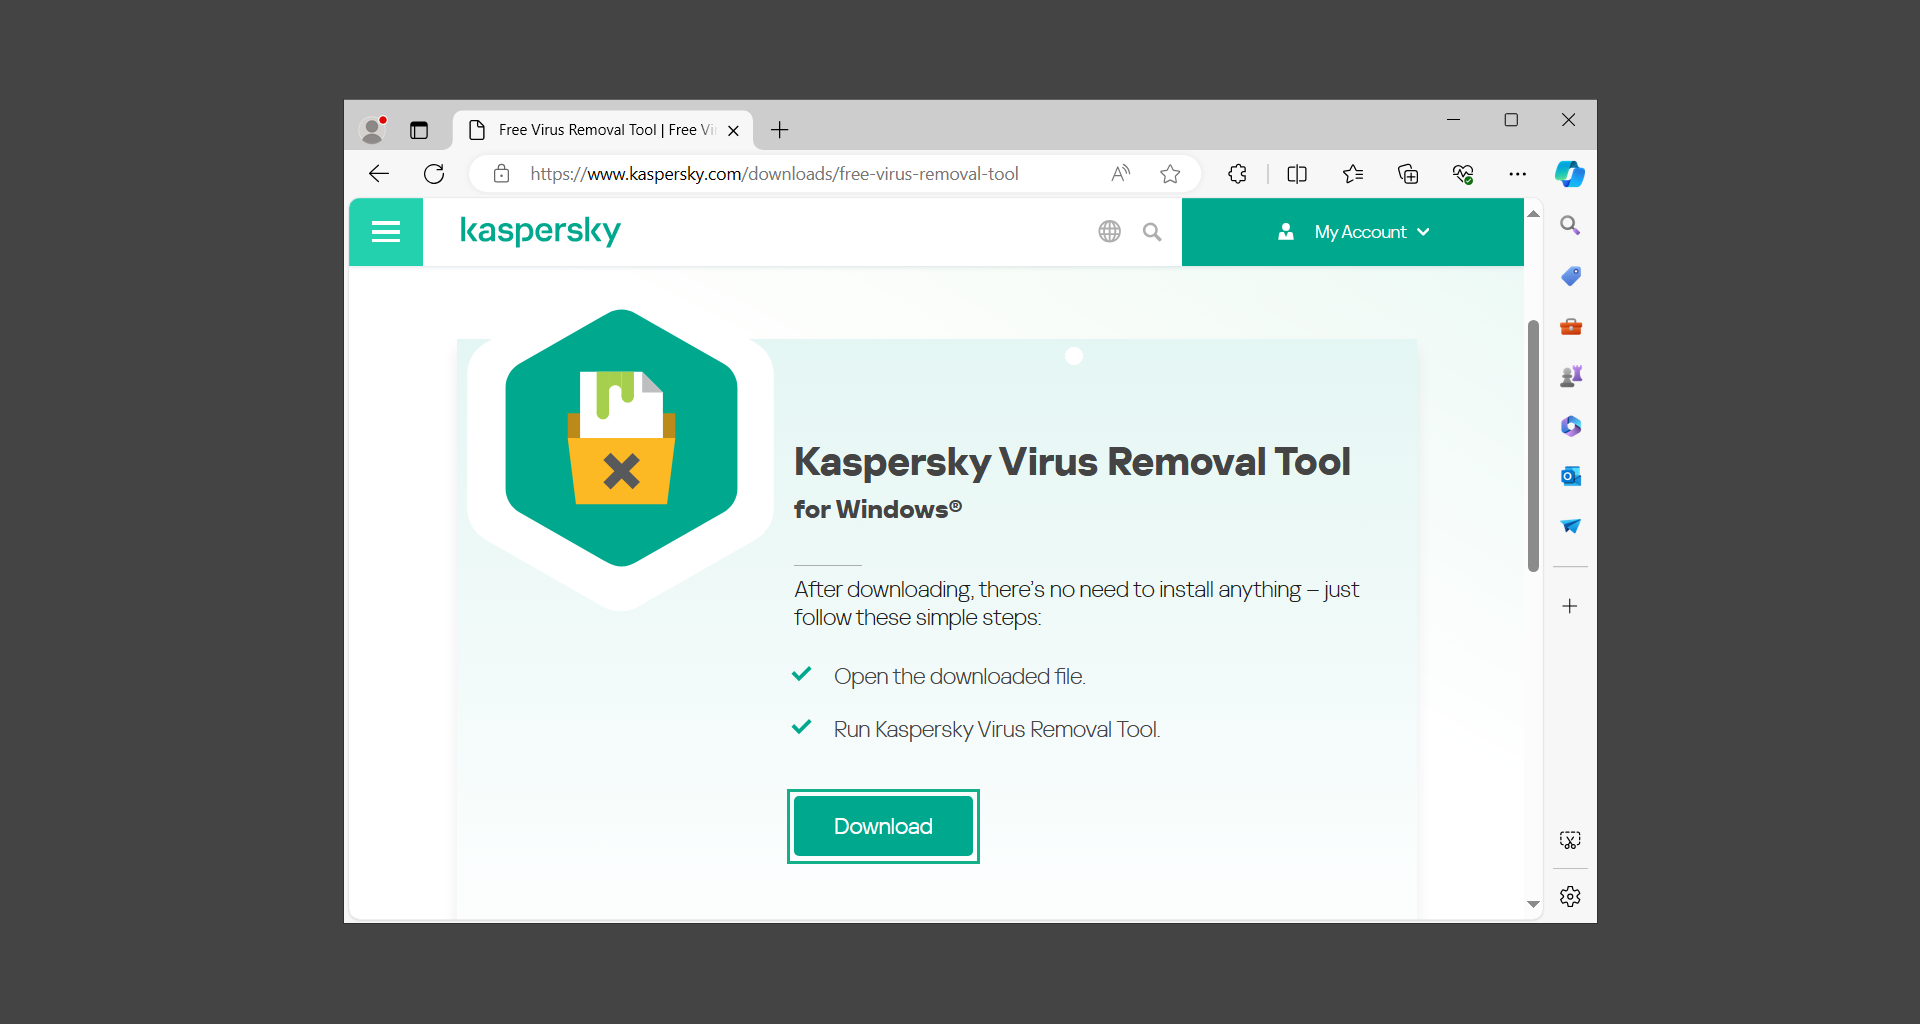
1. Download the Kaspersky Virus Removal Tool from the official Kaspersky website.
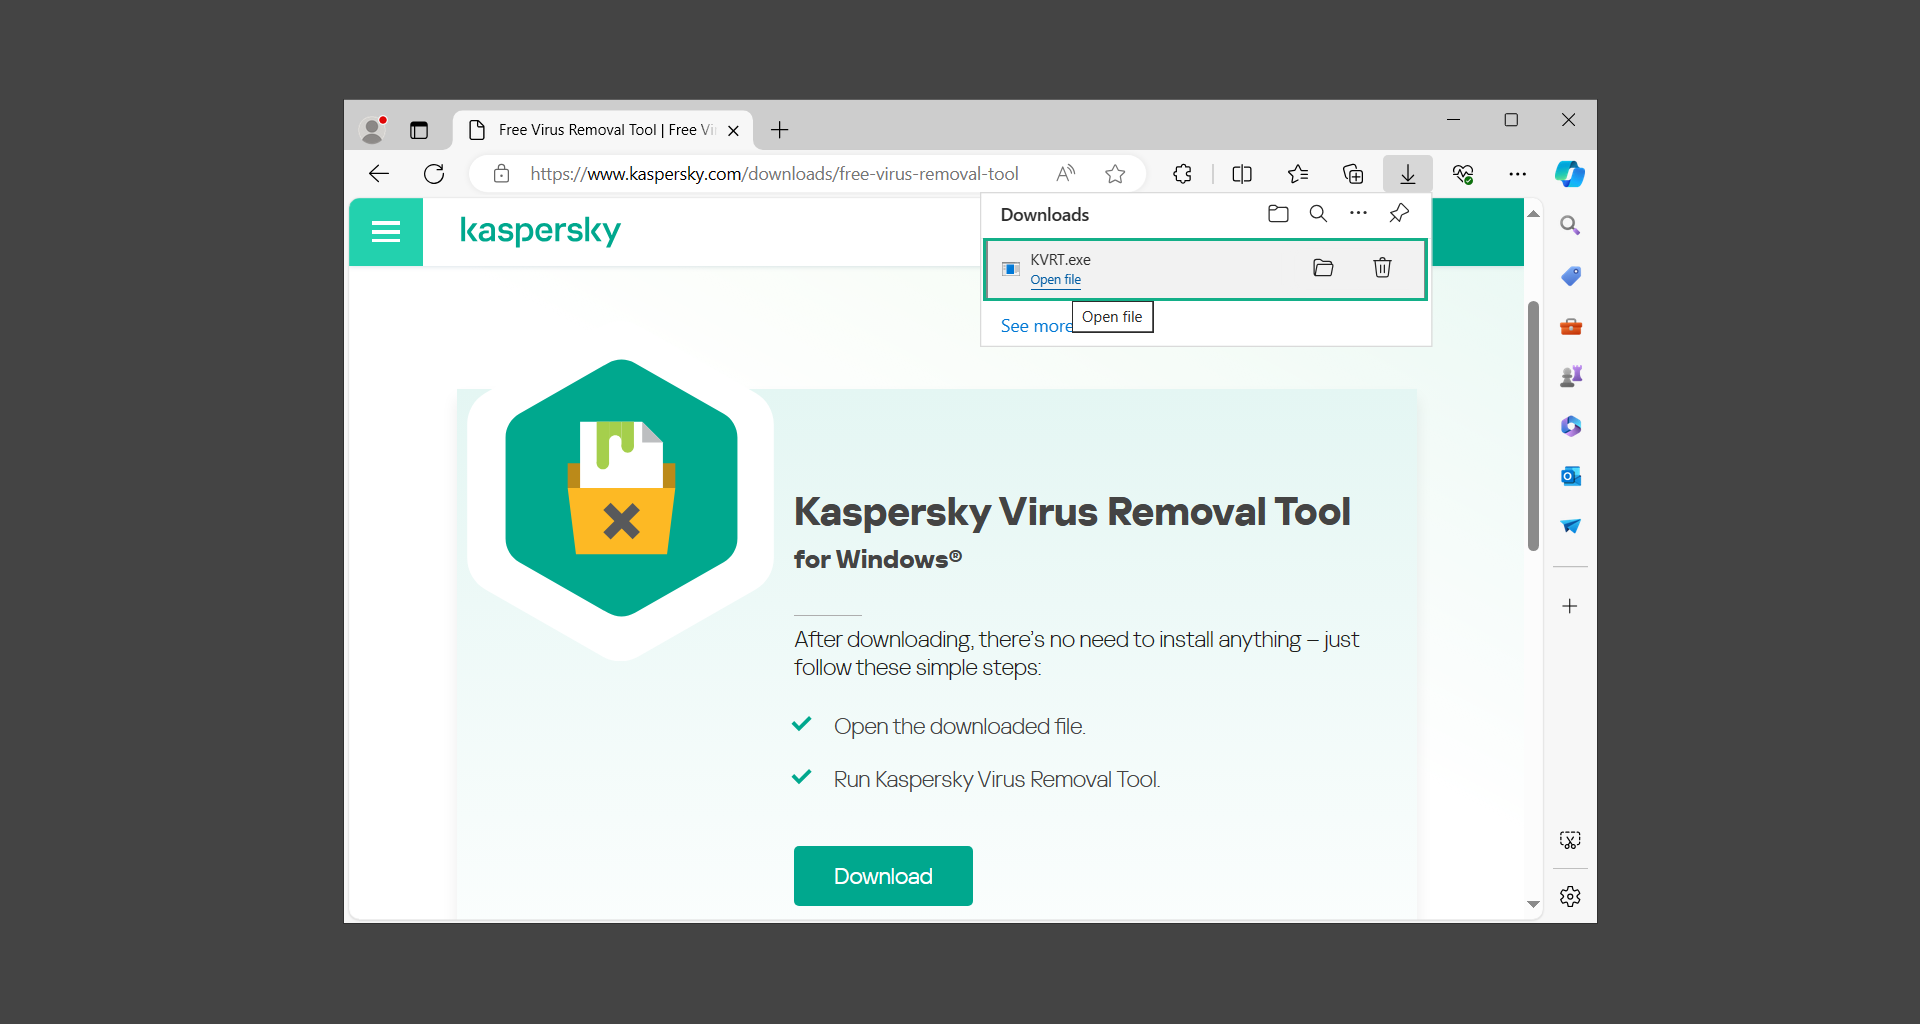
2. After the executable file (KVRT.exe) has finished downloading. You can run the program right off the bat as it does not require to be installed in the system.
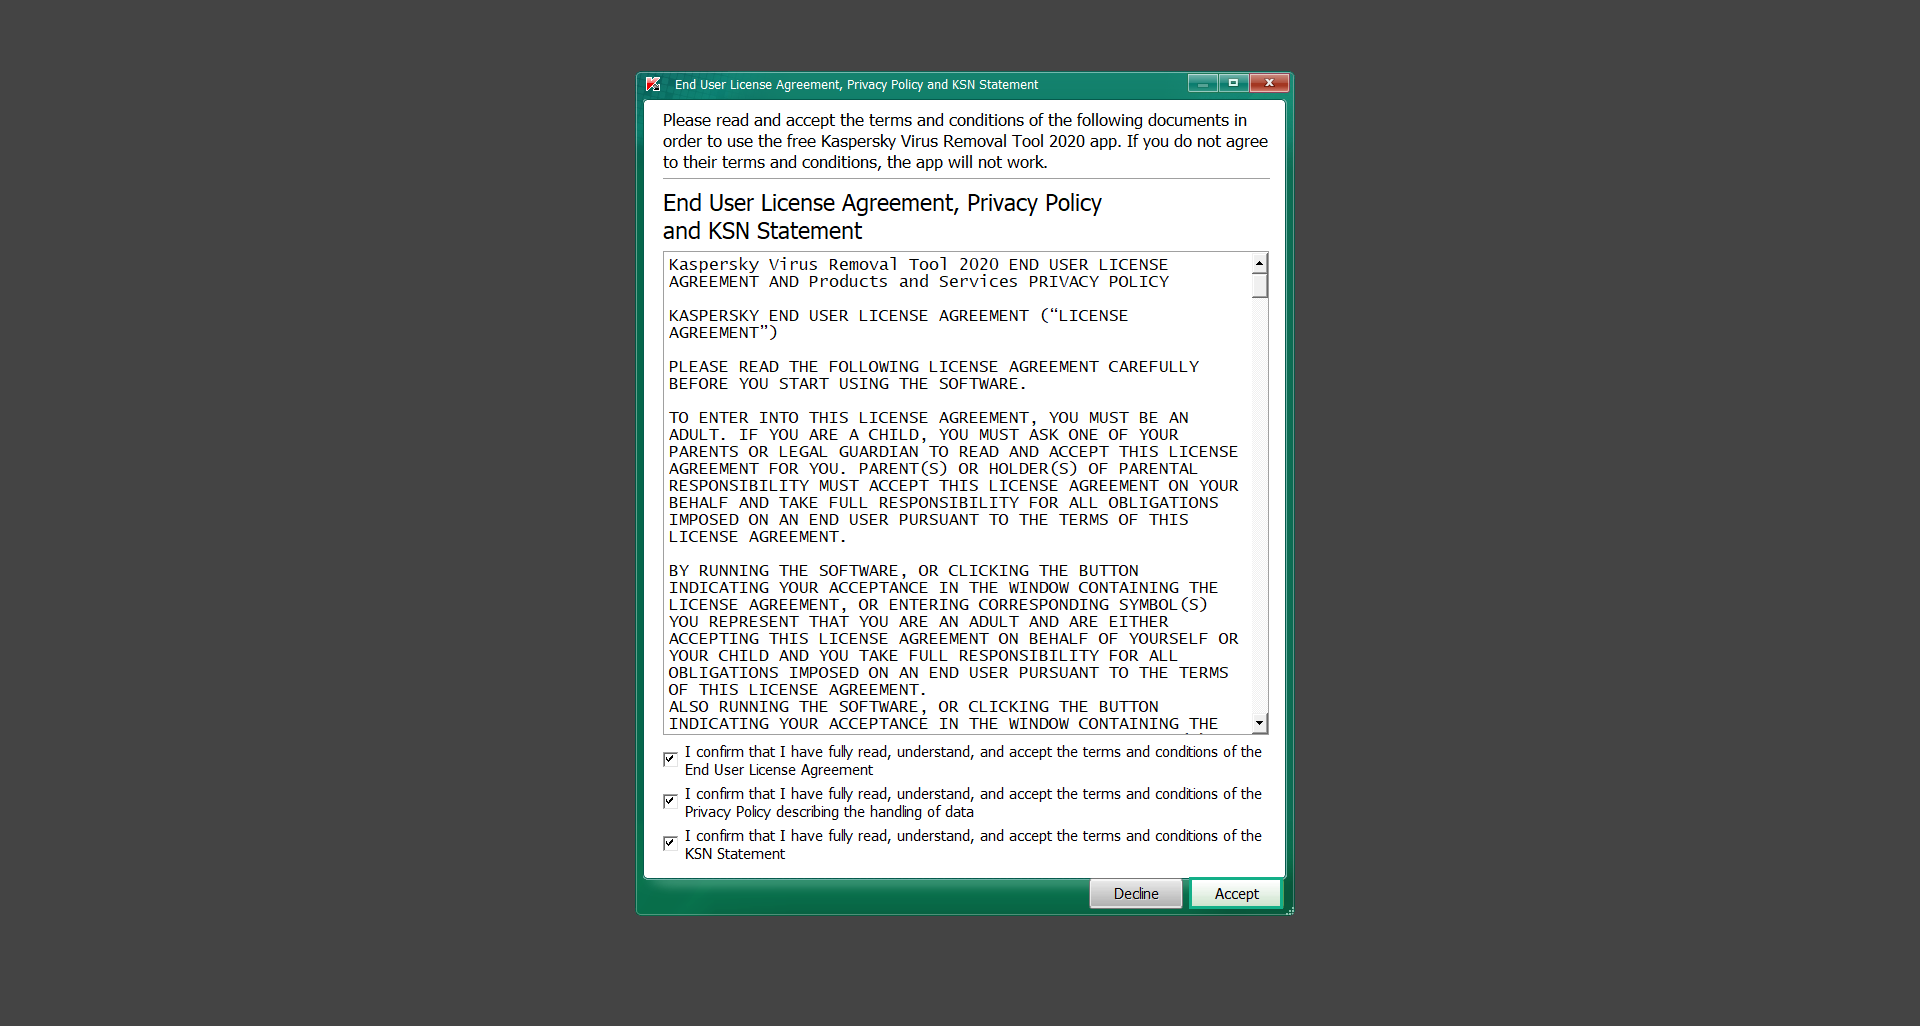
3. Read the End User License Agreement, Privacy Policy, and KSN Statement then tick the checkbox to agree with the terms and conditions. Click Accept to proceed.
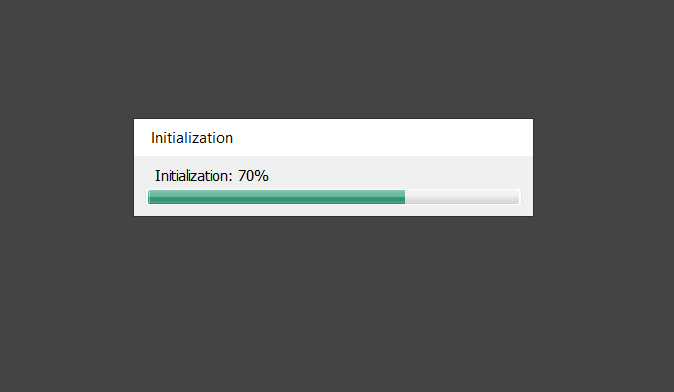
4. Wait for the system initialization process to complete as it runs and check if your system is compatible with running the virus removal tool.
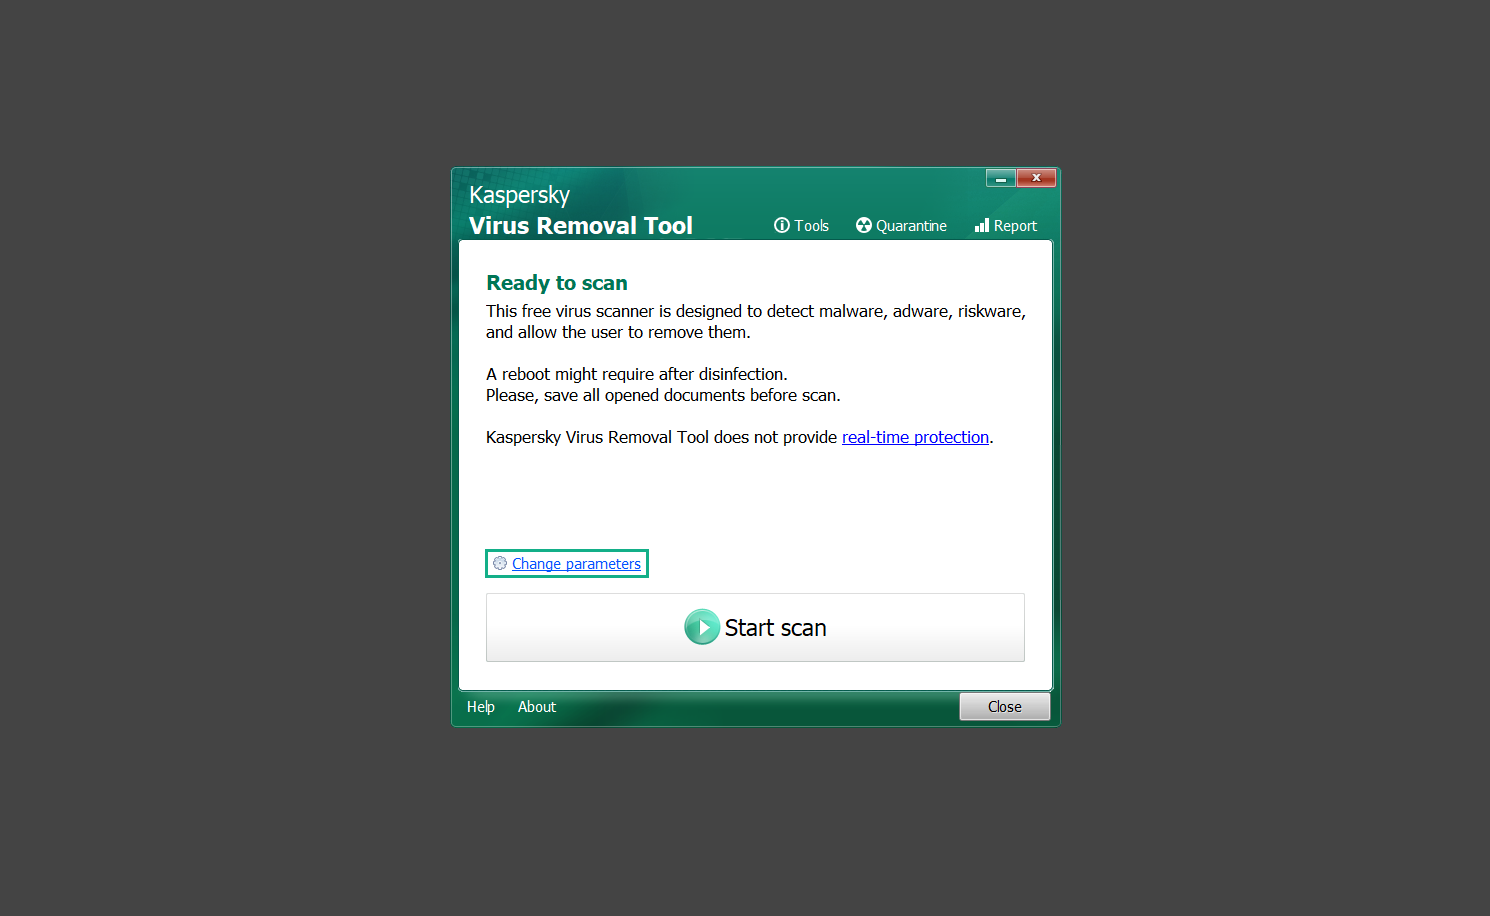
5. Click the Change parameters button to set the scope for the scanner.
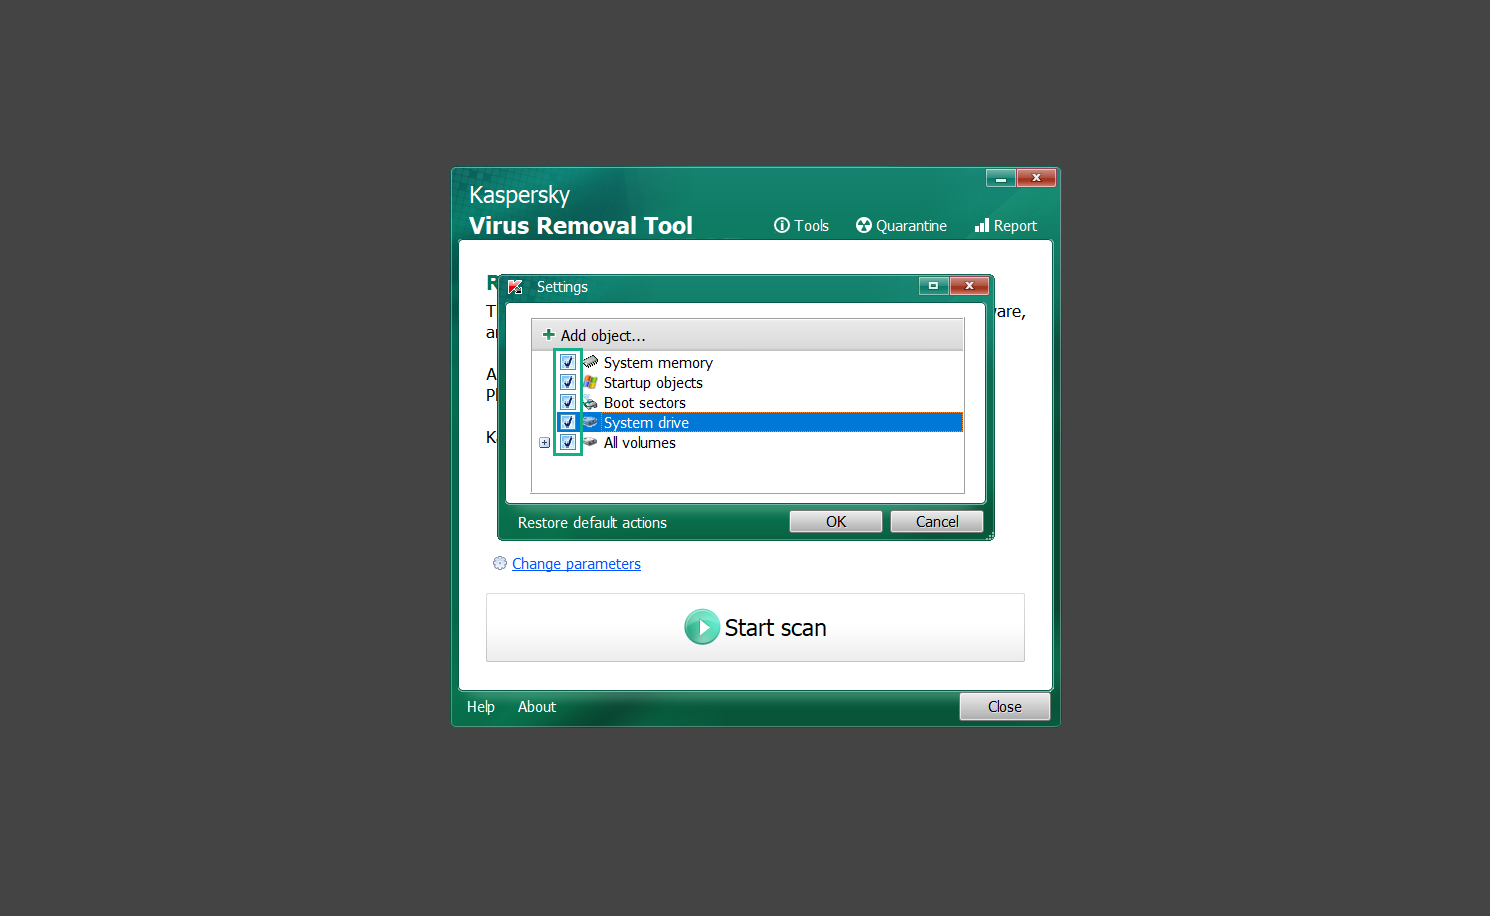
6. Select all the checkboxes for the objects to scan to find malware within all the directories and drives of the computer. Then click OK to proceed back to the home screen.
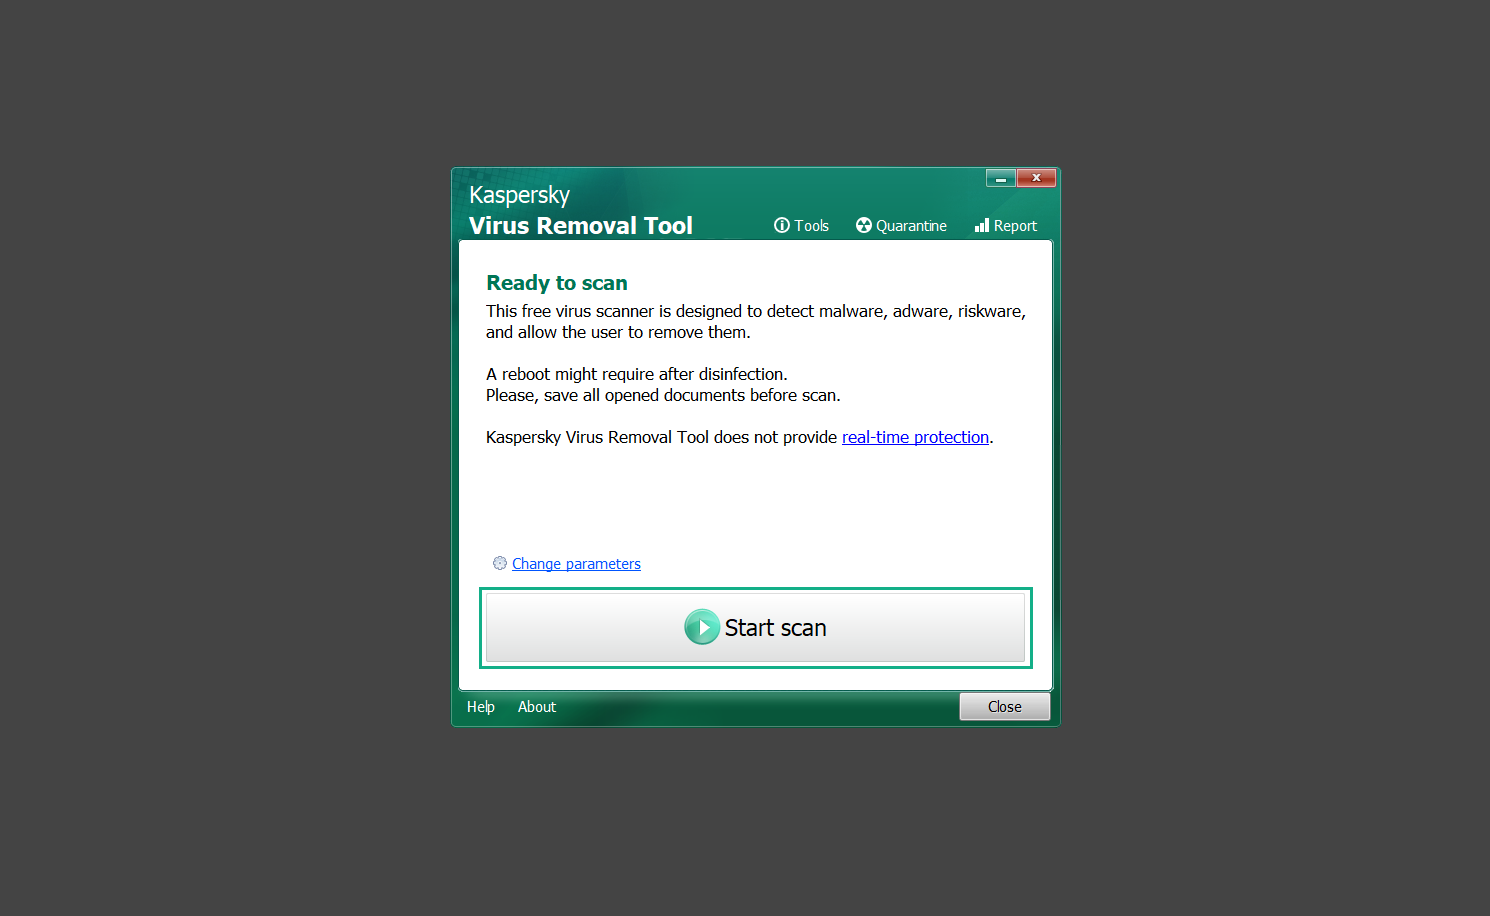
7. Now we are ready to scan, click the big Start scan button and the Virus Removal Tool will now get to work.
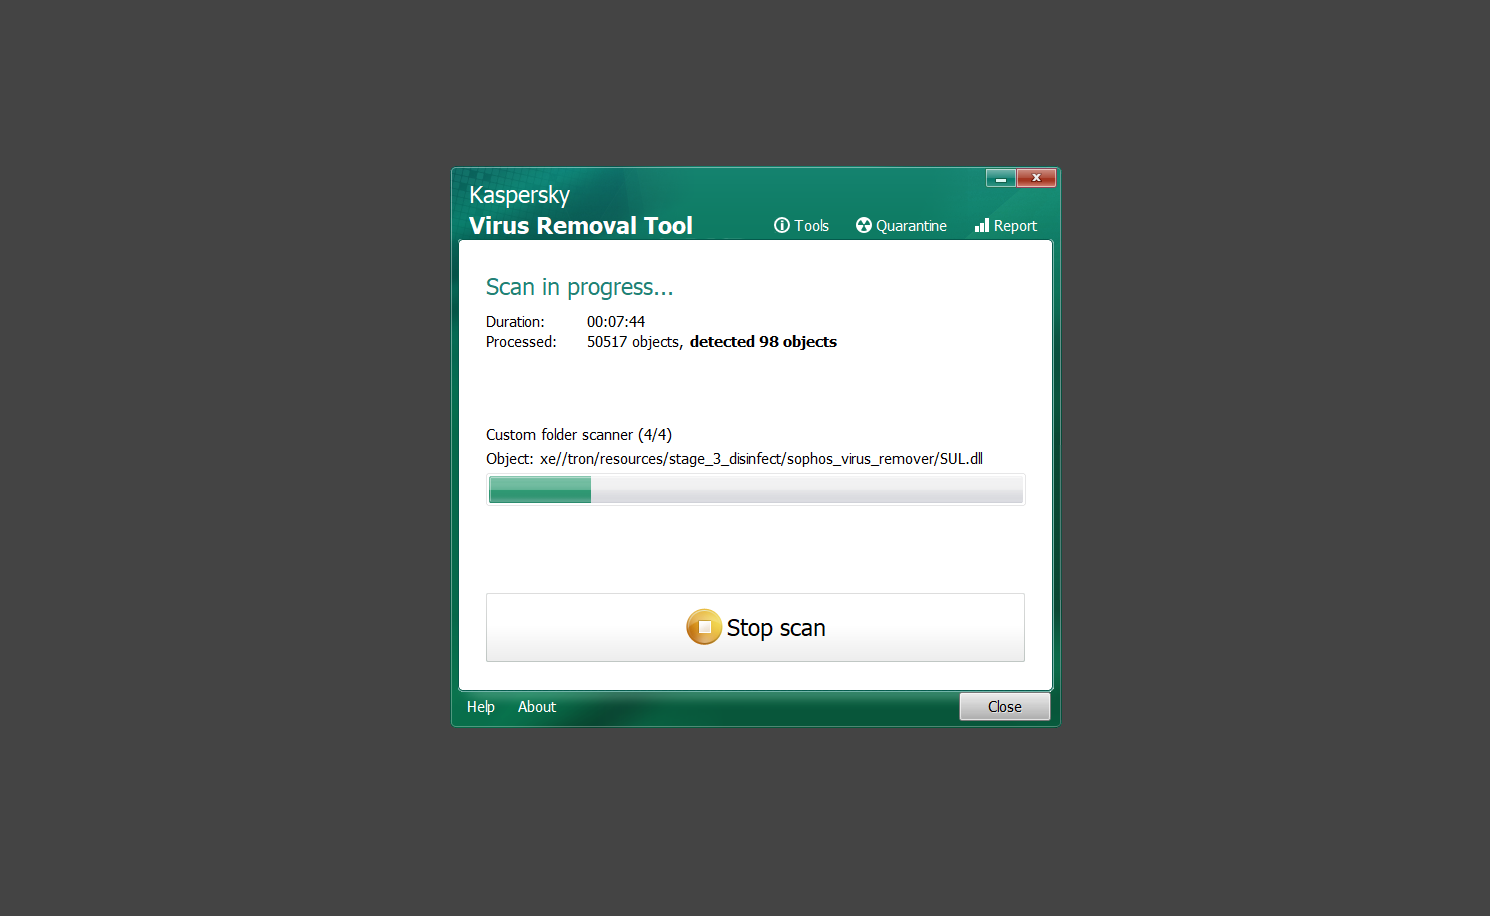
8. Wait patiently until the scan is complete. A notification with a request for action will be displayed if threats are found within the computer system.
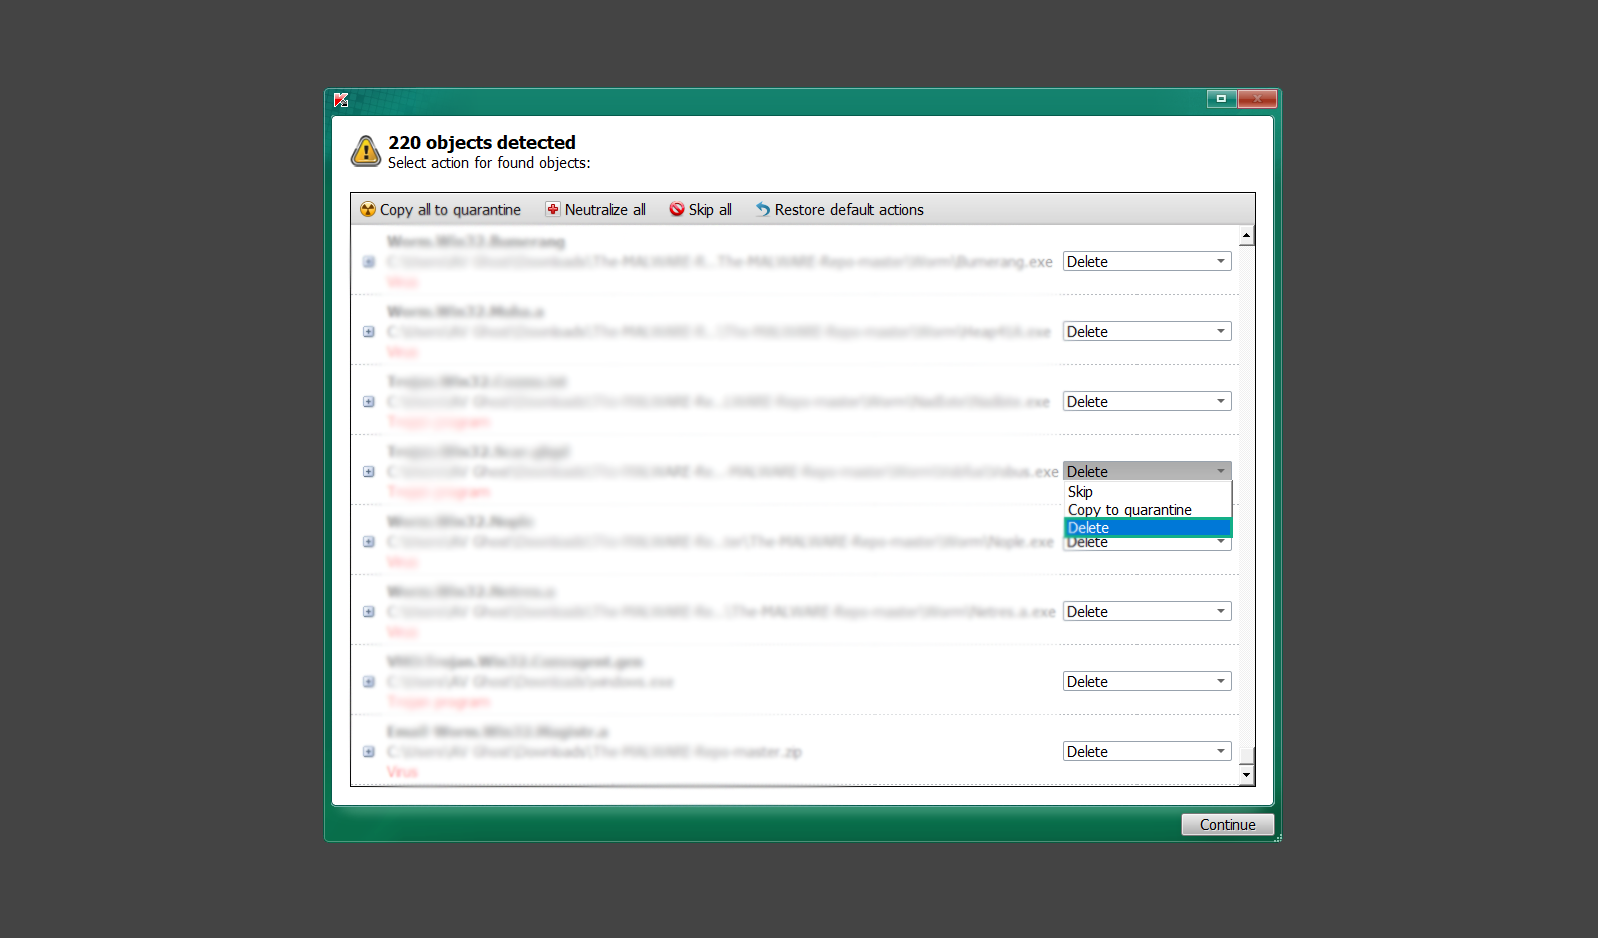
9. From the Please select action drop-down menu of each detected object, choose Delete to fully get rid of the threats found by the tool.
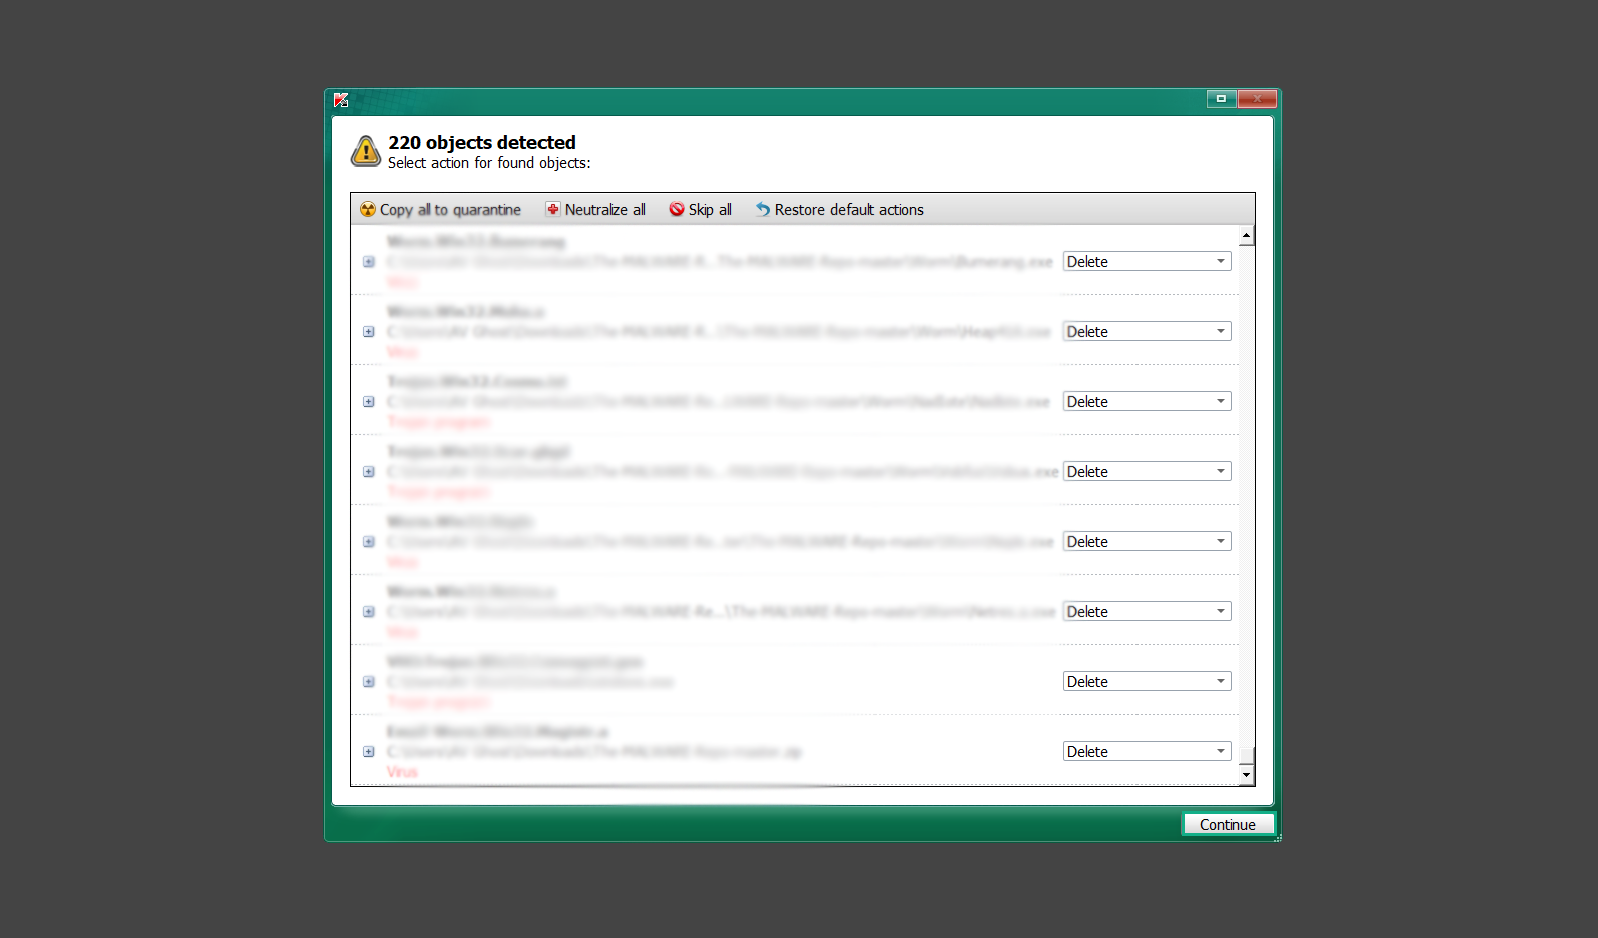
10. Click Continue to proceed with deleting the detected malware threats from your computer.
As the name implies, the Emergency Kit software by Emsisoft is a must-use in your malware scanner arsenal. It features the same powerful scanning technology used by their flagship software, Emsisoft Anti-Malware.
1. Go to the official Emsisoft website and download the Emsisoft Emergency Kit portable software.
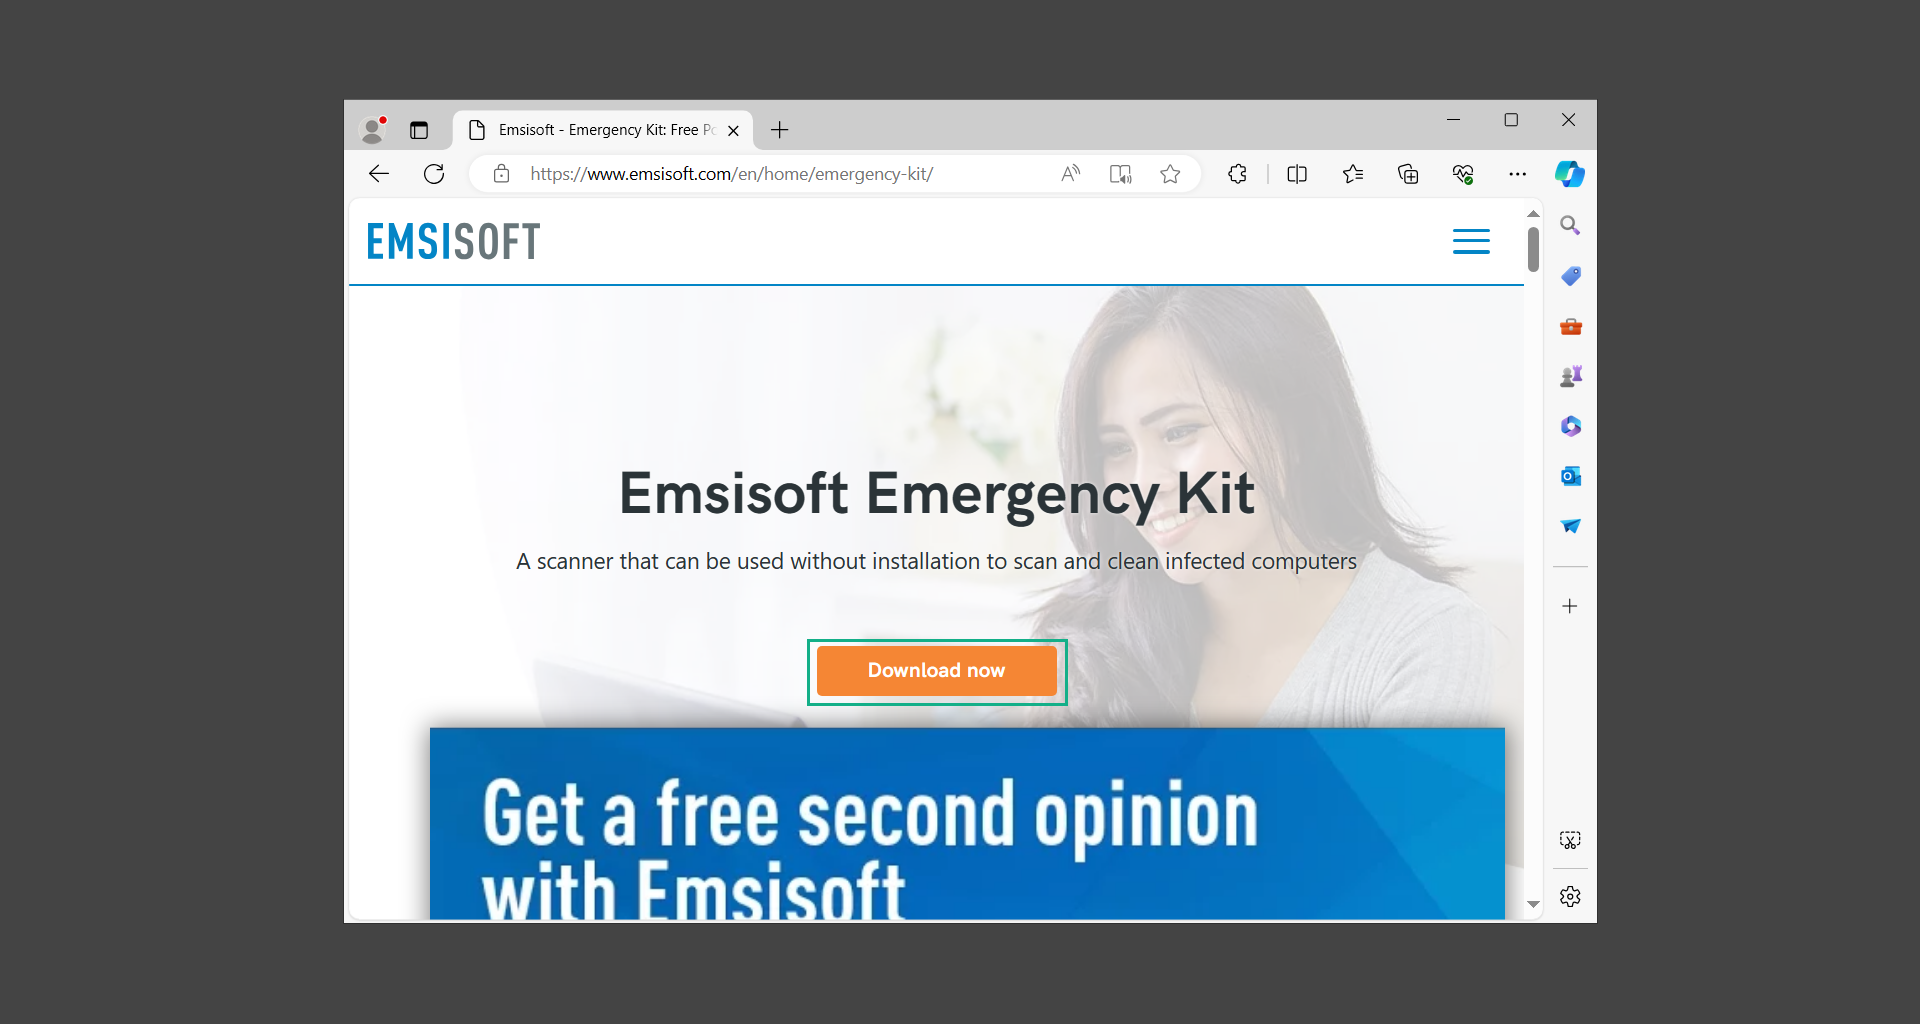
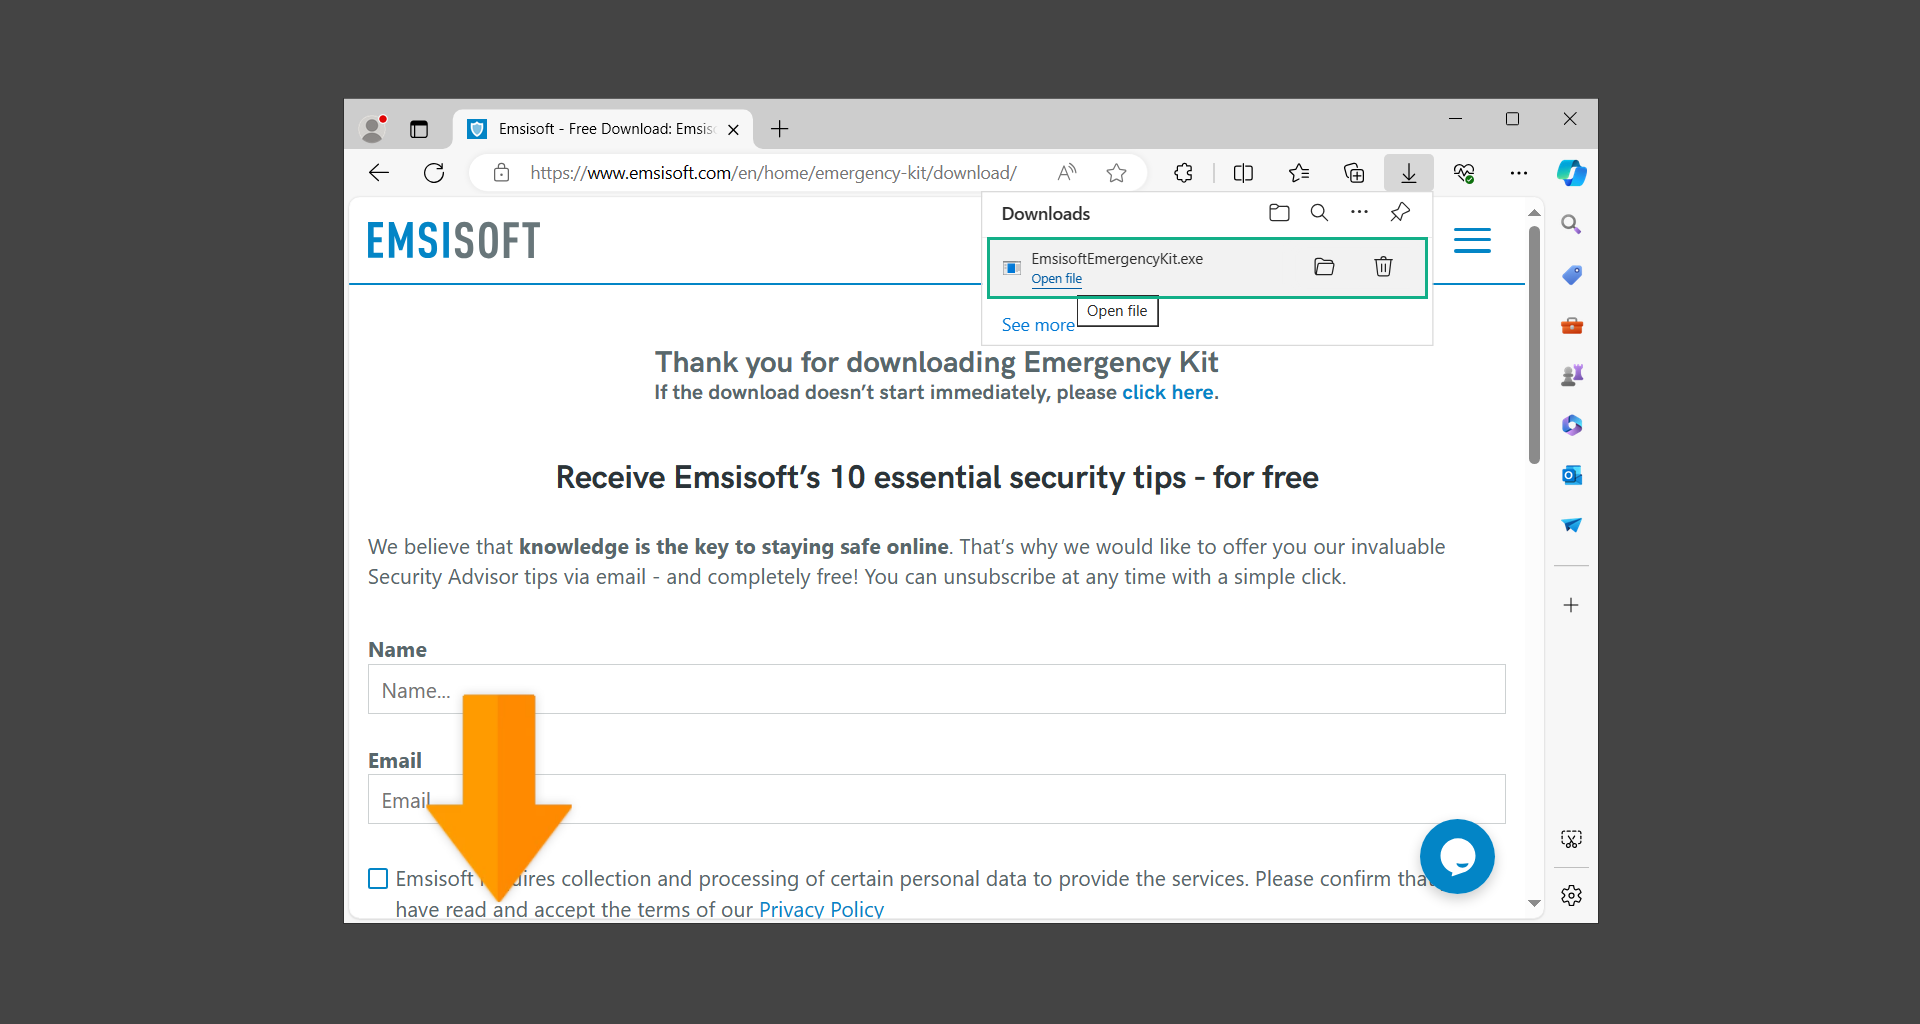
2. After downloading the executable program (EmsisoftEmergencyKit.exe), you can run it straight from your downloads folder.
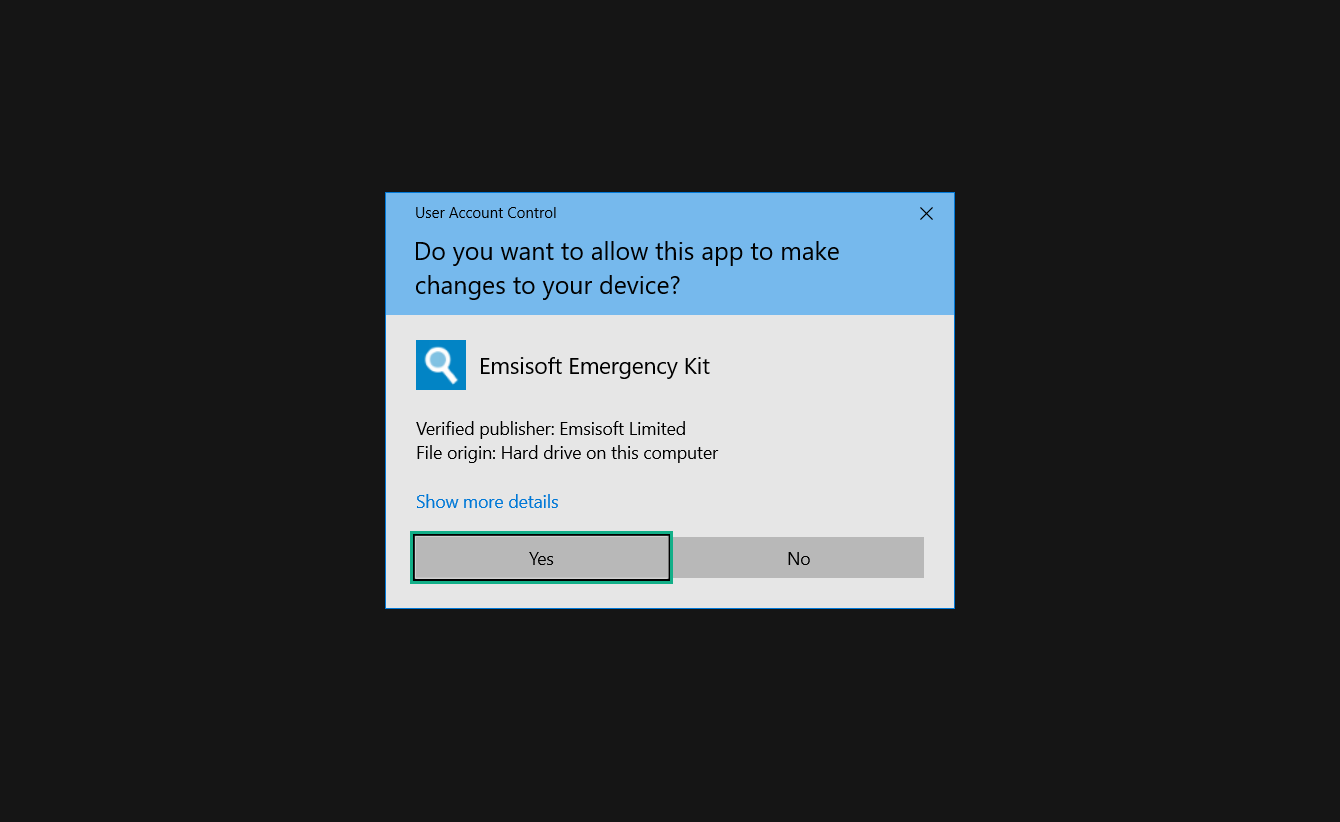
3. When presented with the User Account Control window, click Yes to allow the program to begin running on the computer.
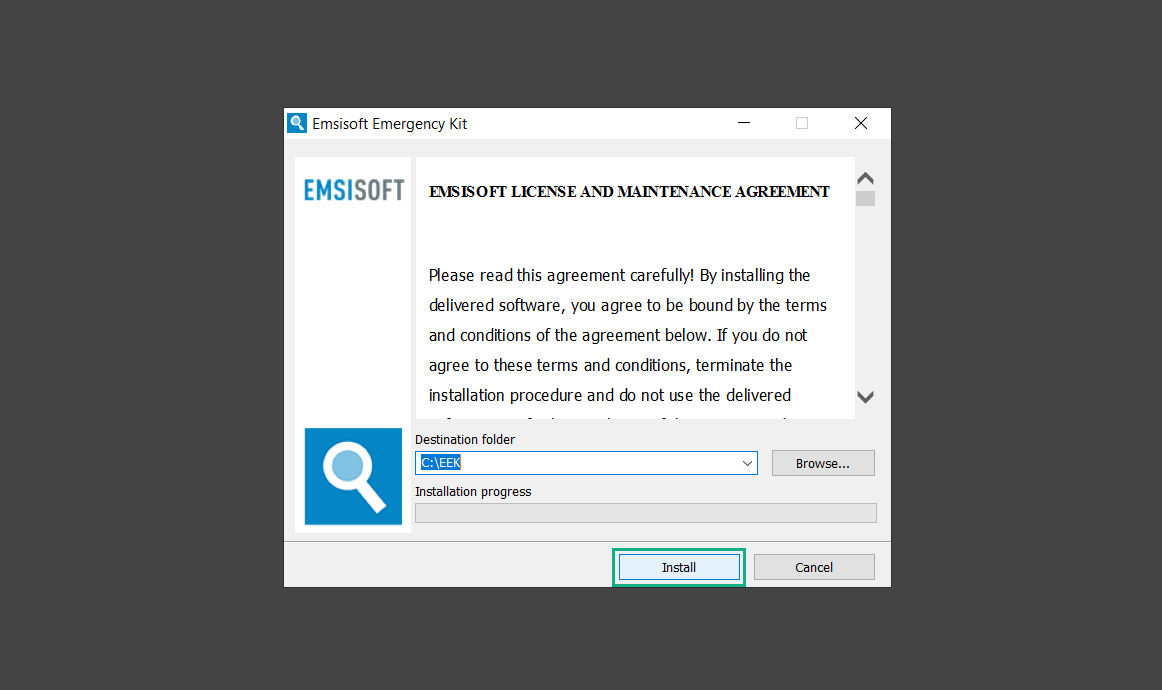
4. Agree to the license and maintenance agreement and select your destination folder for the program. Then click Install to proceed.
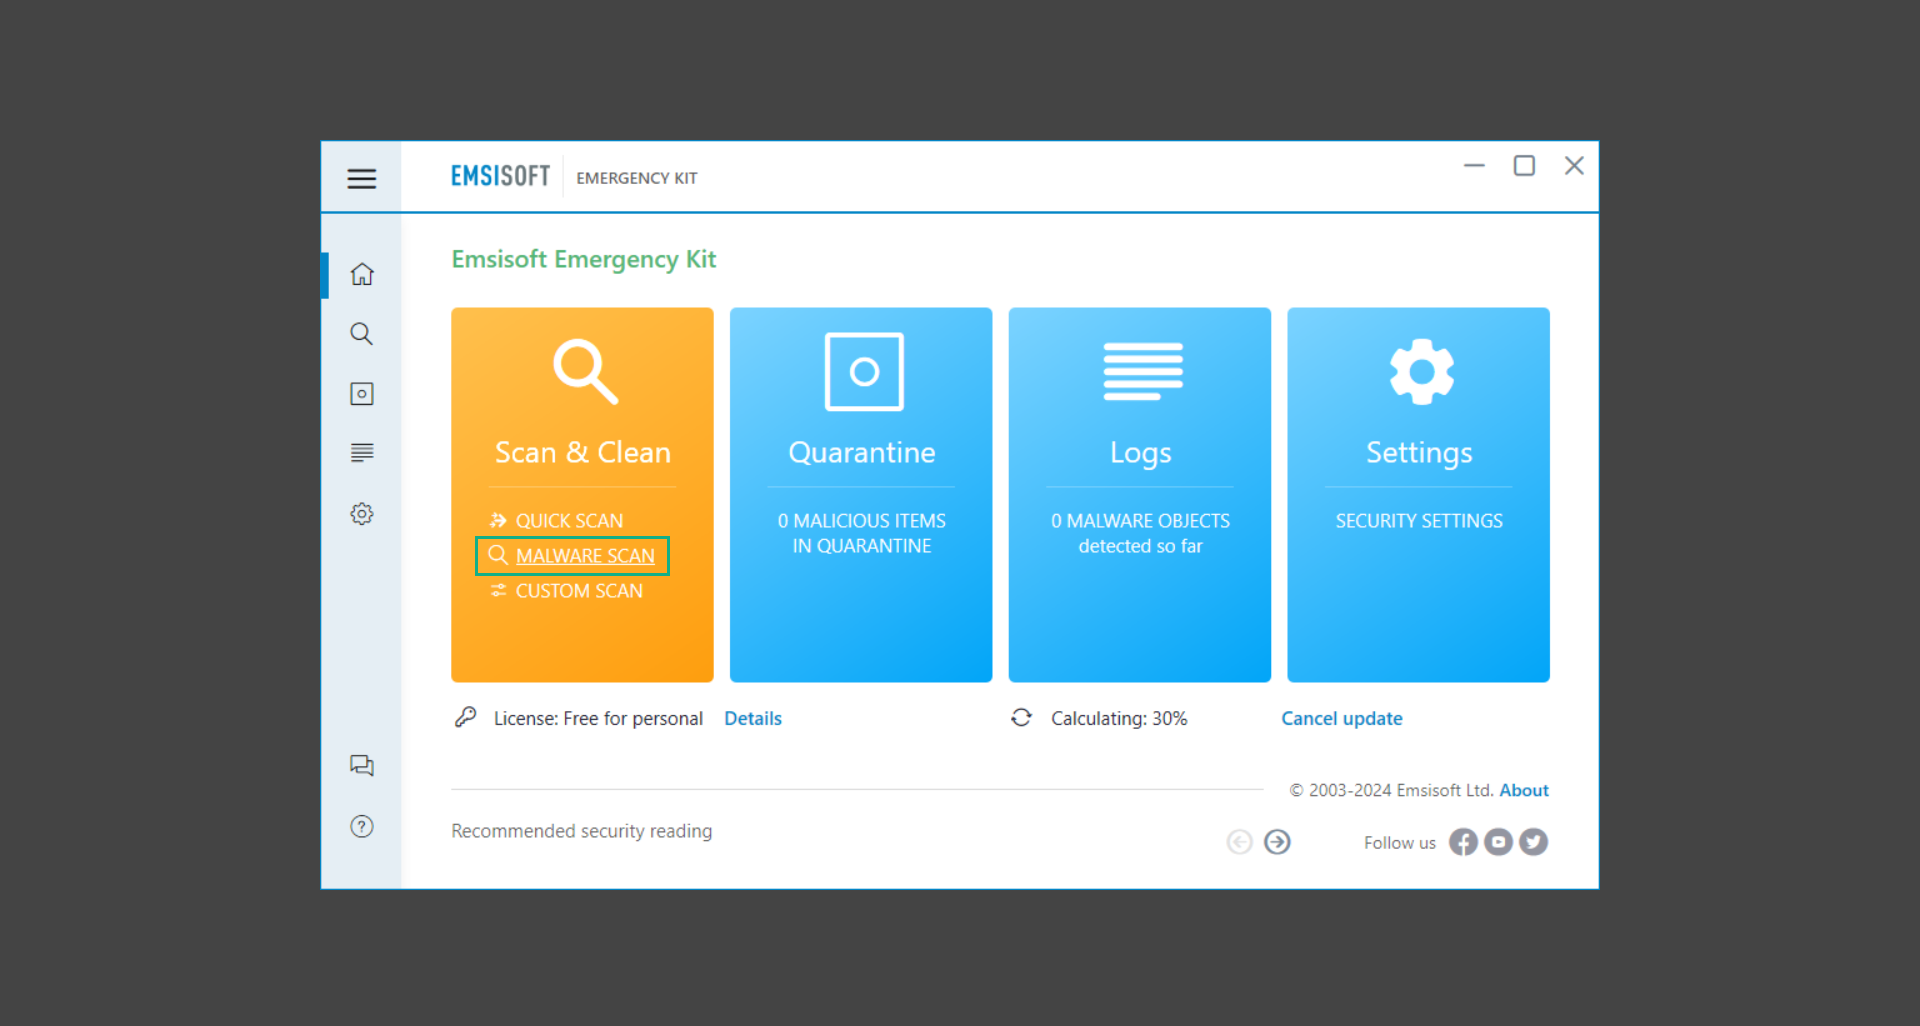
5. Once the Emergency Kit program has launched, click Malware Scan from the homepage to initiate the scanning process. The program will be scanning the computer and it might take long depending on how many files you have as well as the hardware capabilities of your system.
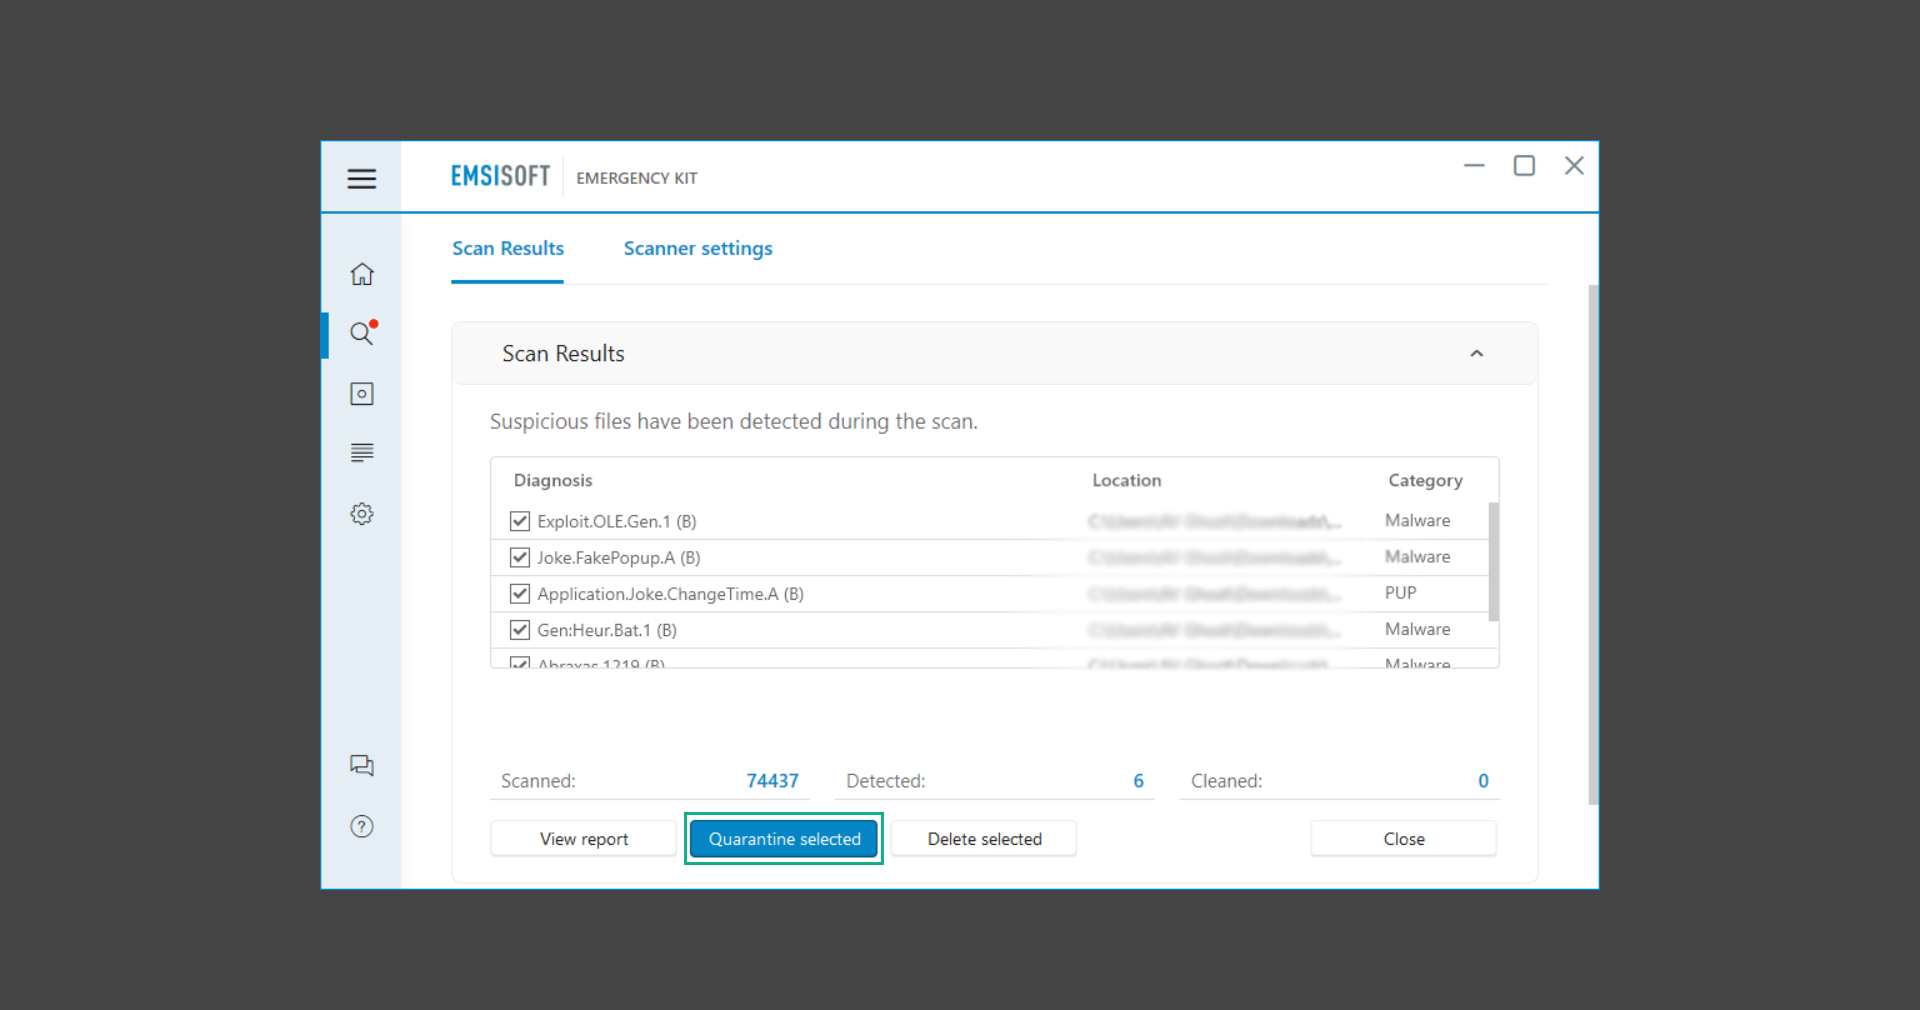
6. After the scan has finished, Emsisoft Emergency Scanner will show you the list of files detected by the software. Click on Quarantine selected to remove the threats from your computer.
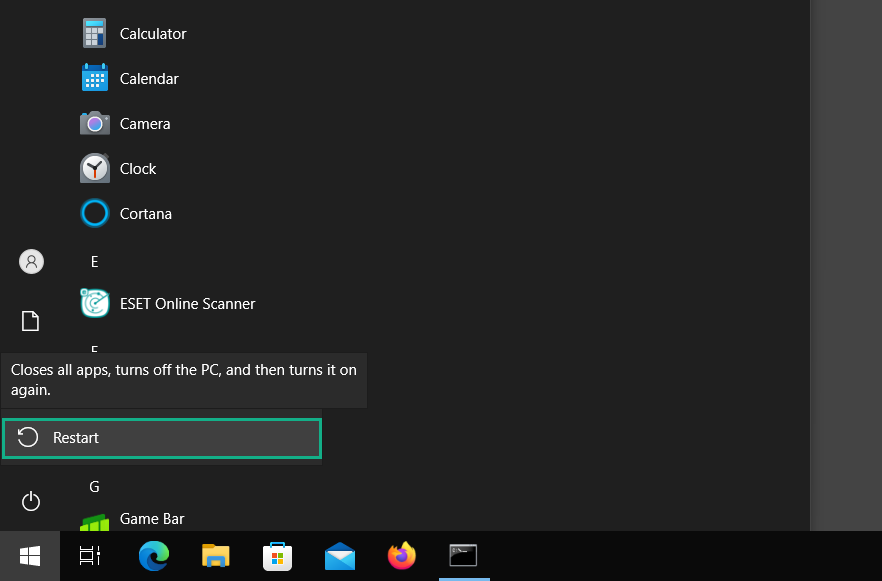
7. Emsisoft Emergency Scanner may also require you to restart your computer to finish the malware removal process, simply click Reboot to restart your PC.
ESET Online Scanner is a program that is designed only to remove malware threats from your computer for free. It is simple to use and features an advanced malware detection system. There is no need for registration, free trials, or anything else. Simply download, execute, and remove the malware.
1. To start, go to the official ESET website and download the latest Online Scanner. Scroll down until you find the Download button.
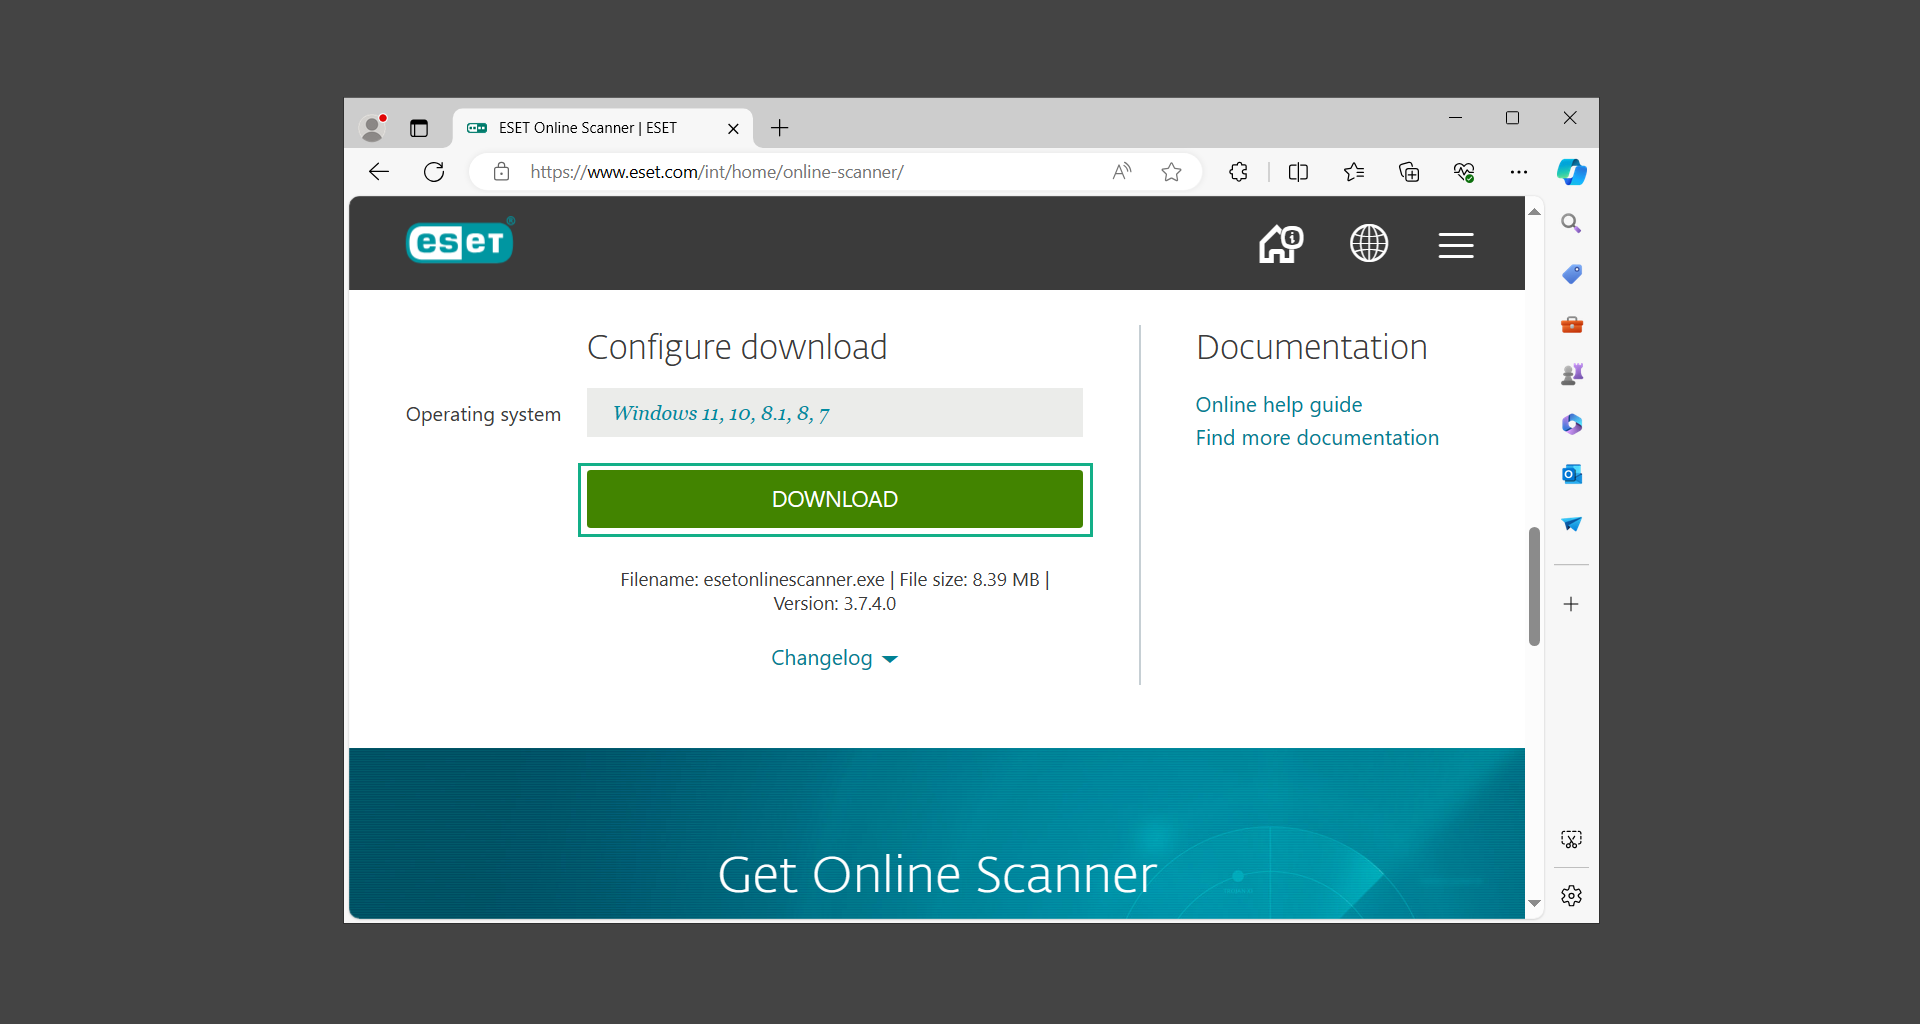
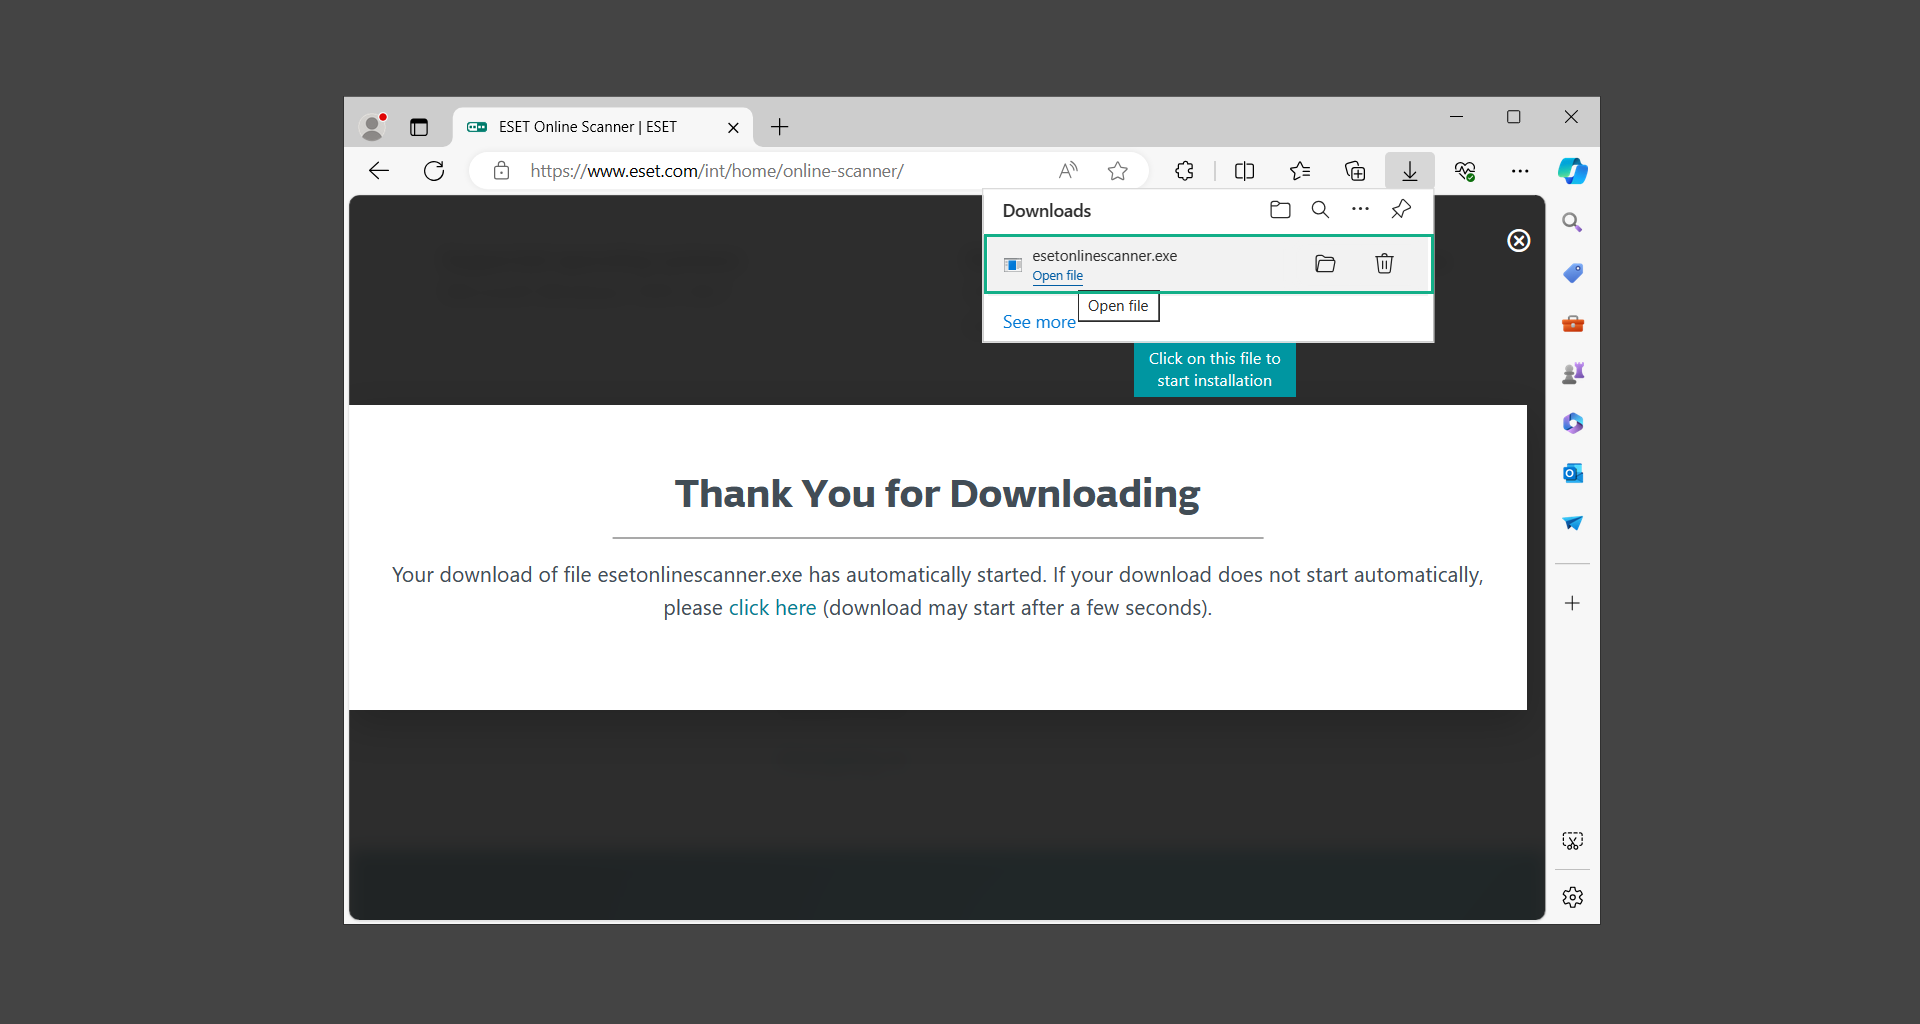
2. The file Esetonlinescanner.exe would have been downloaded on your computer after clicking the download button. Simply run the said file to begin the program.
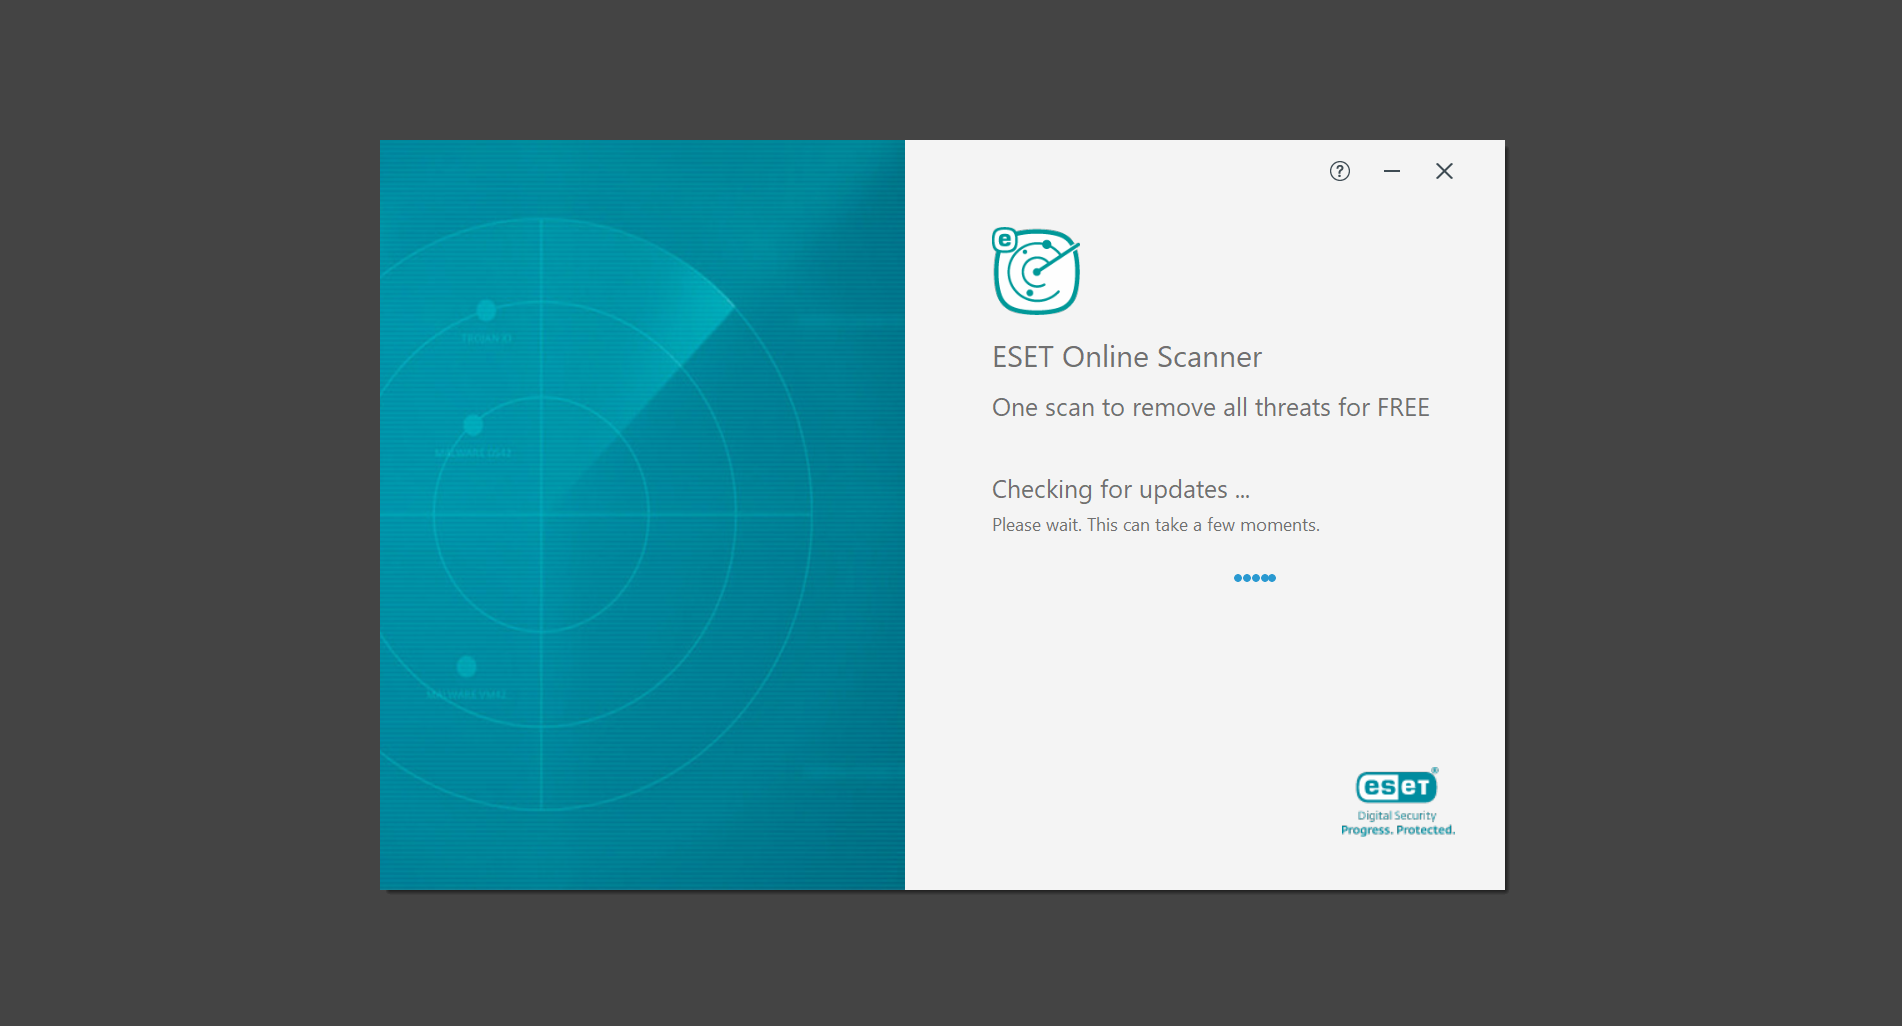
3. ESET Online Scanner will need to be initialized before proceeding to be used, select your desired language and click on Get started. Follow the on-screen instructions until the homepage shows up.
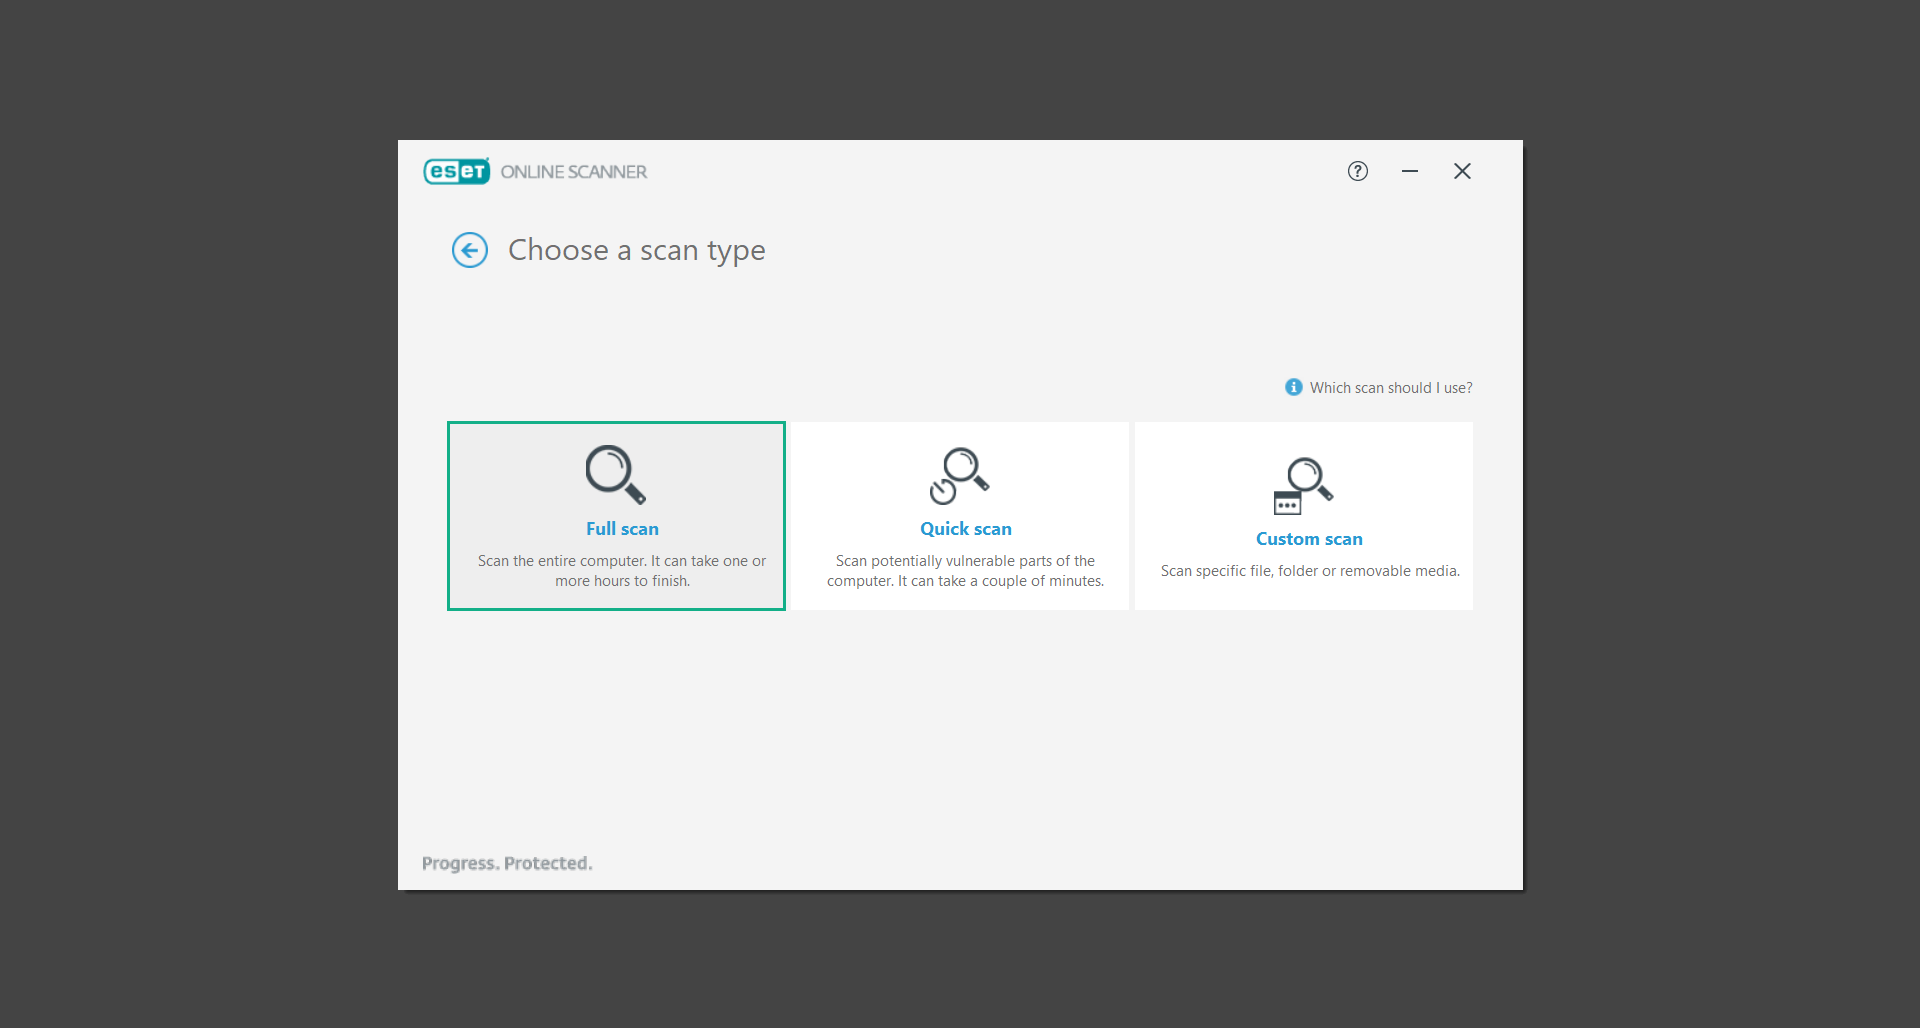
4. Click on Computer scan, then select Full scan from the three options available.
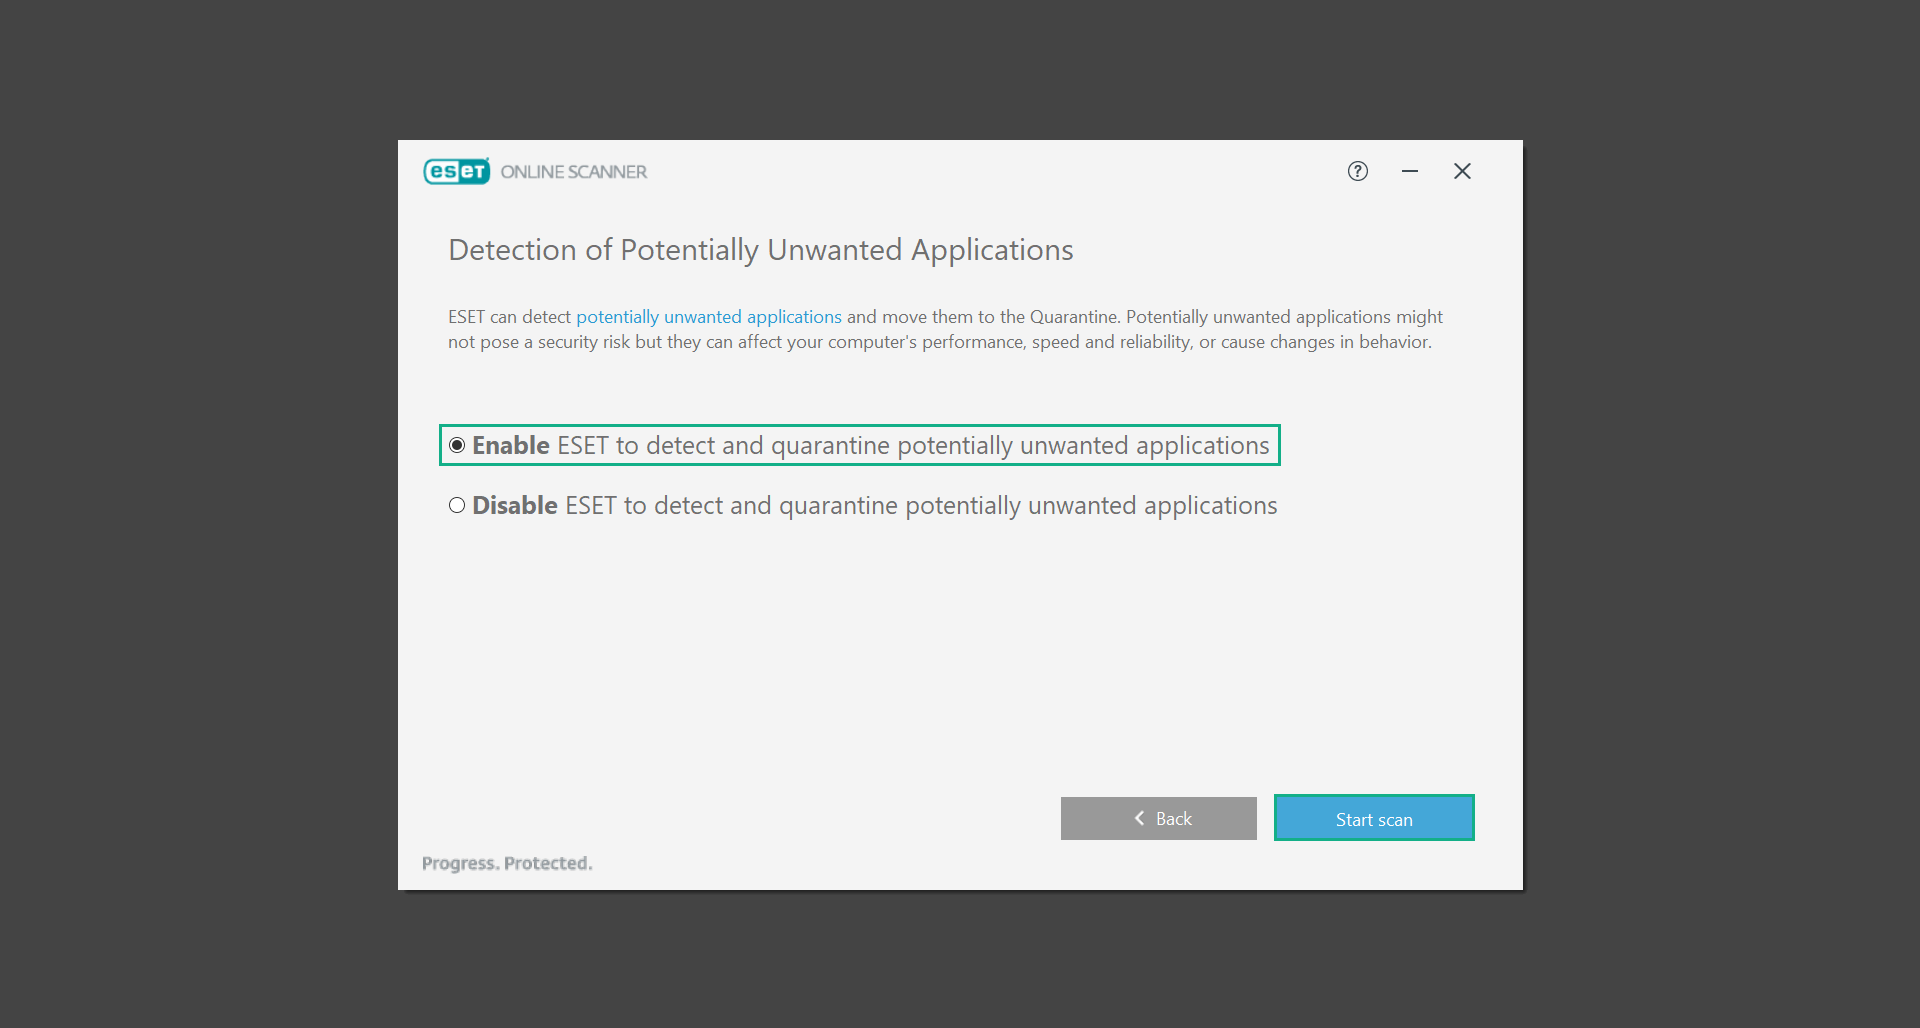
5. Give the program permission to detect and remove potentially unwanted apps by selecting the Enable option. Then click Start scan to begin the process.
6. Wait for the ESET Online Scanner to finish scanning your system for malware. After the scan, ESET Online Scanner would have automatically deleted the detected threats. Click Continue to finish the malware removal process.

Let us perform one last scan of the computer with one of the well-known tools for detecting malware and viruses.
Malwarebytes Anti-malware is well-known in the security field; they have helped many people with malware issues through their software, and downloading it will help you as well.
Note: We will only use the free version of Malwarebytes because it includes all of the capabilities we require.
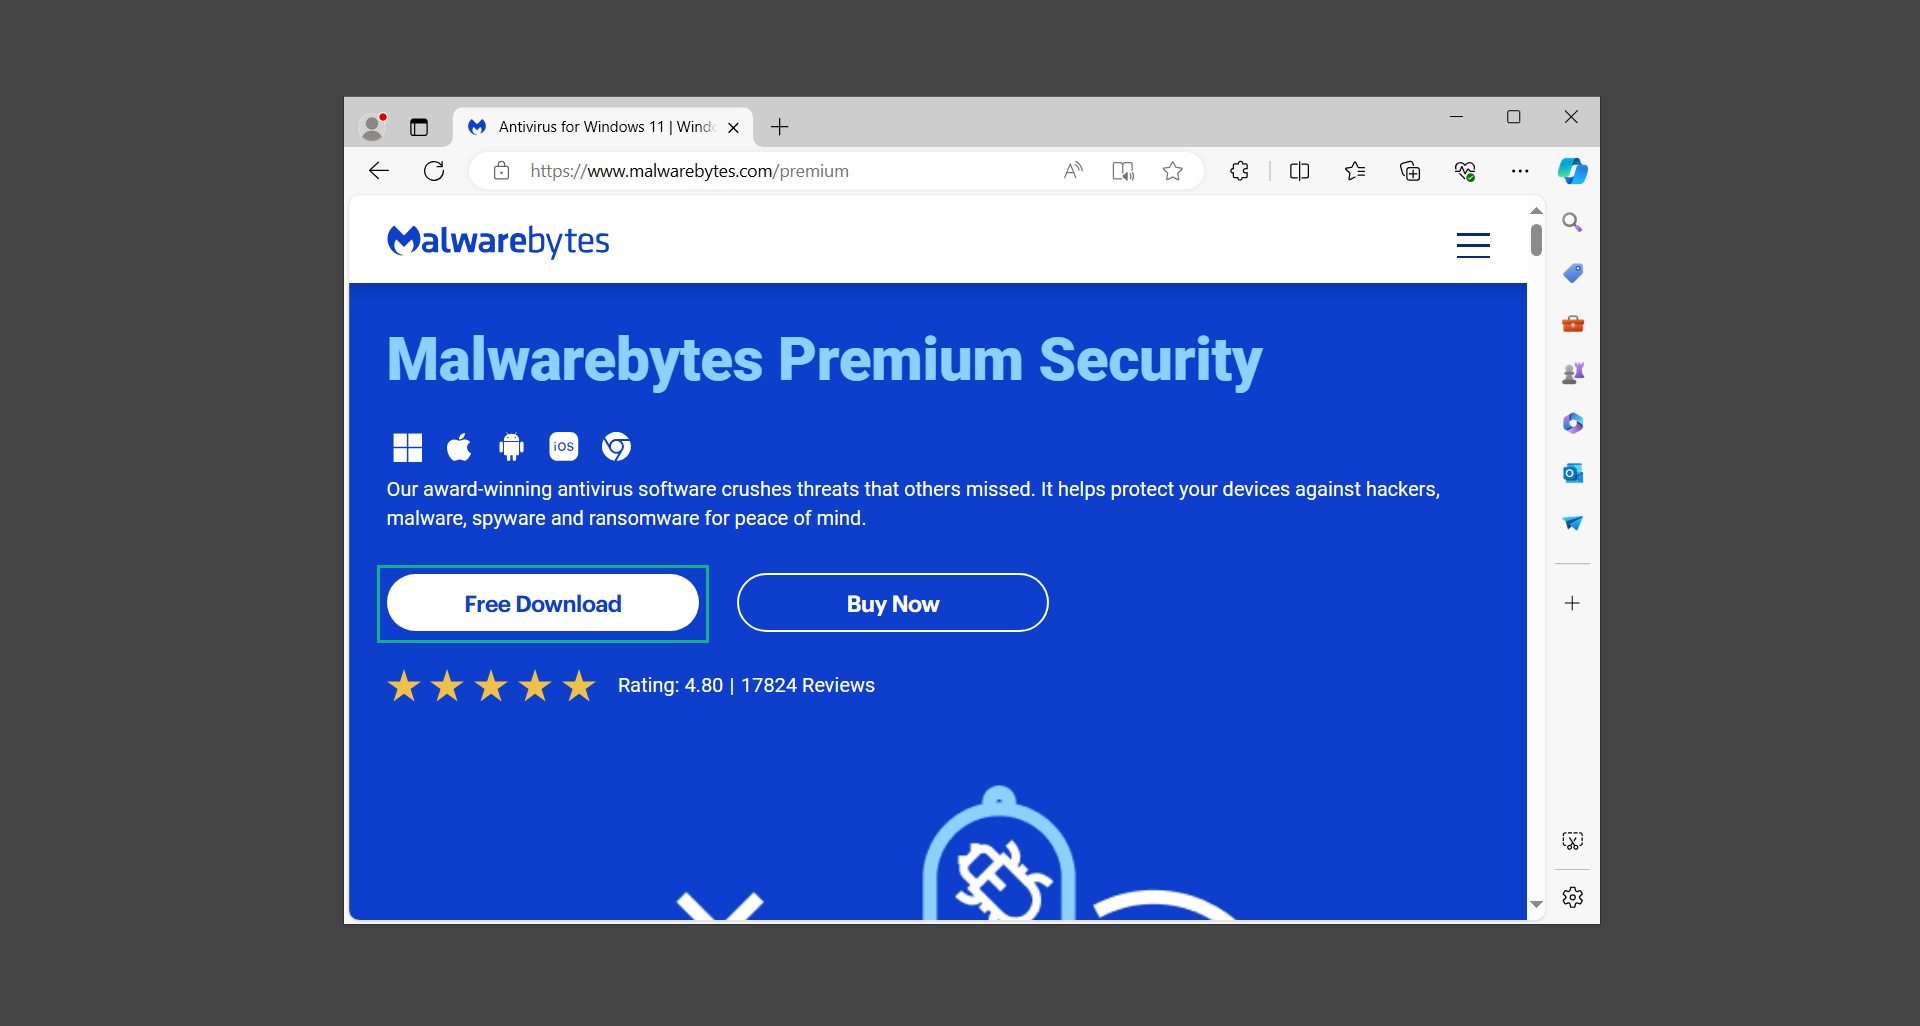
1. To begin, head over to the official website of Malwarebytes Anti-malware and click the Free Download button.
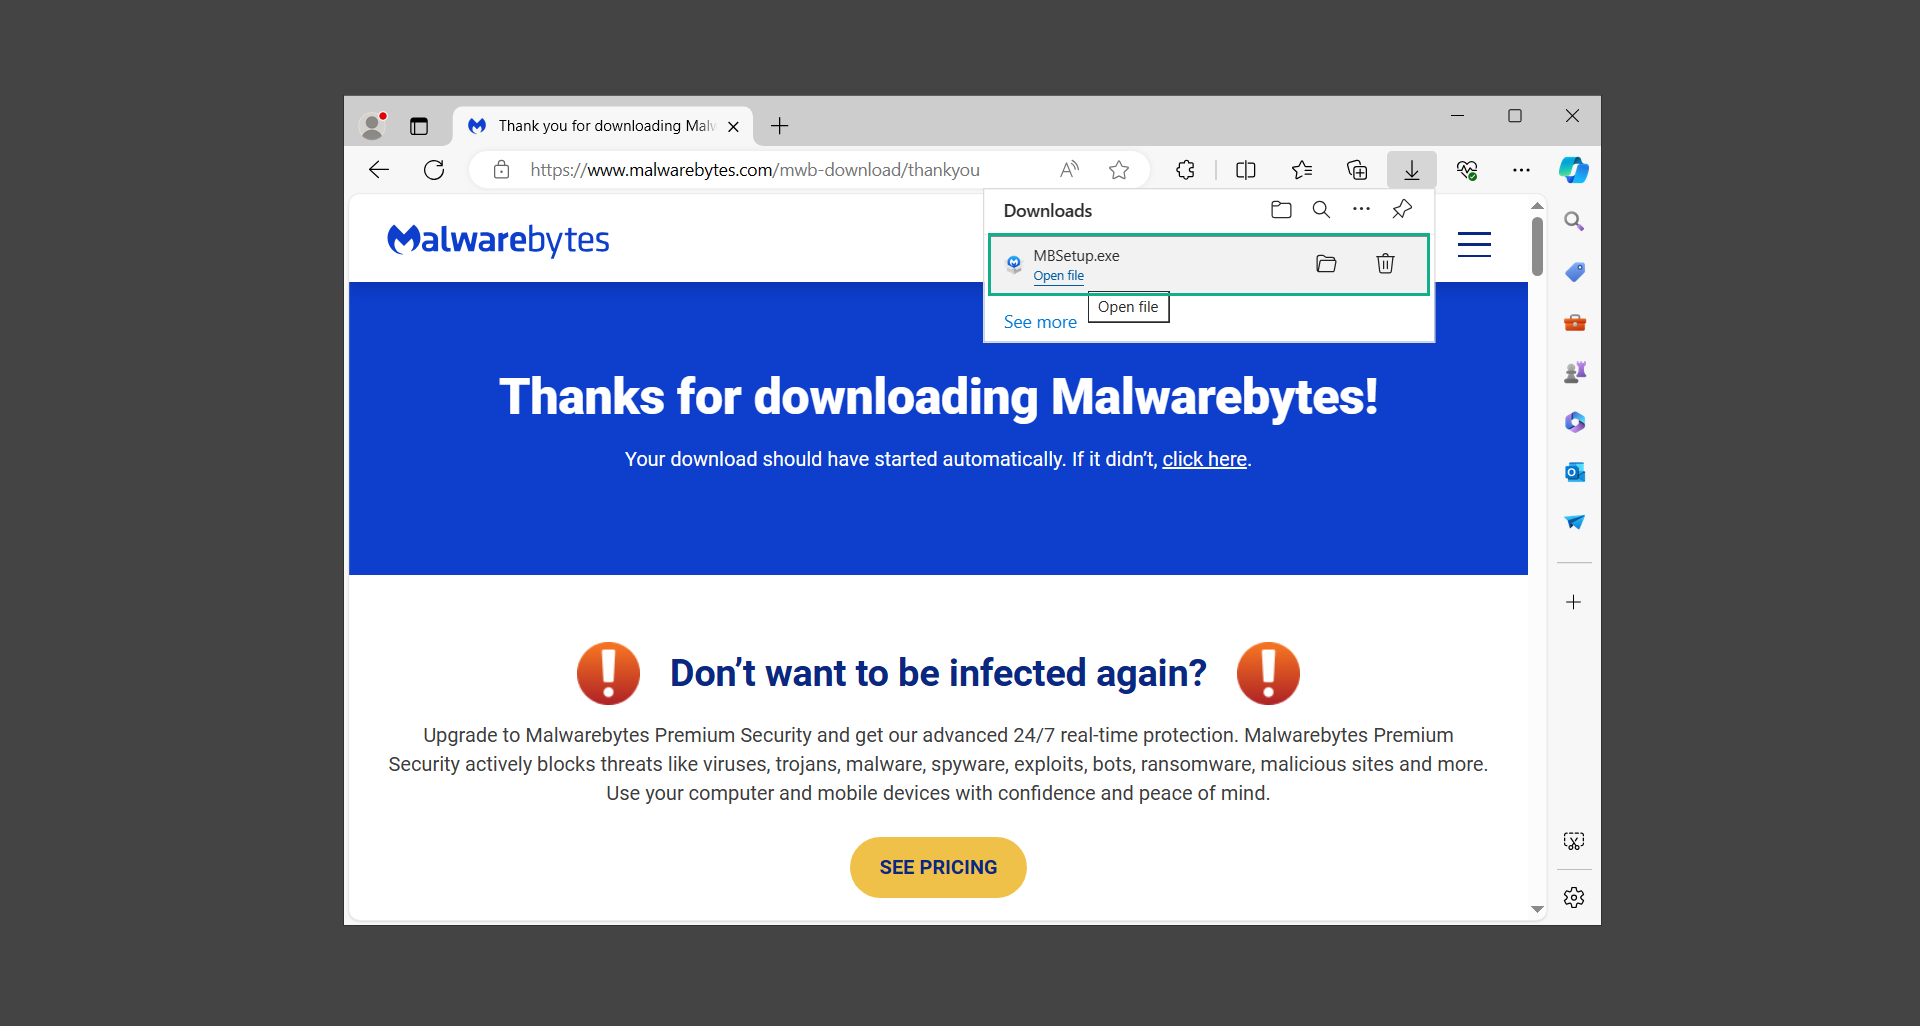
2. Malwarebytes will begin downloading the installation file (MBSetup.exe). Run the executable file after it has finished the download.
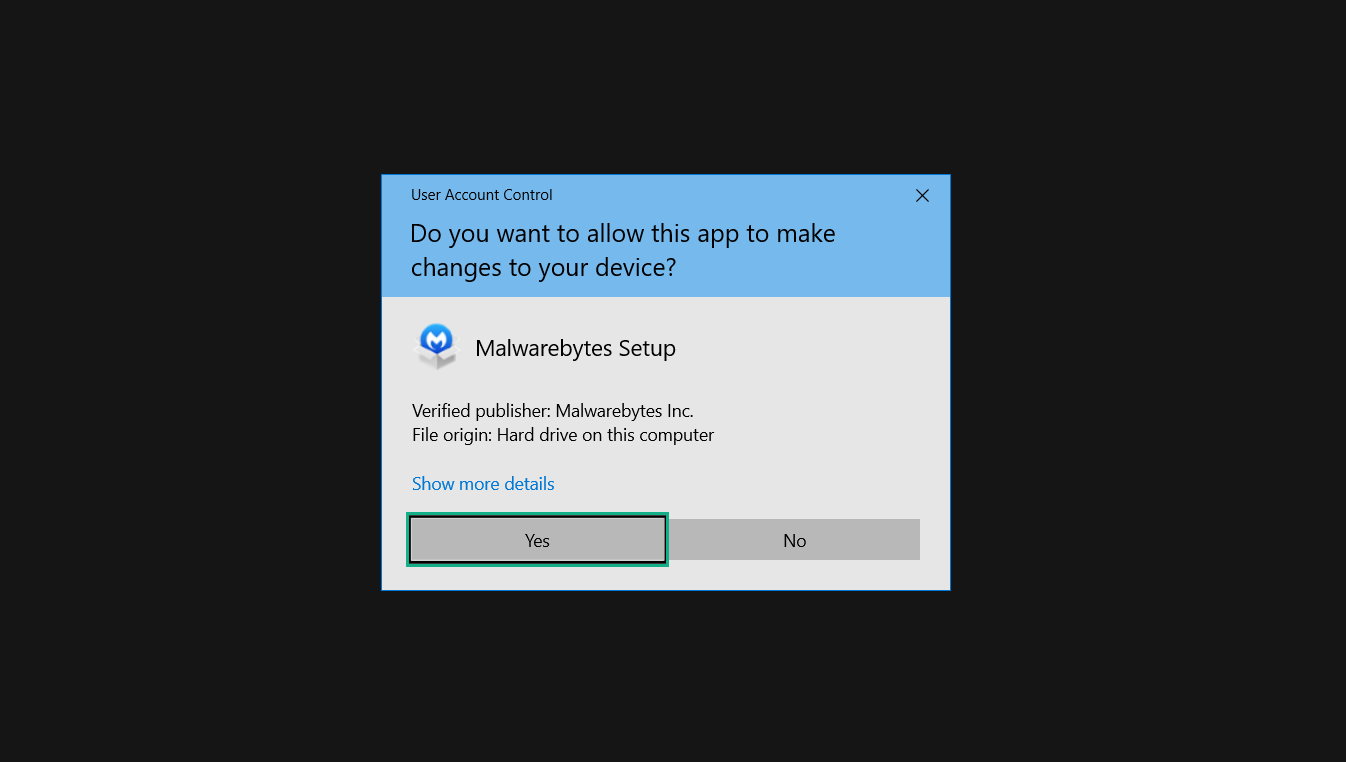
3. The User Account Control window may pop up, simply click Yes to allow the program to run.
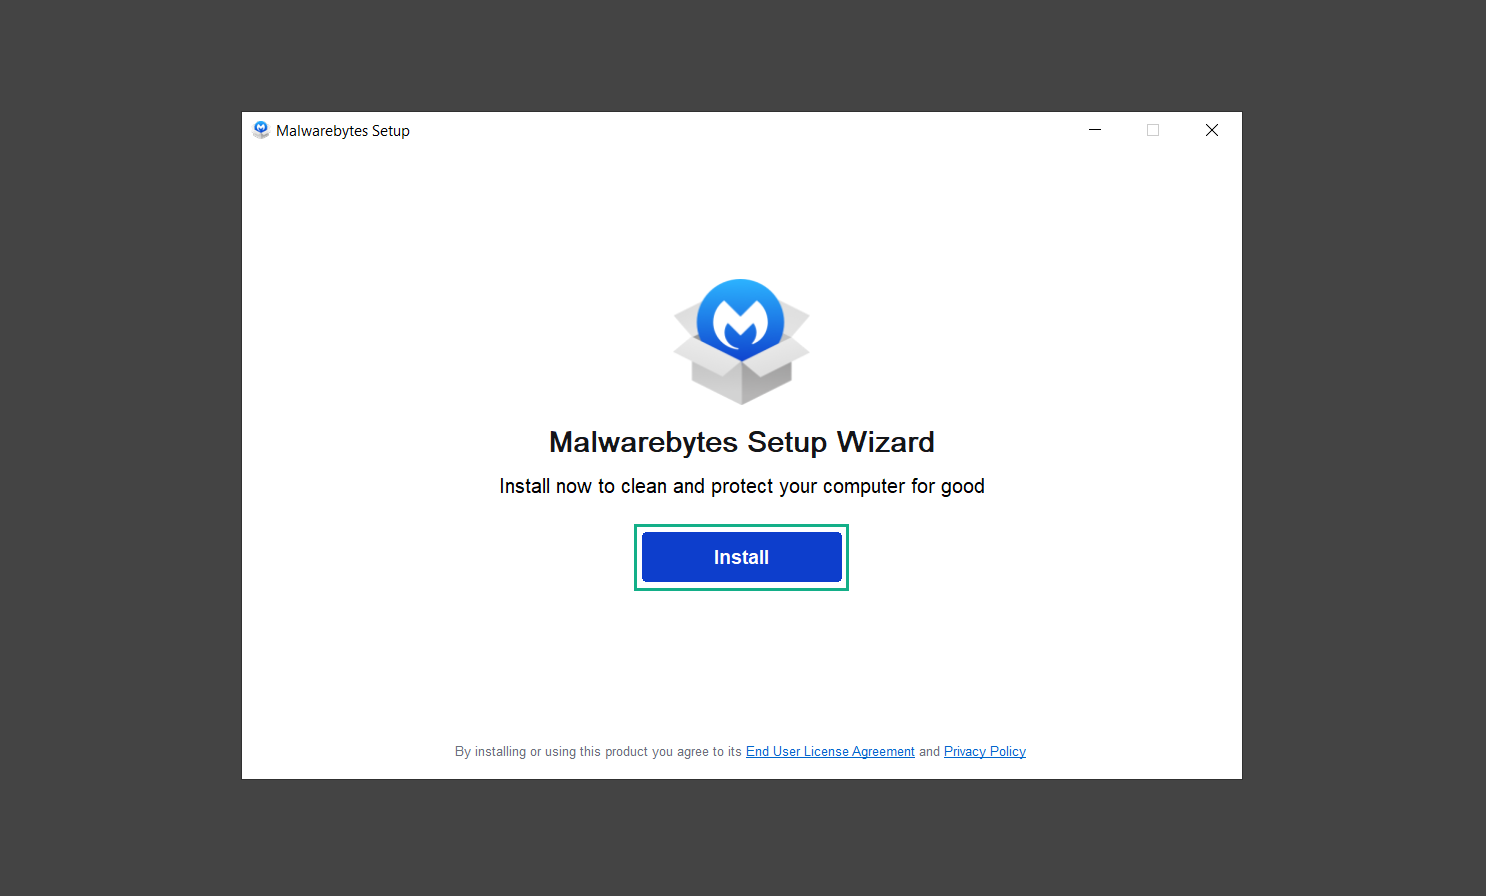
4. The Malwarebytes setup wizard will launch, click on the Install button to proceed.
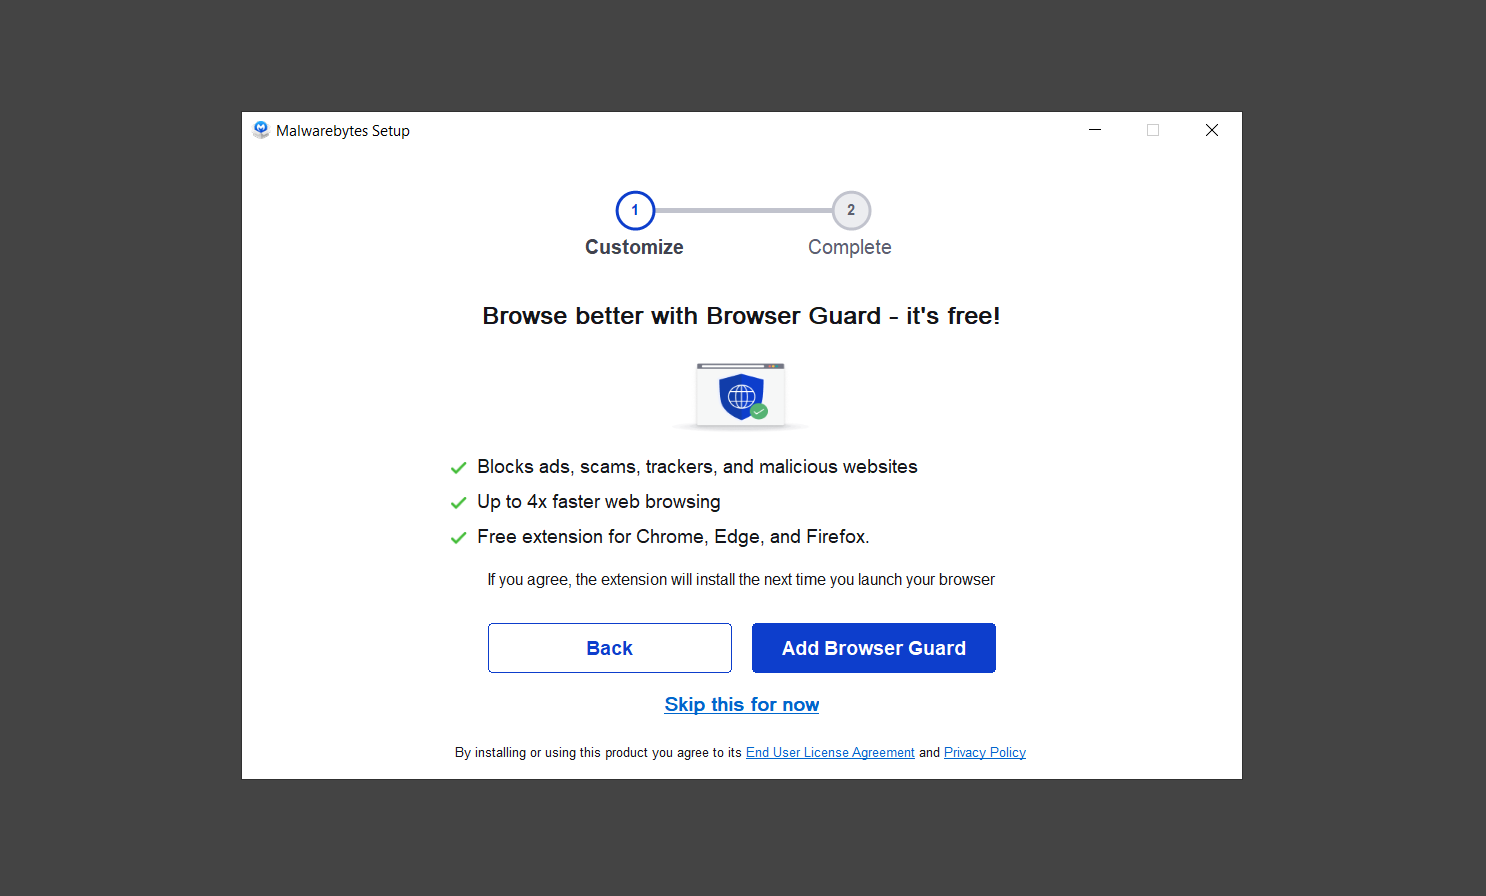
5. Malwarebytes will ask you to install the Browser Guard extension. You can opt to download it, depending on whether you want it on your browser or not (It is completely free).
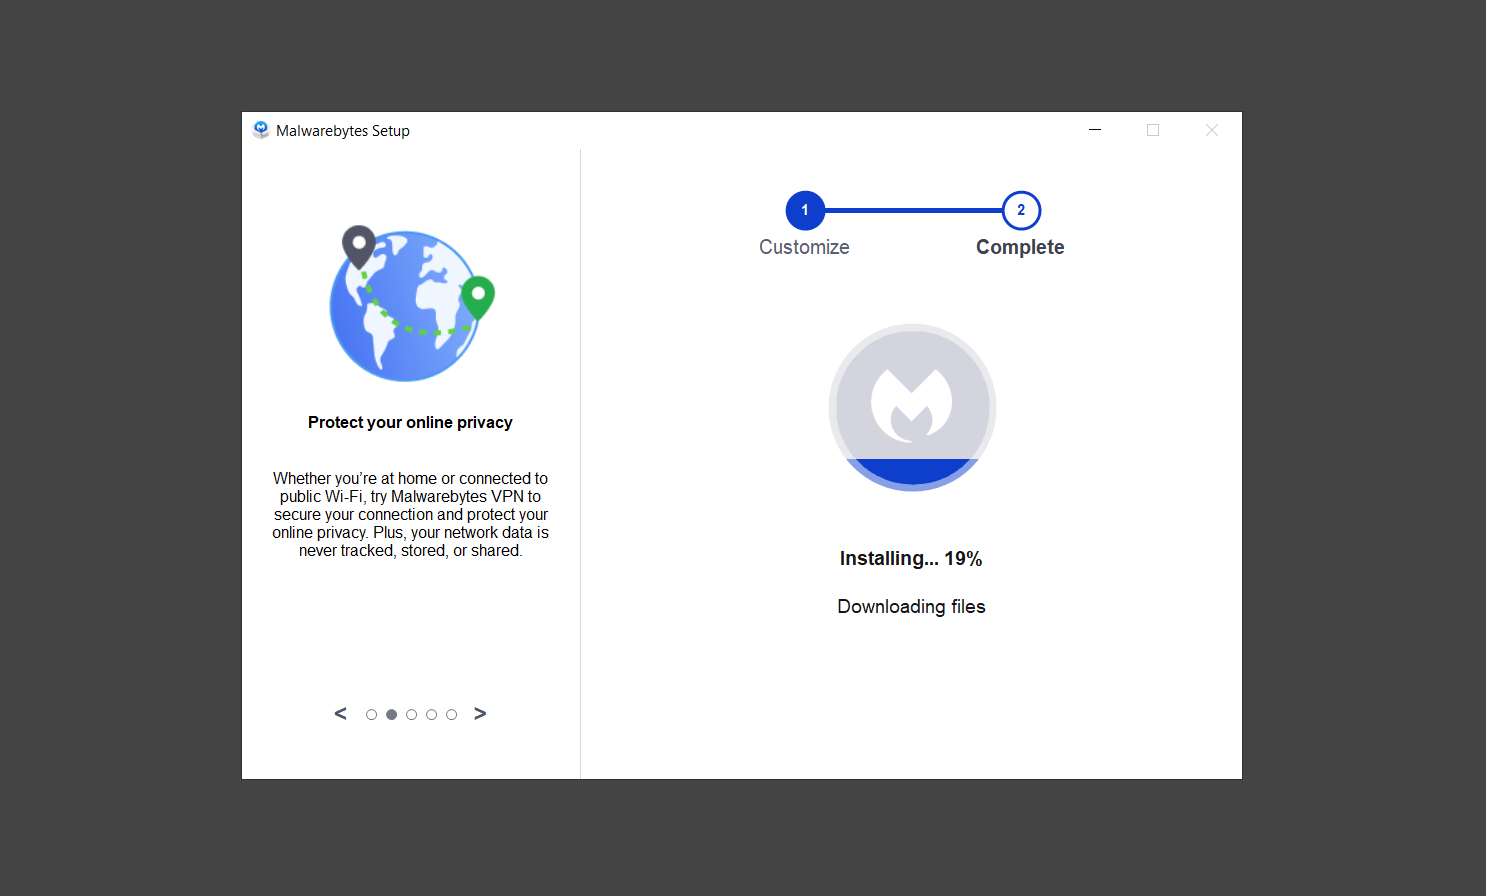
6. Please wait as the Malwarebytes Setup installs the antimalware program. Follow the on-screen instructions until you have successfully installed Malwarebytes.
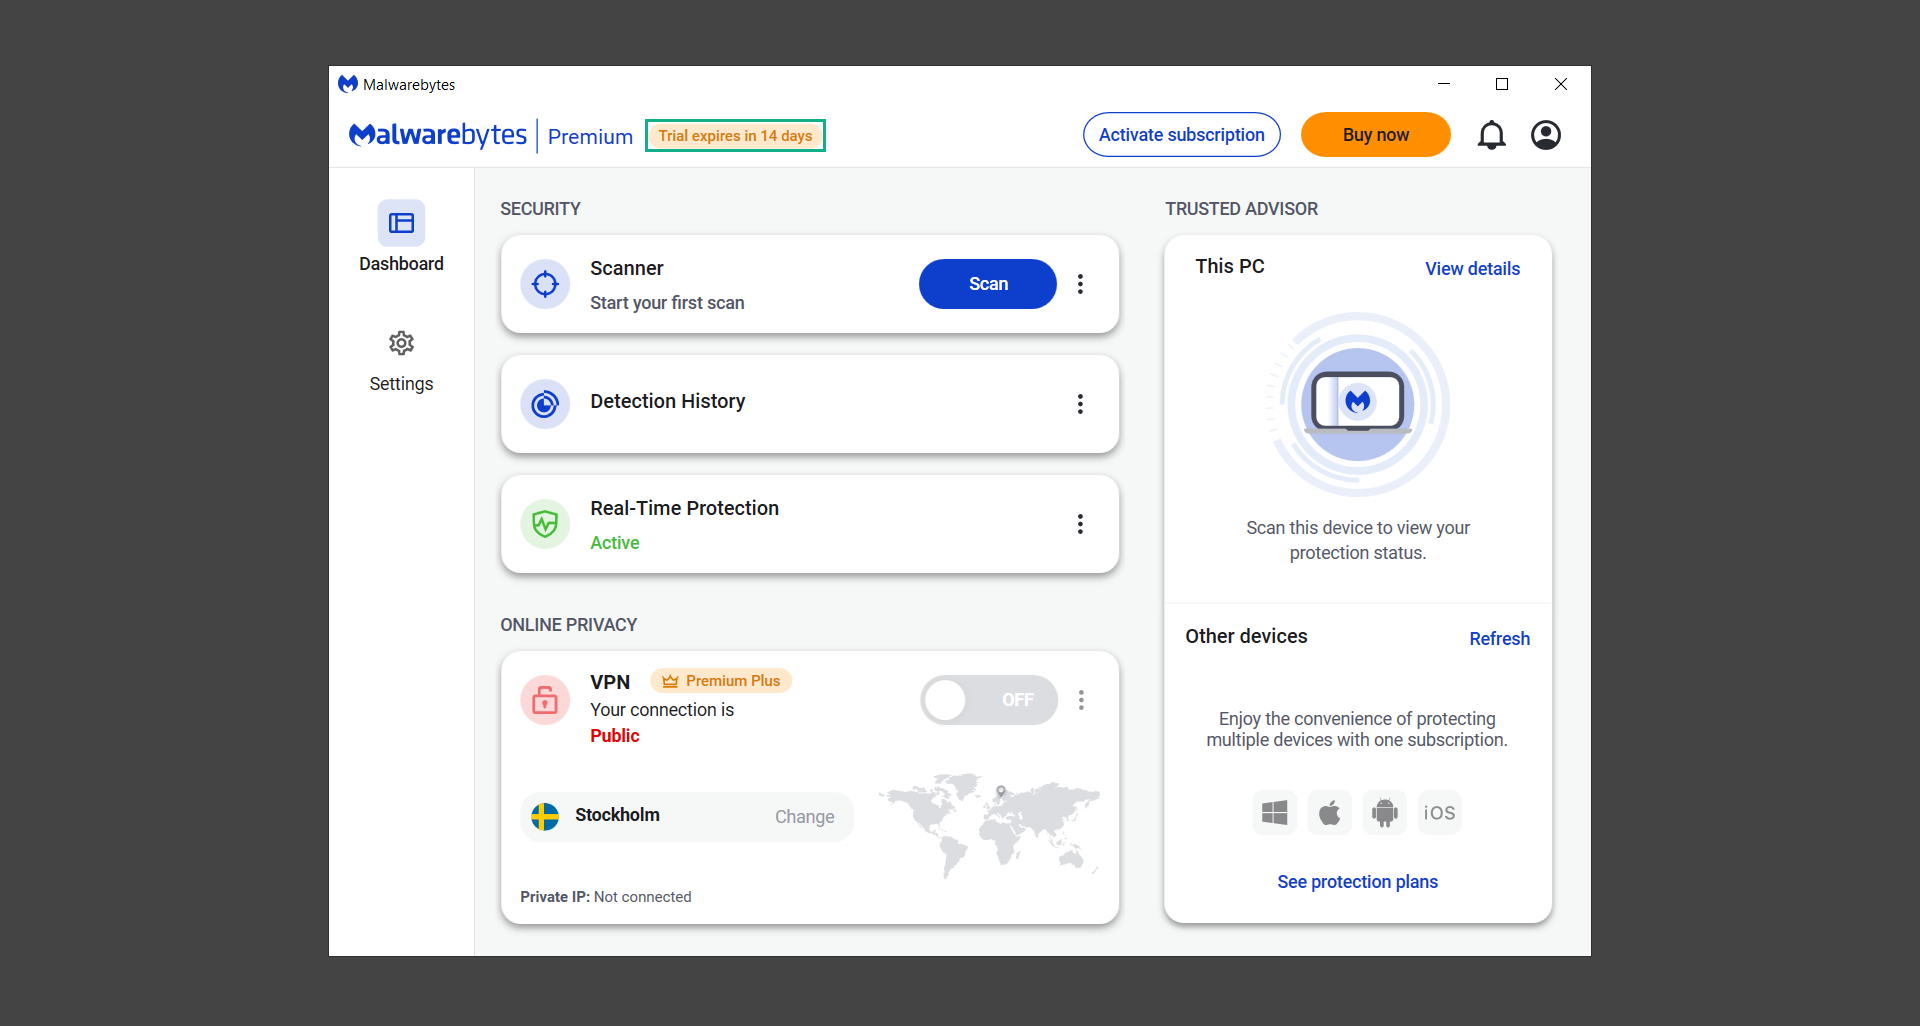
7. Now that Malwarebytes Anti-malware is installed, begin by opening the program for the first time. You will receive a 14-day free trial if this is the first time you install Malwarebytes.
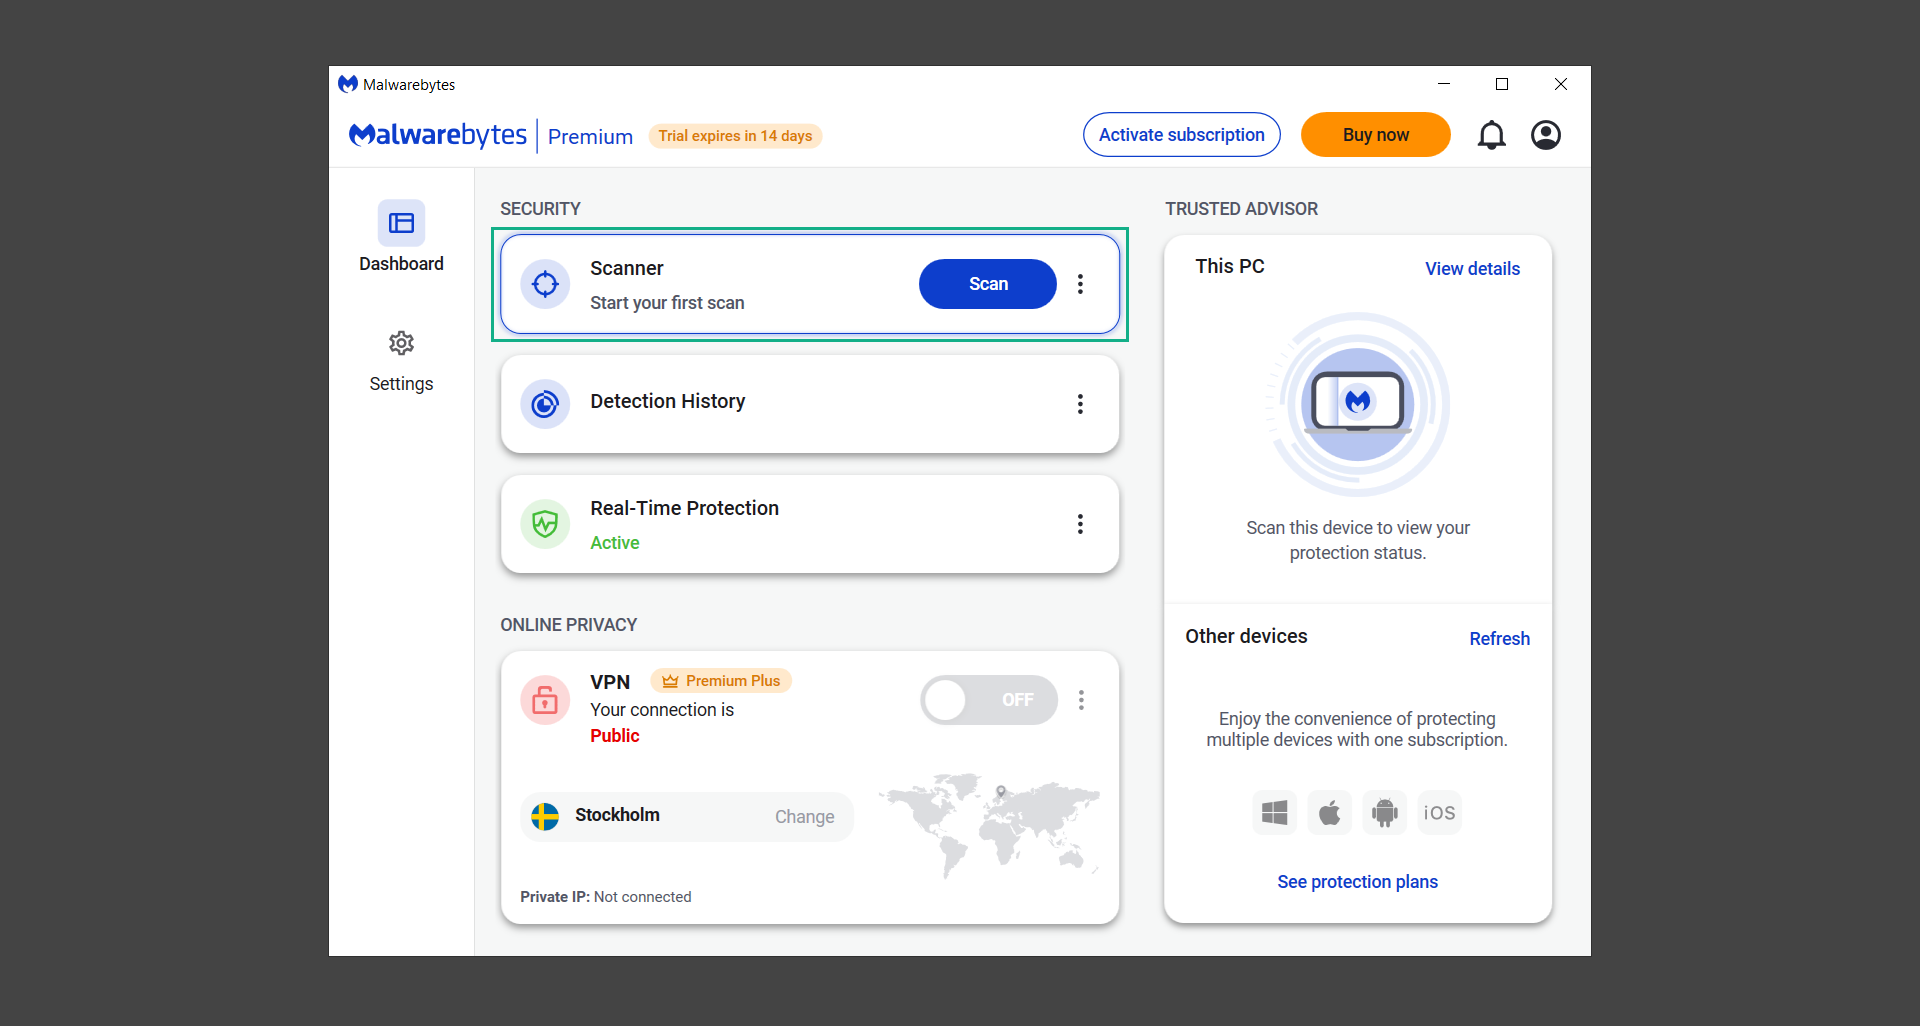
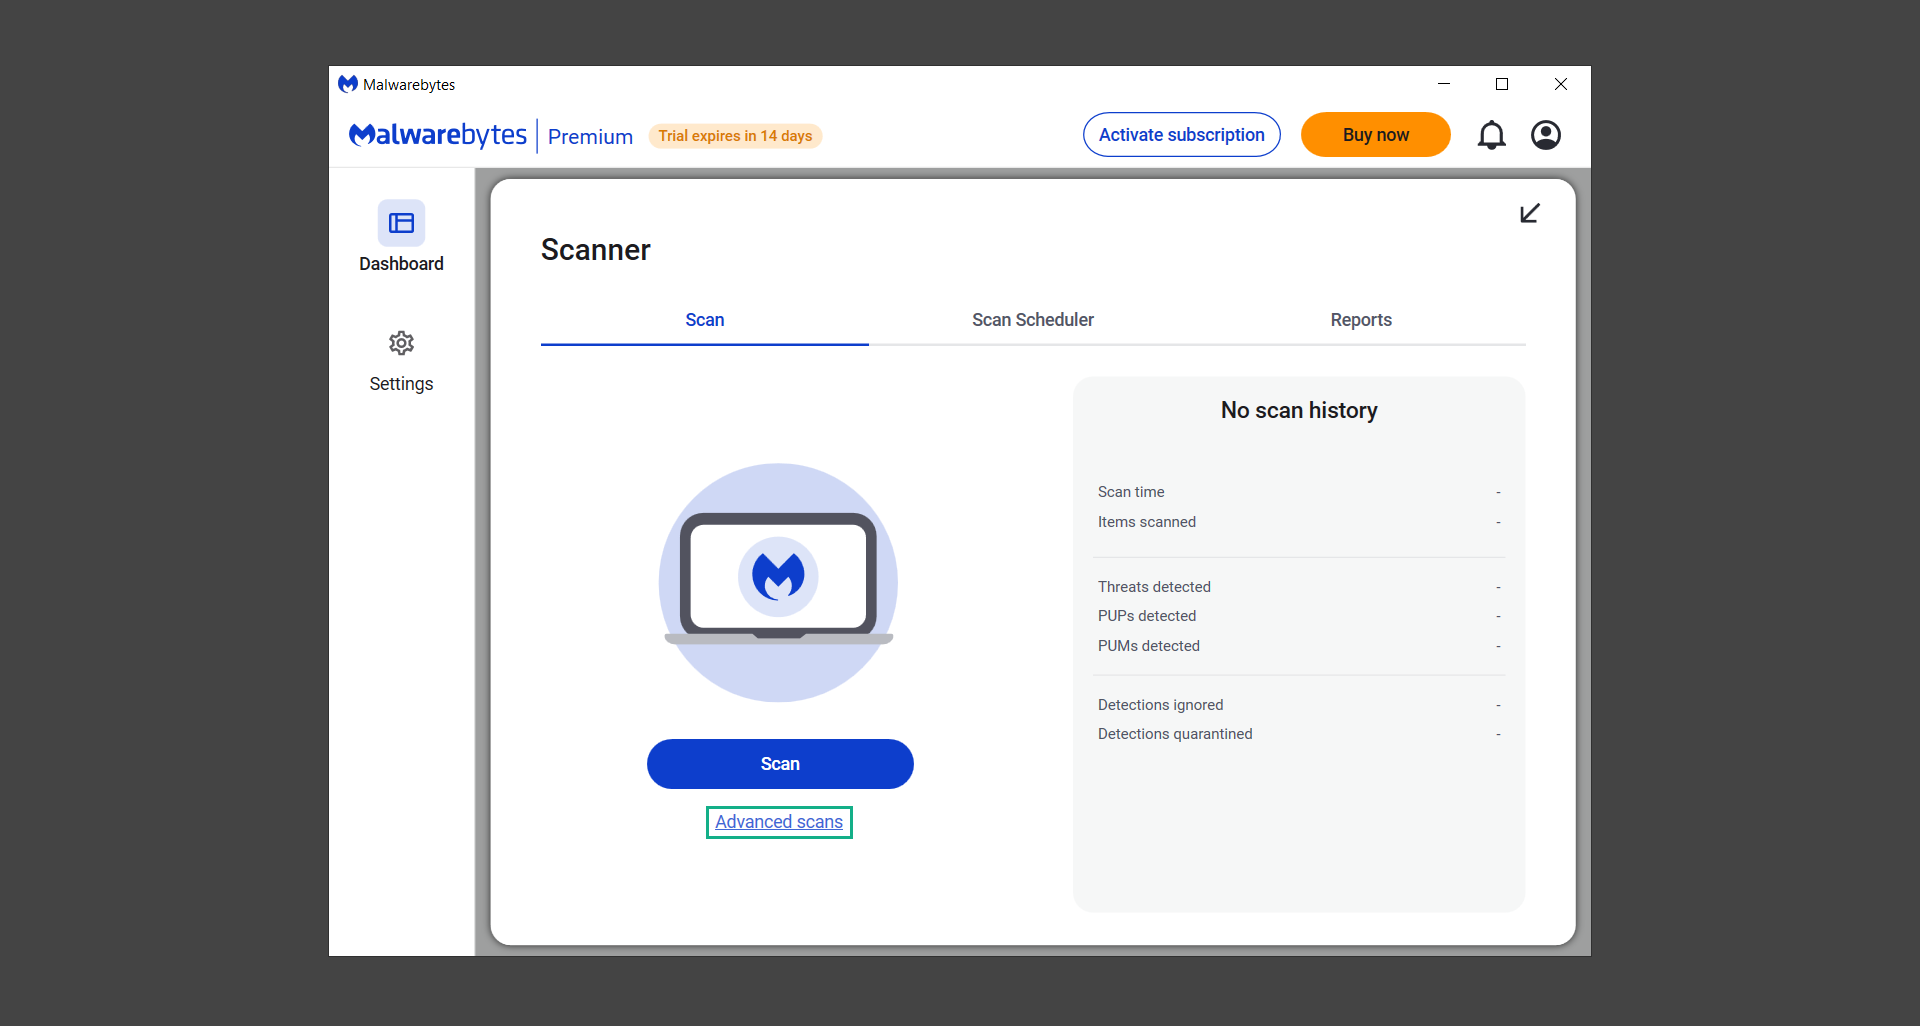
8. You will be taken to the main dashboard of the program, from here, we can begin scanning the computer by clicking the Scanner box at the middle.
9. Once you are on the Scanner page, you will not click Scan just yet. Instead, click on Advanced scans below it.
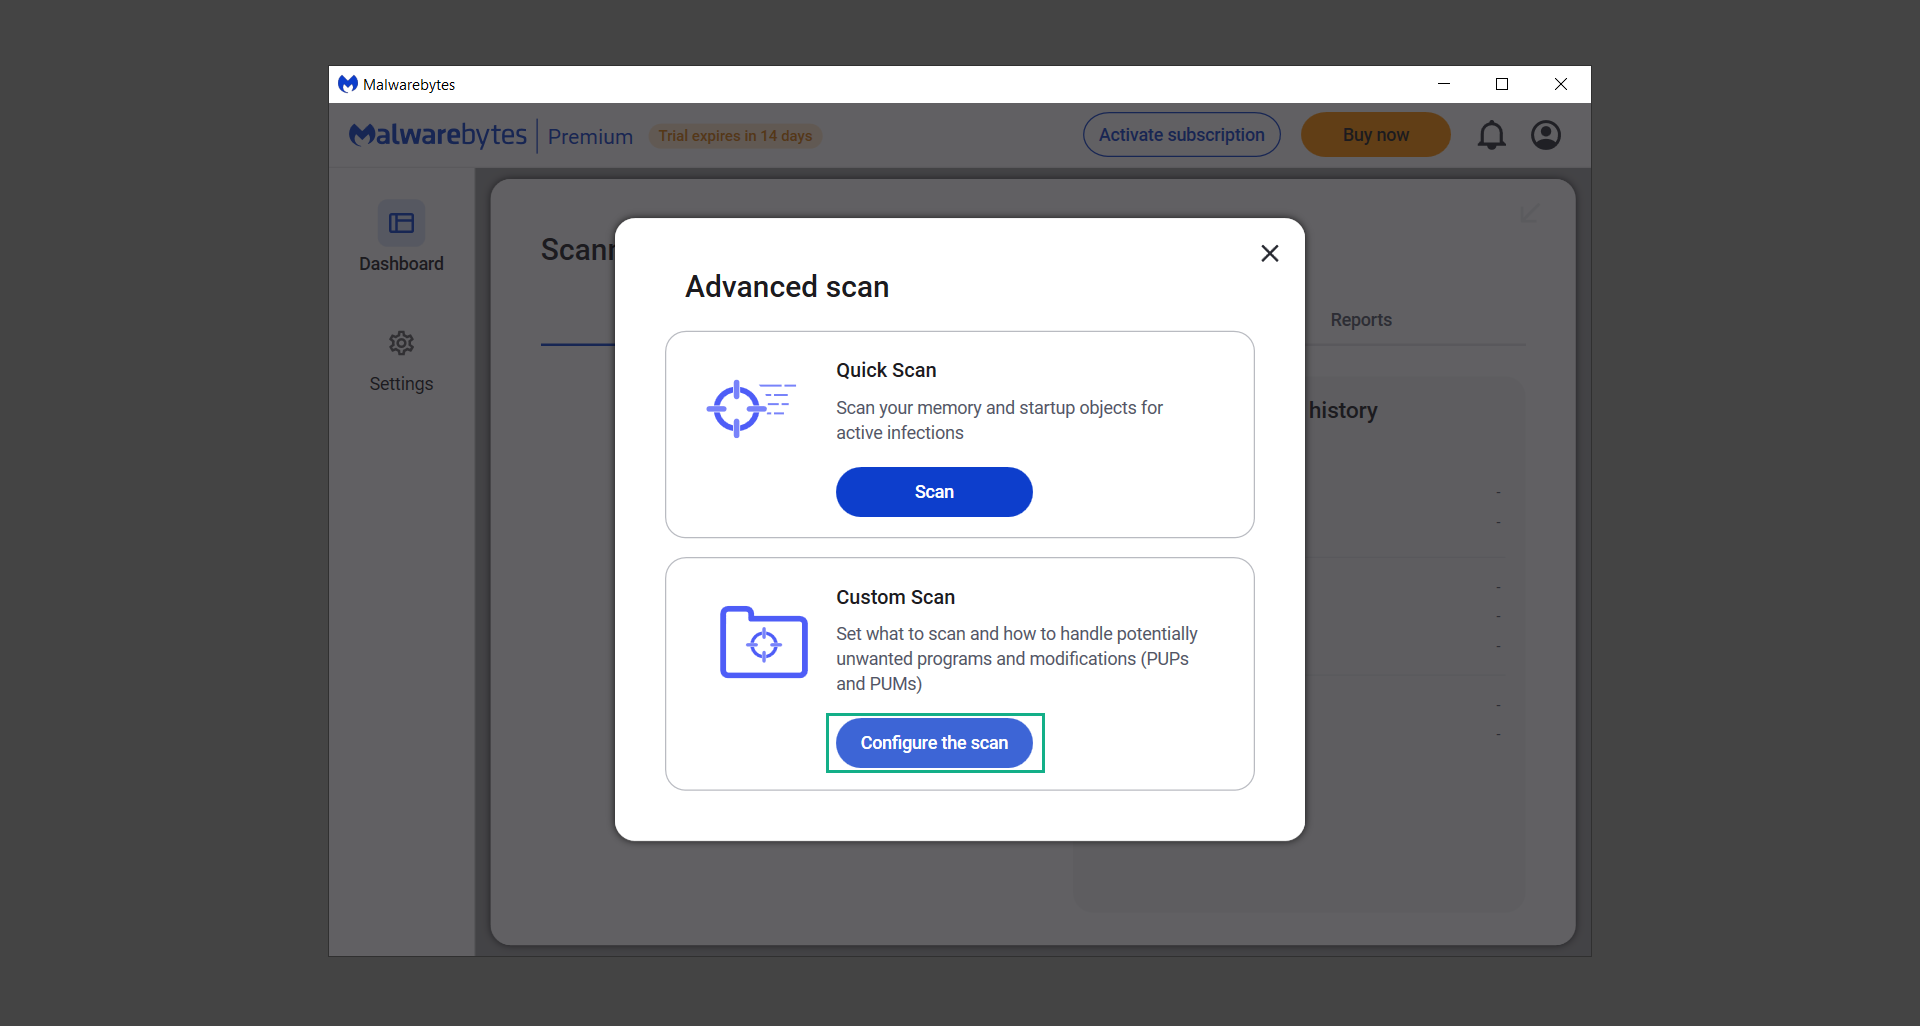
10. Click on Configure scan inside the Custom scan section. This will allow us to customize how the program scans the computer. Simply hitting scan upon installation won’t show its full potential.
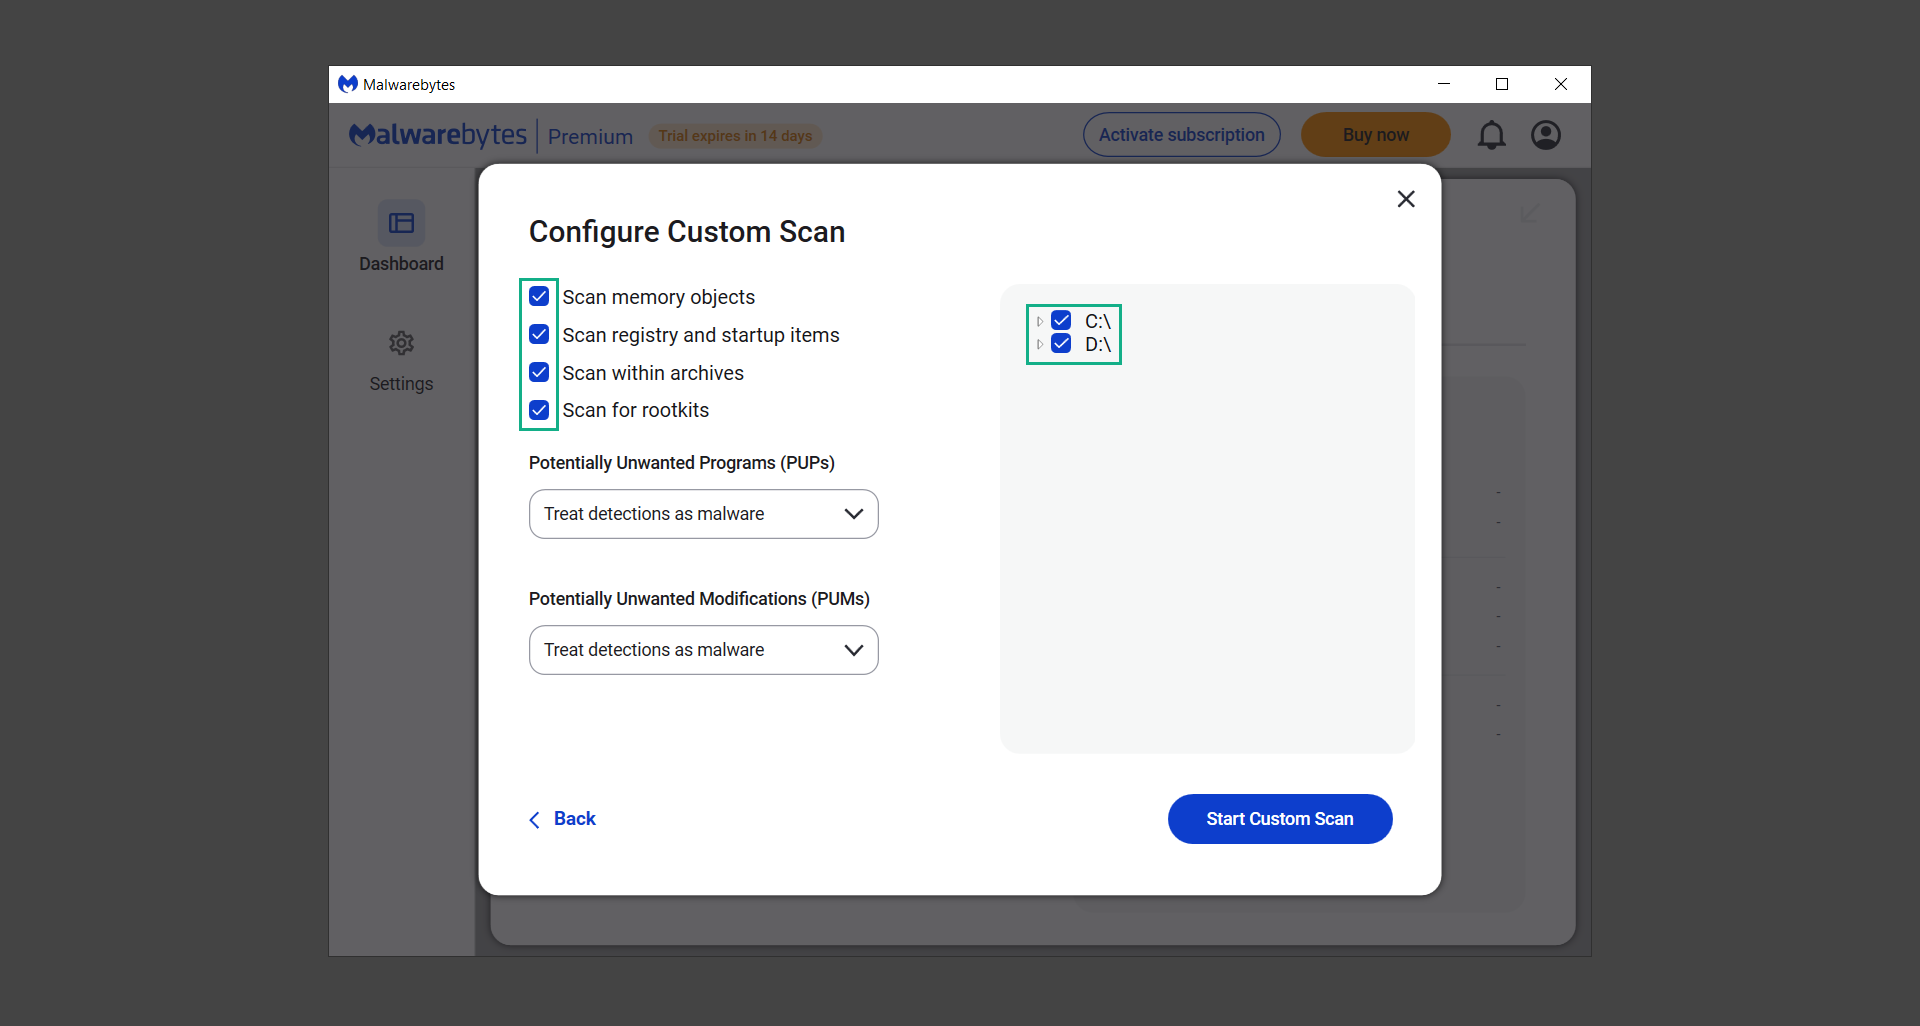
11. On the Configure Custom Scan page, check the box beside Scan for rootkits to find hidden malware. In addition, tick the boxes near all the drives you have on your computer so Malwarebytes can scan them.
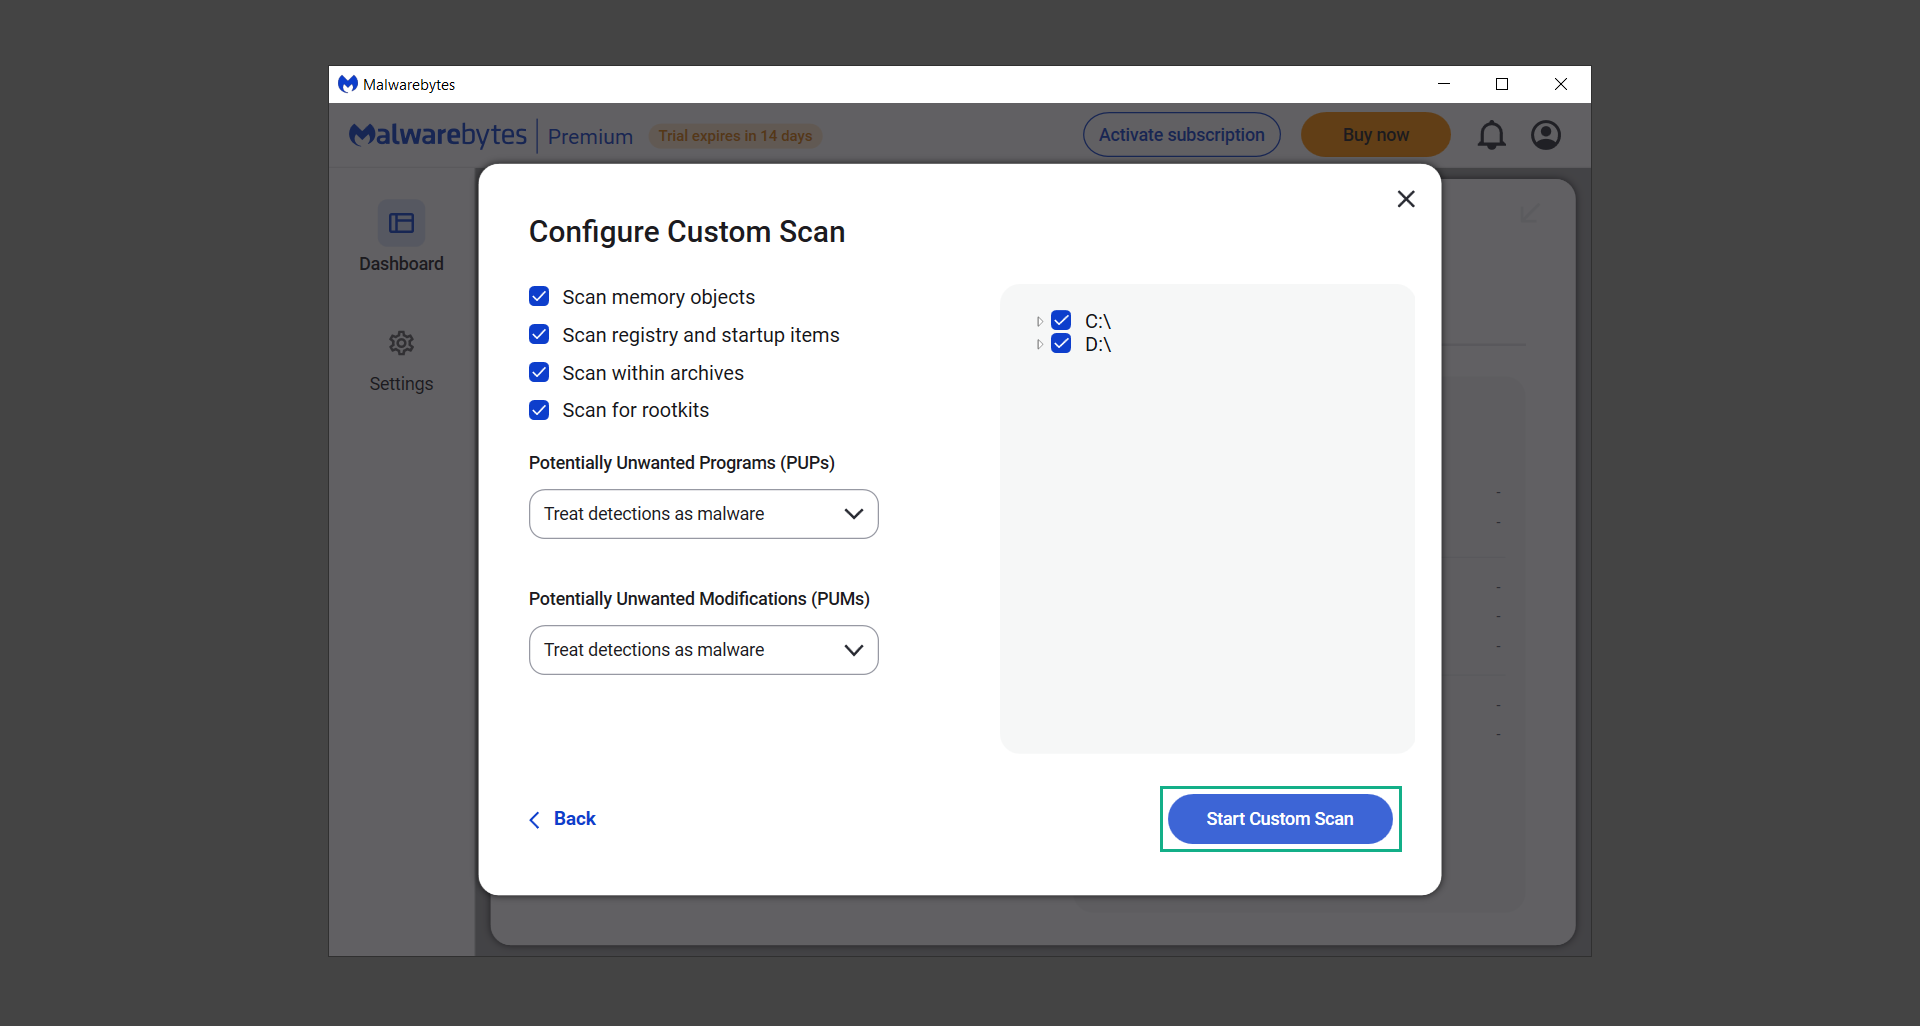
12. After configuring the Custom Scan settings, click on the Start Custom Scan button to begin the process.
13. You will see a side window showing the progress of the computer scan. Please wait until Malwarebytes has scanned the whole system for malware.
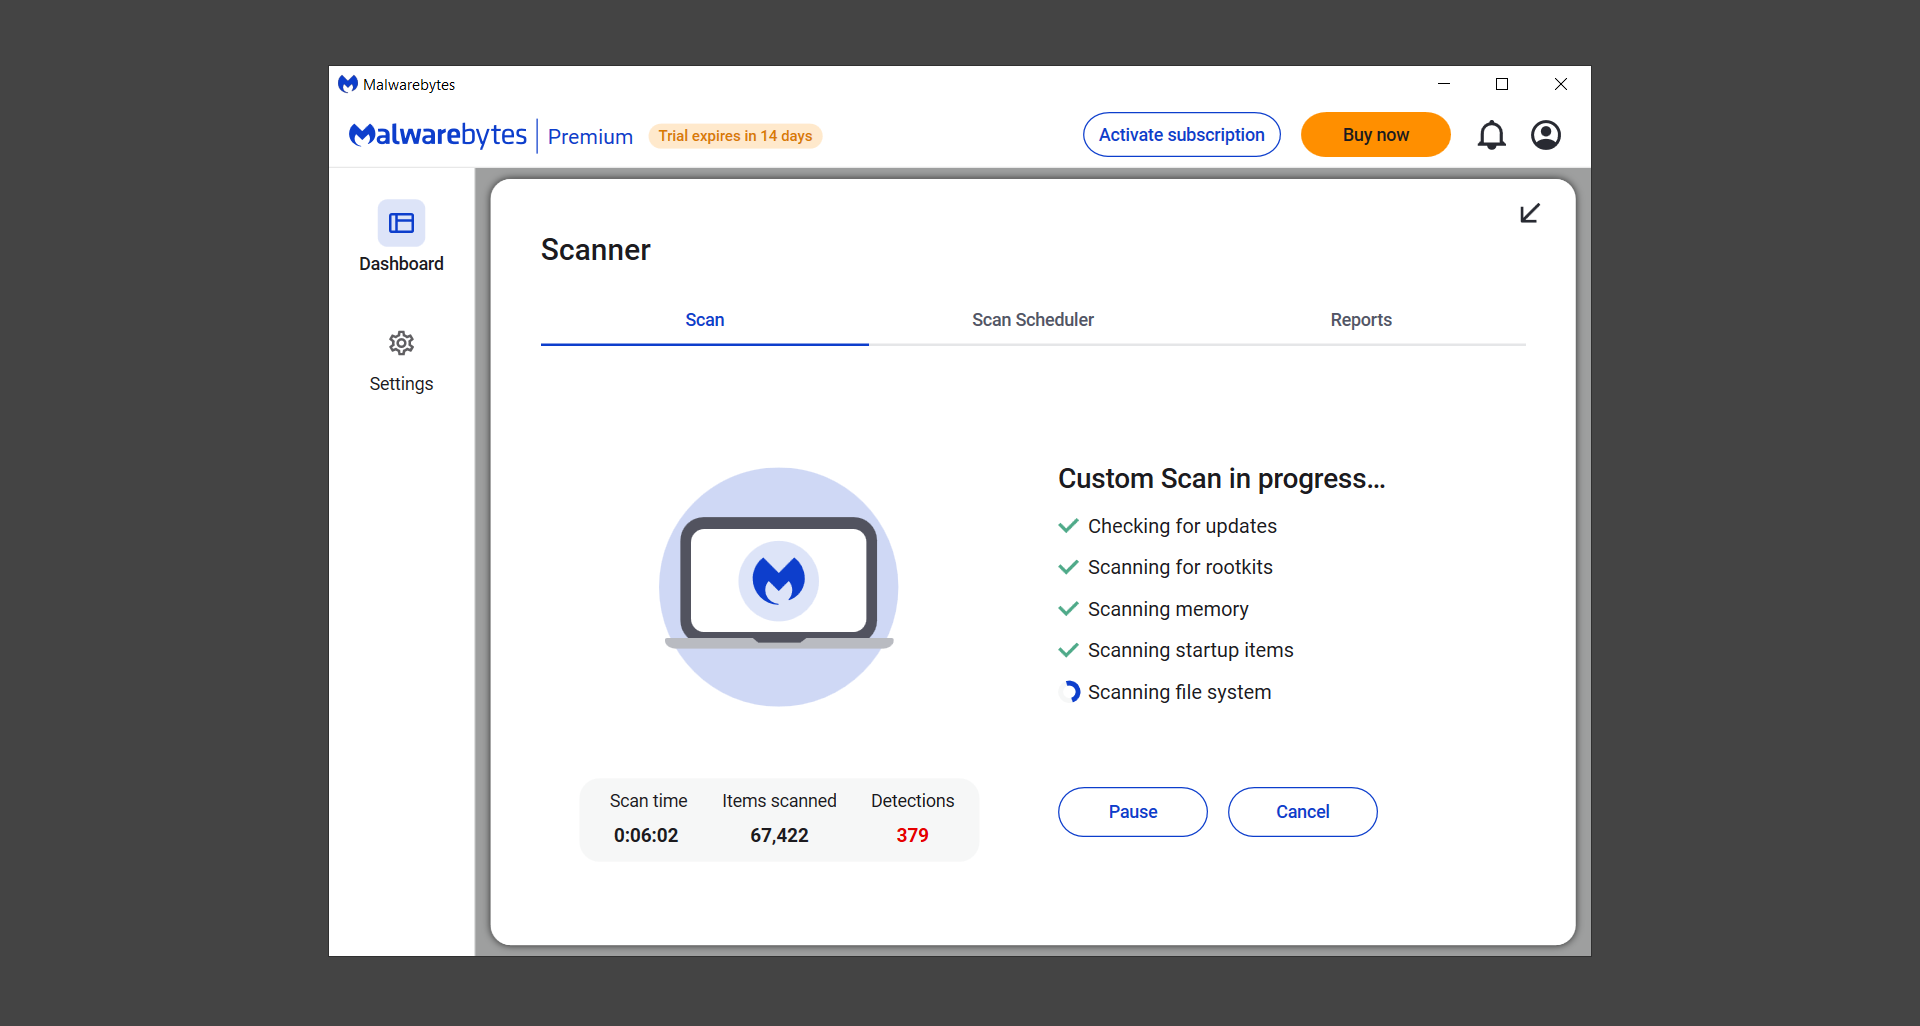
14. Once the scan is complete, a list of detected threats will show up. Check the boxes near all the malicious files and get rid of them from the computer by clicking Quarantine.
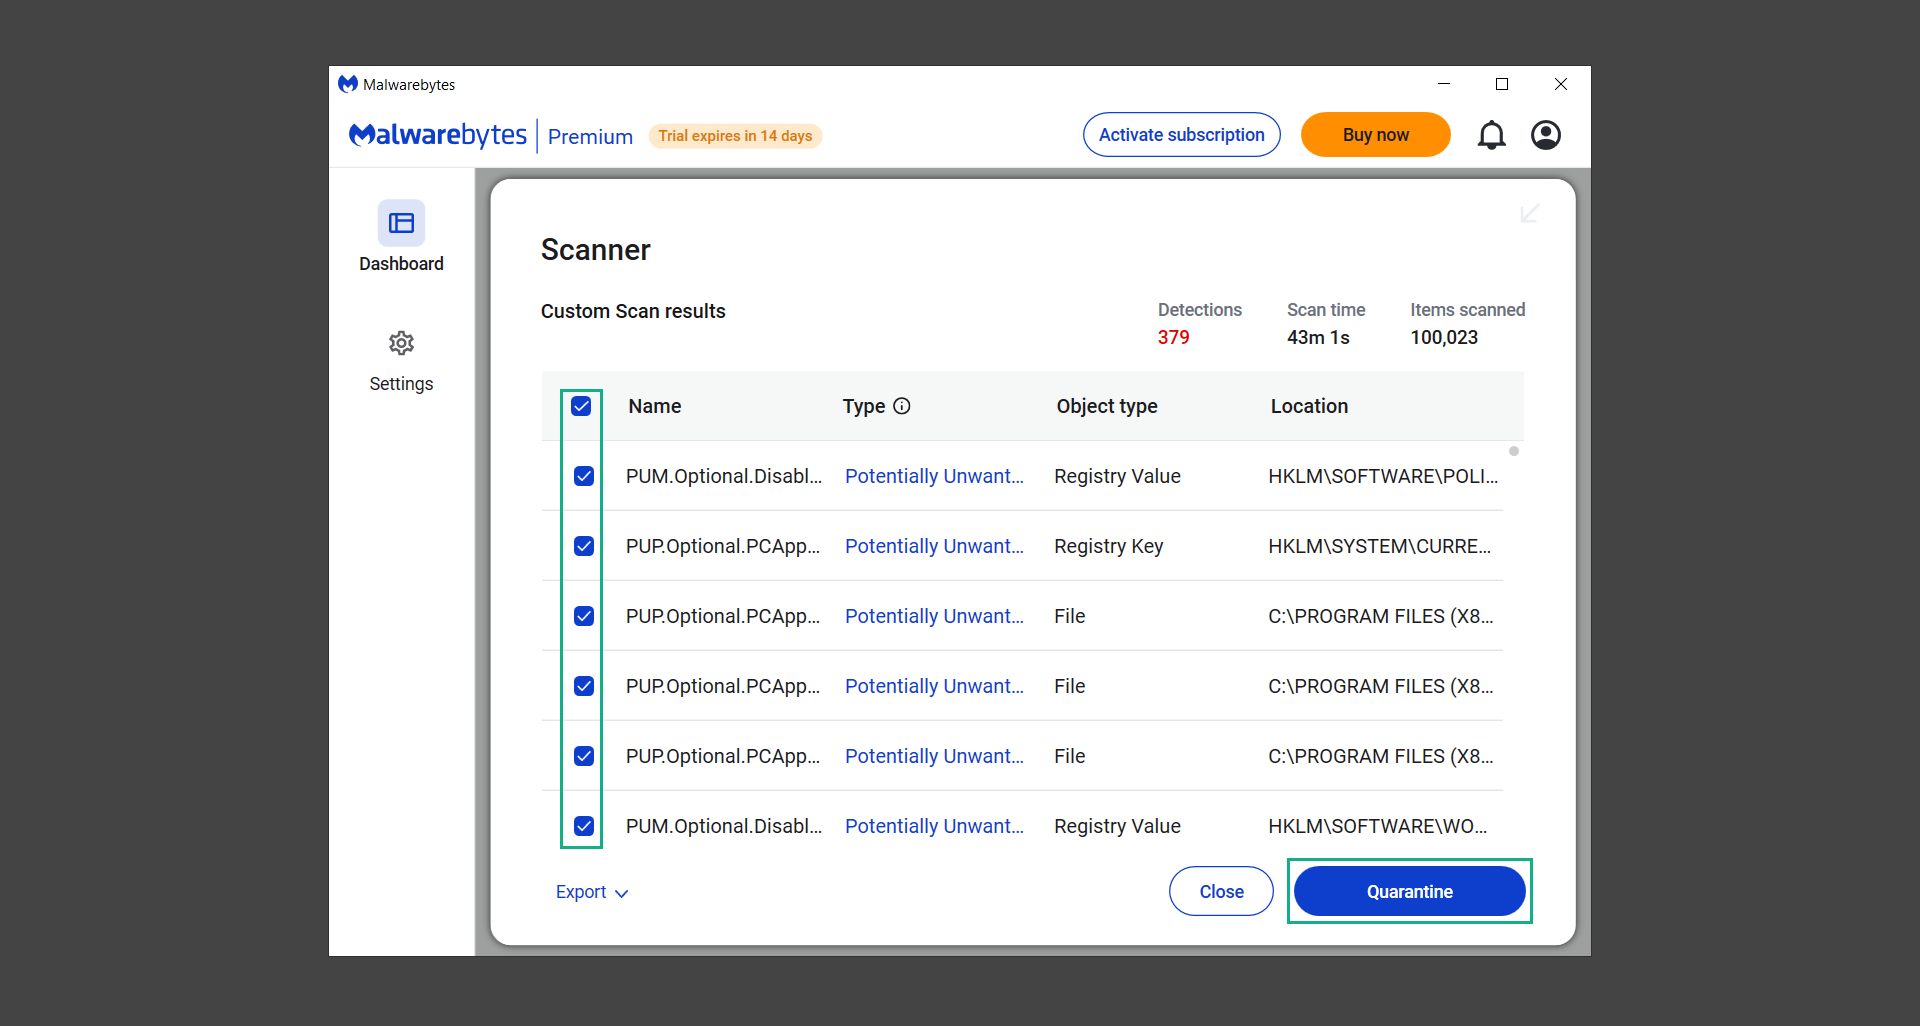
Malwarebytes may require a computer restart, please do so if prompted.
Since the first three programs mentioned above are all portable, you can always run them straight from your downloads folder whenever you feel the presence of malware in your computer. We recommend that you organize them all into a single folder for future use.
Step 6: Reset the web browser to default settings
When it comes to browser-targeted malware, it will alter the browser settings for the threat to persist. Therefore simply changing the search engine back to default may not work in many cases.
So we should reset the web browser to its default settings from when it was first installed. This will get rid of all the configurations the malware has set.
Note: Resetting the browser will get rid of all the data except for saved bookmarks and passwords.
- Google Chrome
- Mozilla Firefox
- Microsoft Edge
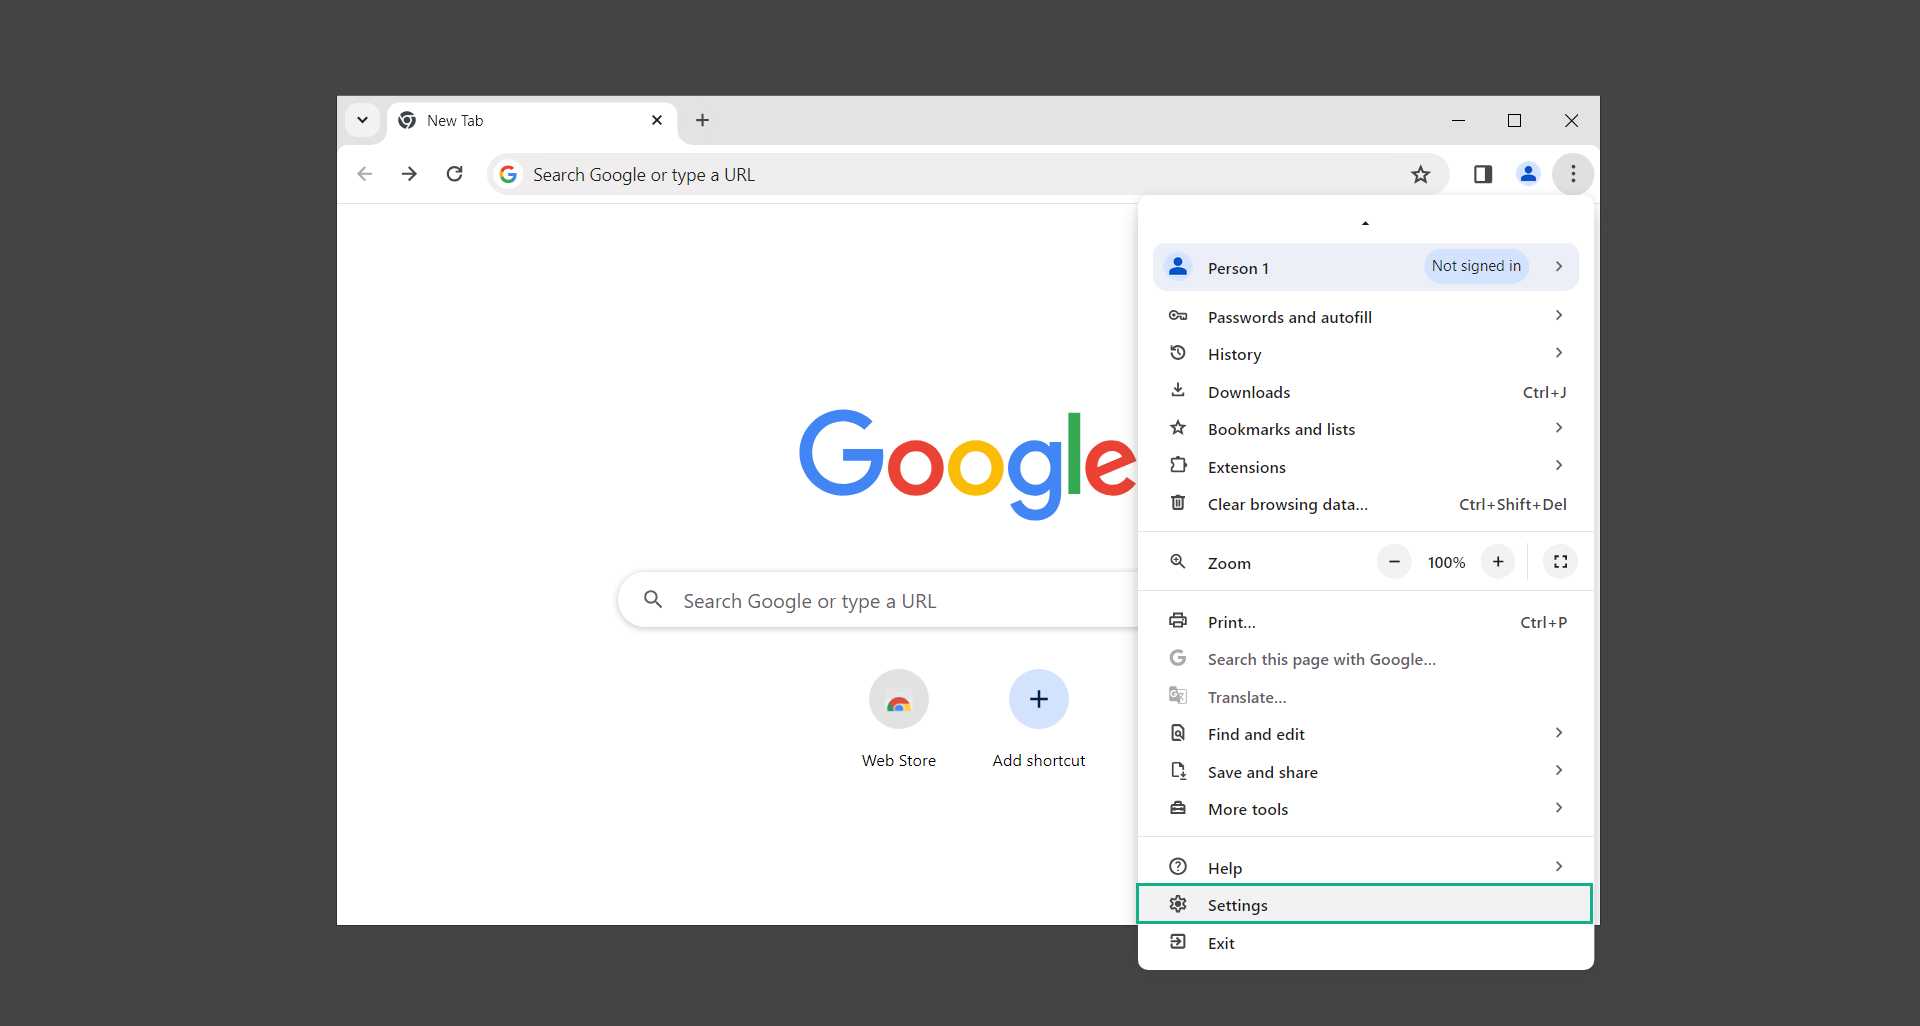
1. Open the Chrome browser and click the three horizontal dots at the upper-right corner of the screen.

2. On the dropdown menu, scroll down to the bottom and click Settings.
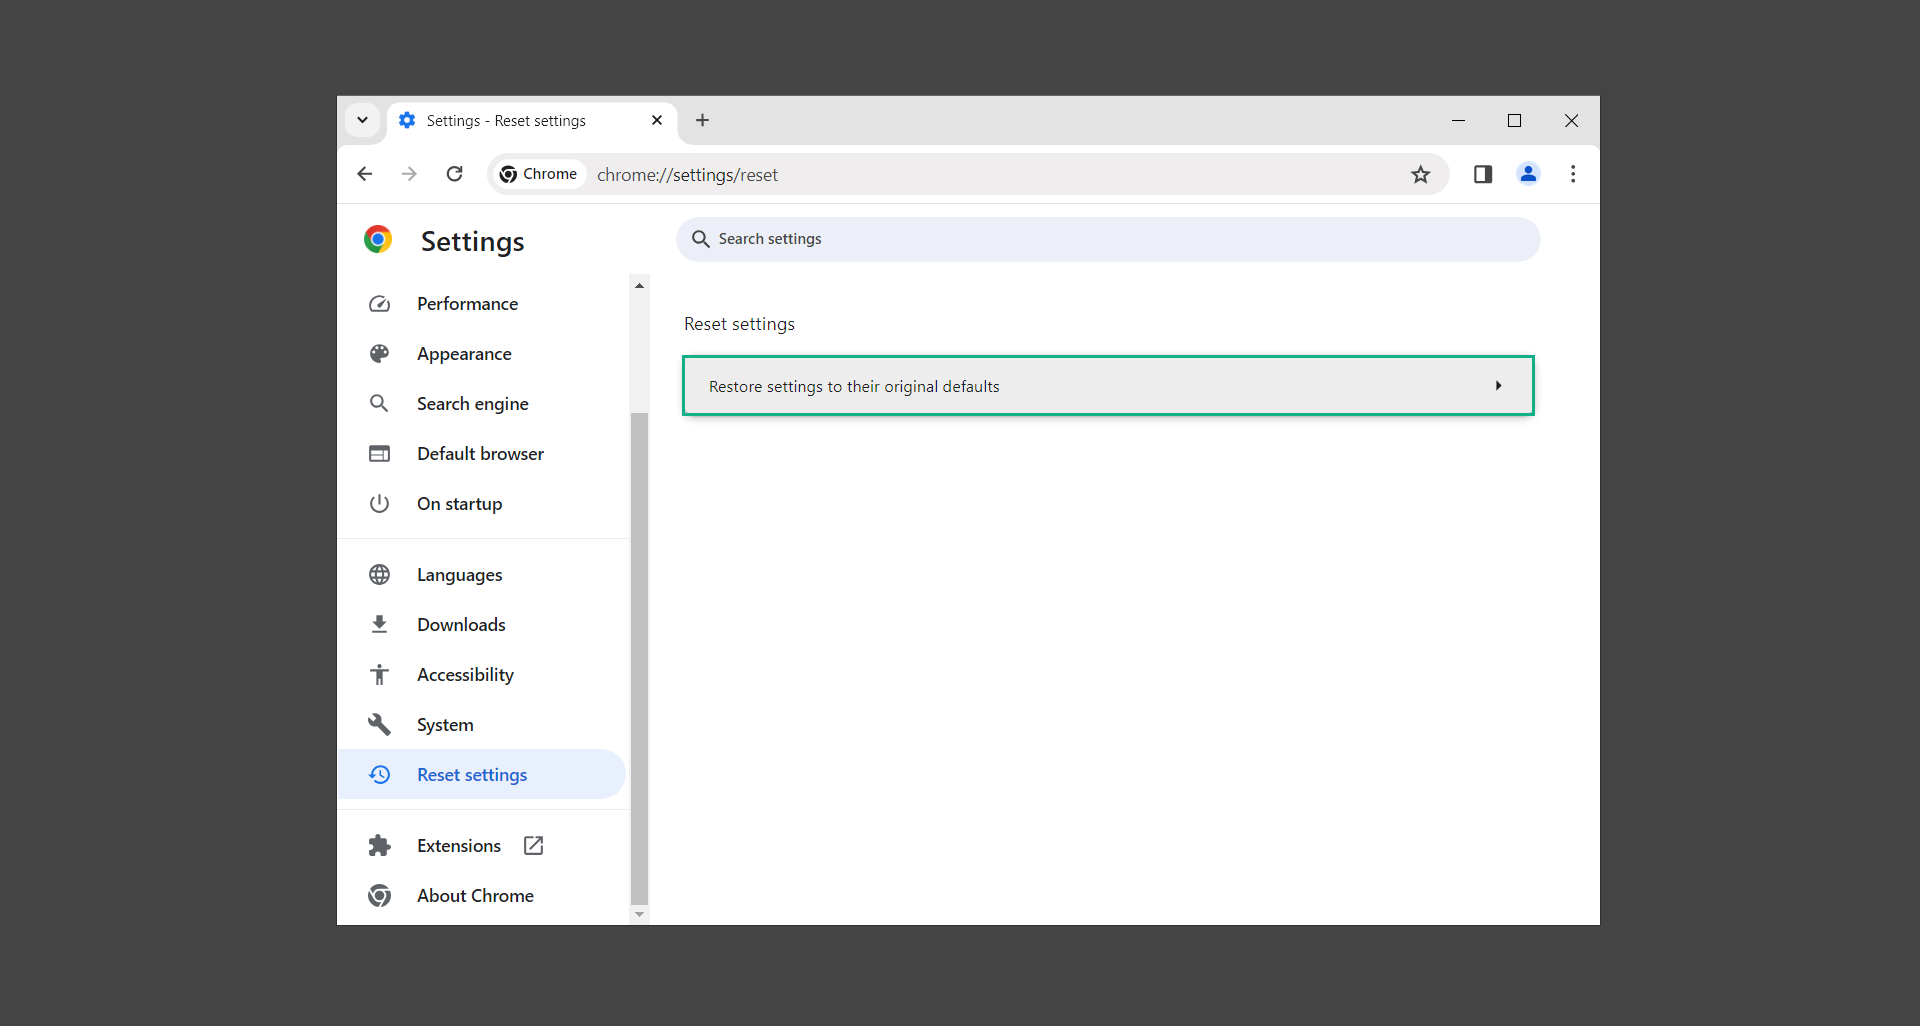
3. In the left sidebar, scroll down and find Reset settings.
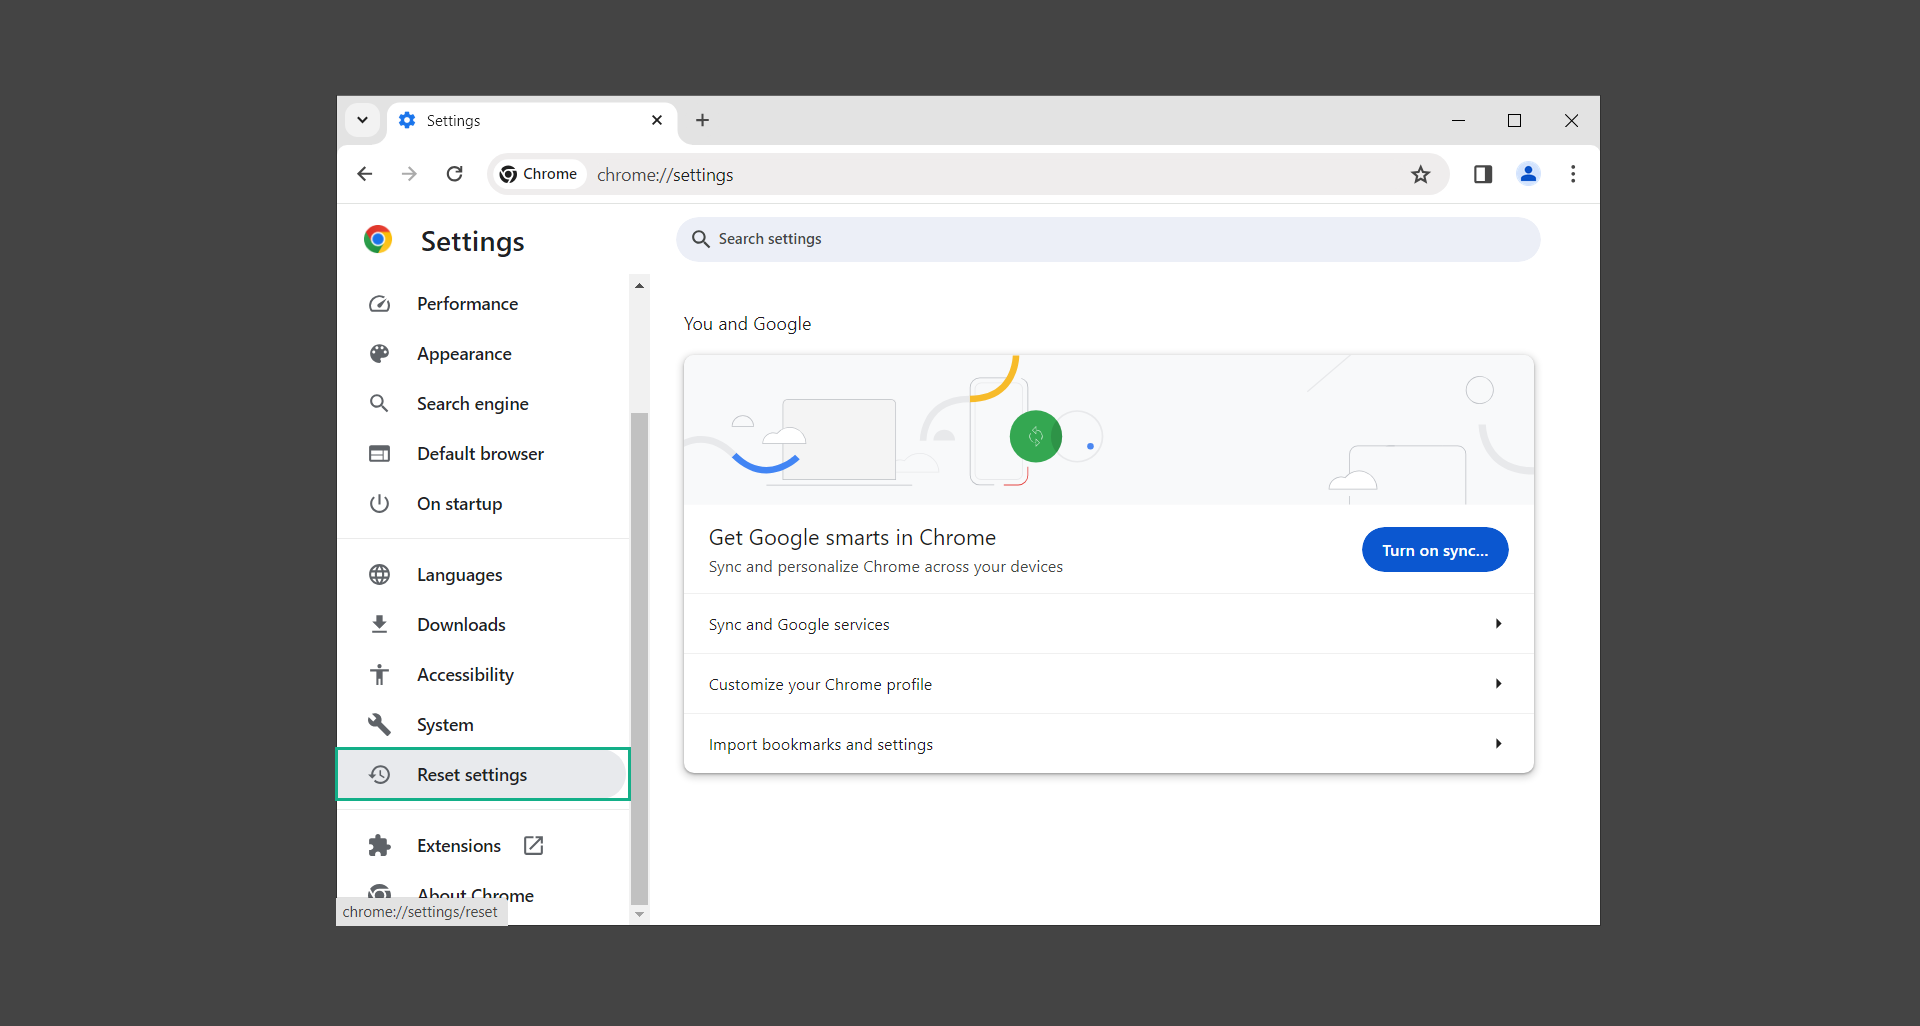
4. Click on Reset settings to their original defaults.
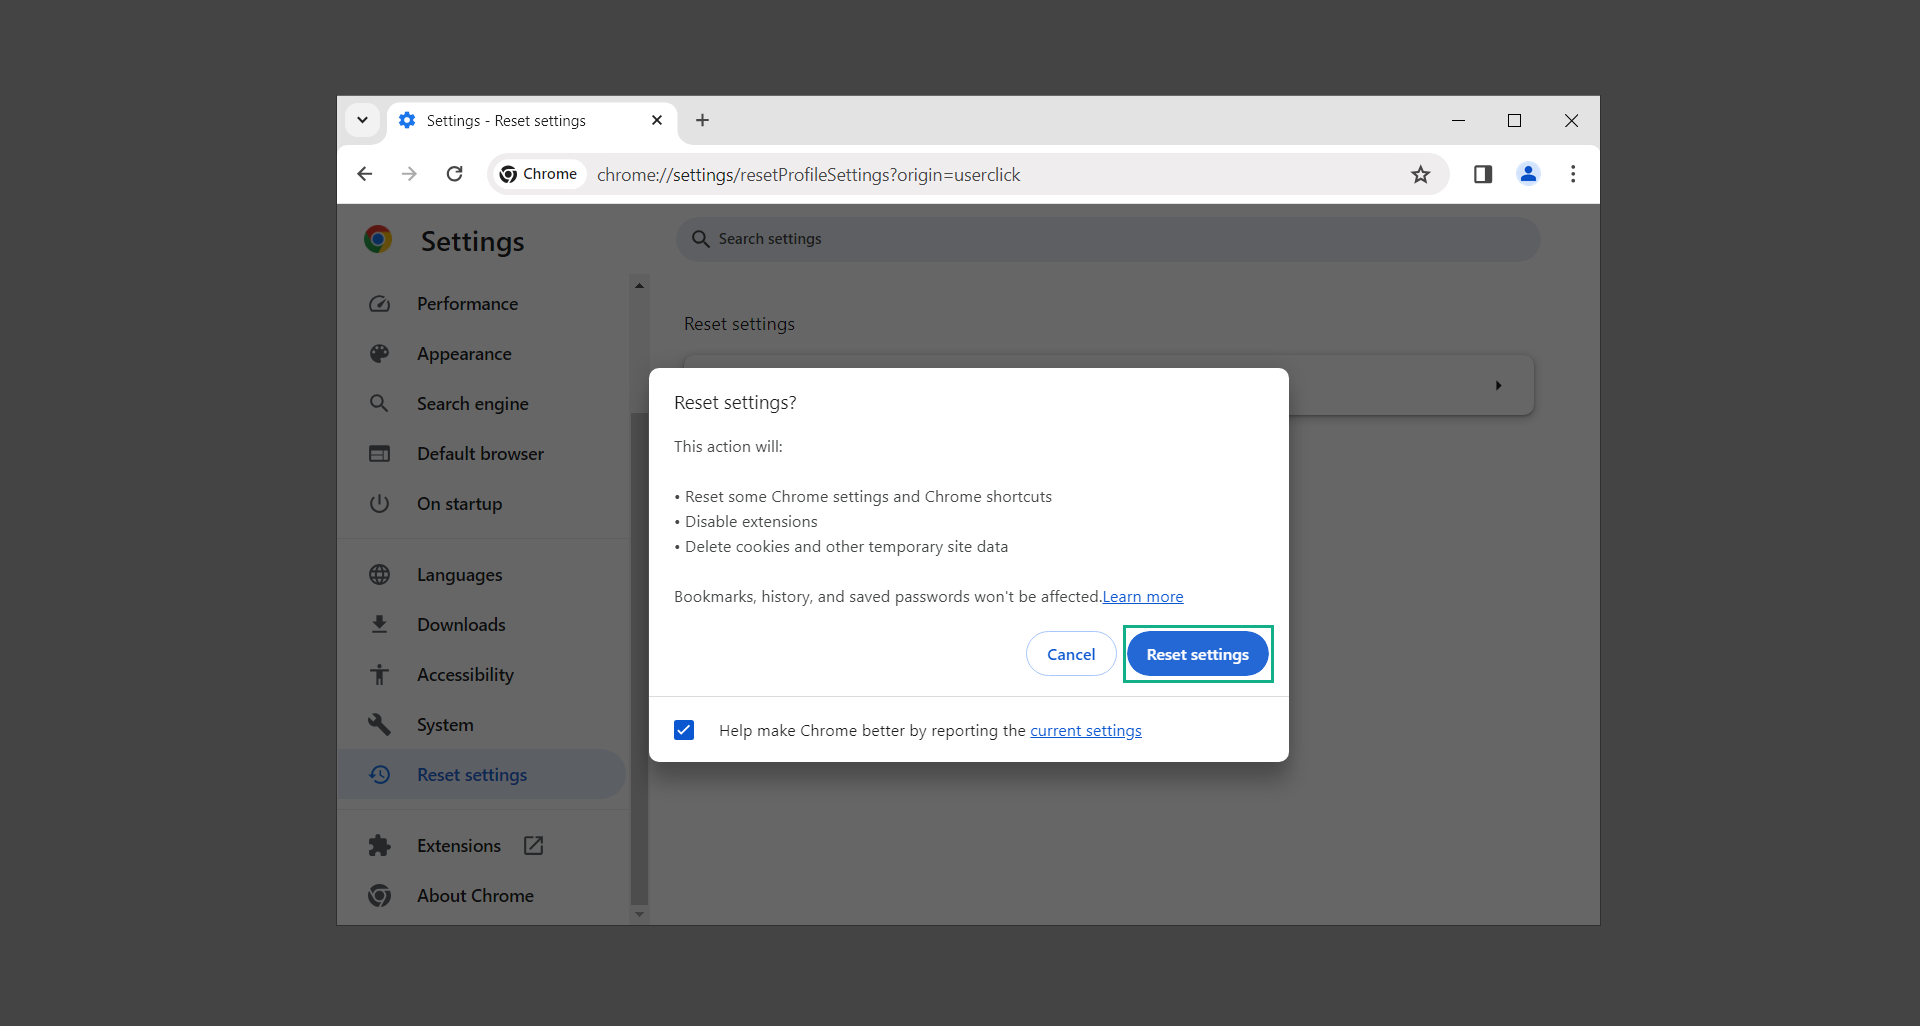
5. A confirmation window will appear, click Reset settings to proceed.
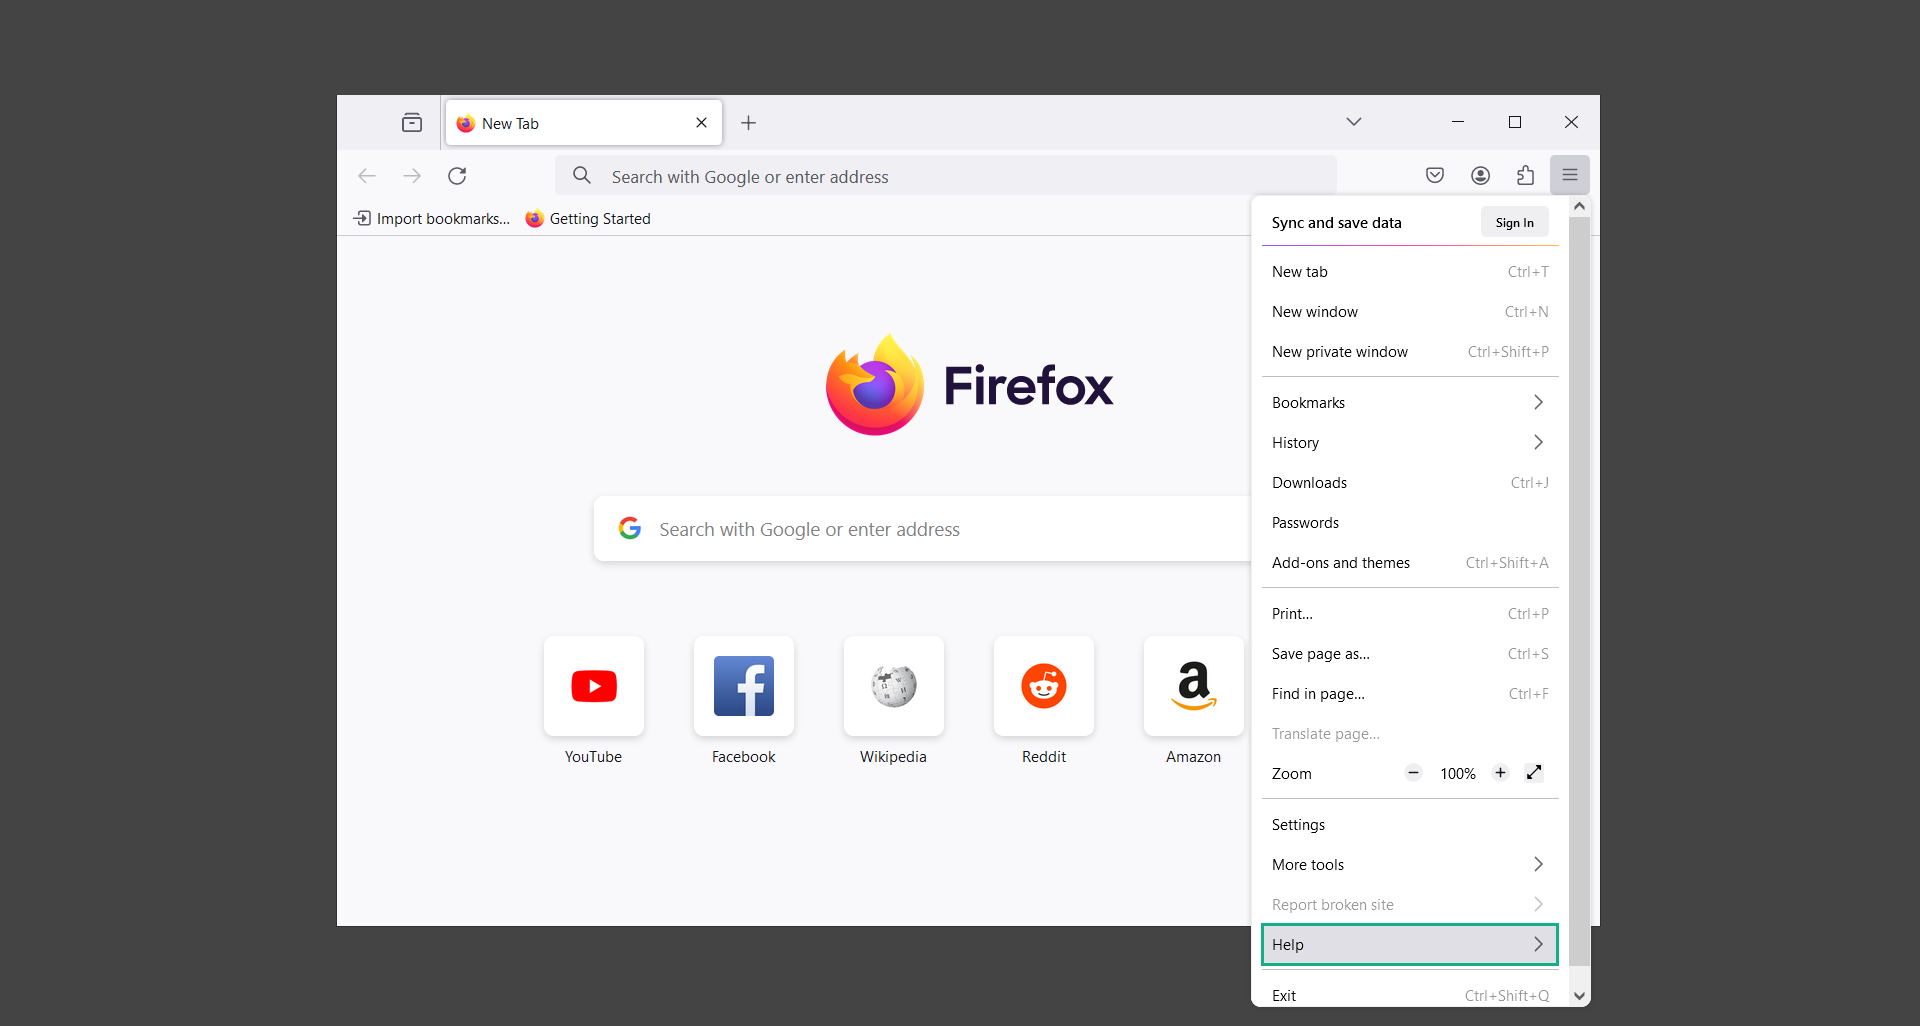
1. Launch the Firefox browser and click the hamburger menu on the upper-right corner of the screen.

2. From the dropdown menu, scroll down and click on Help.
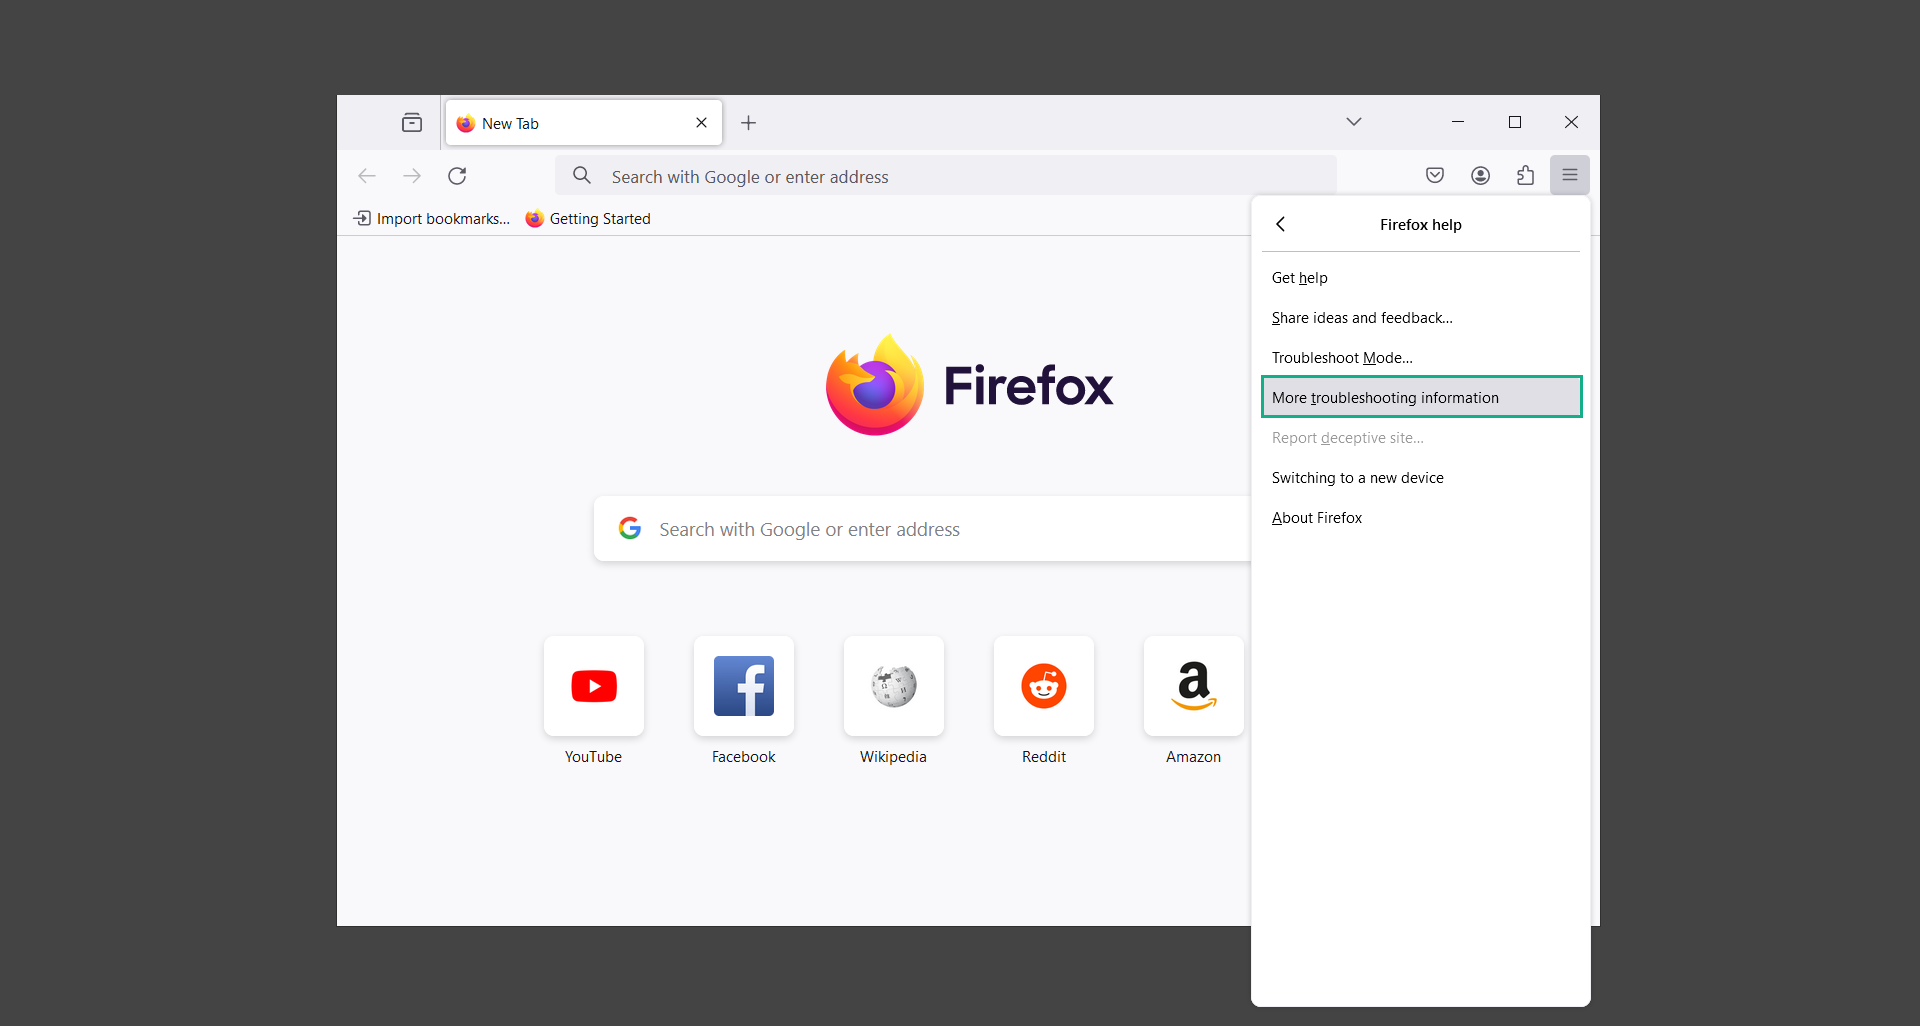
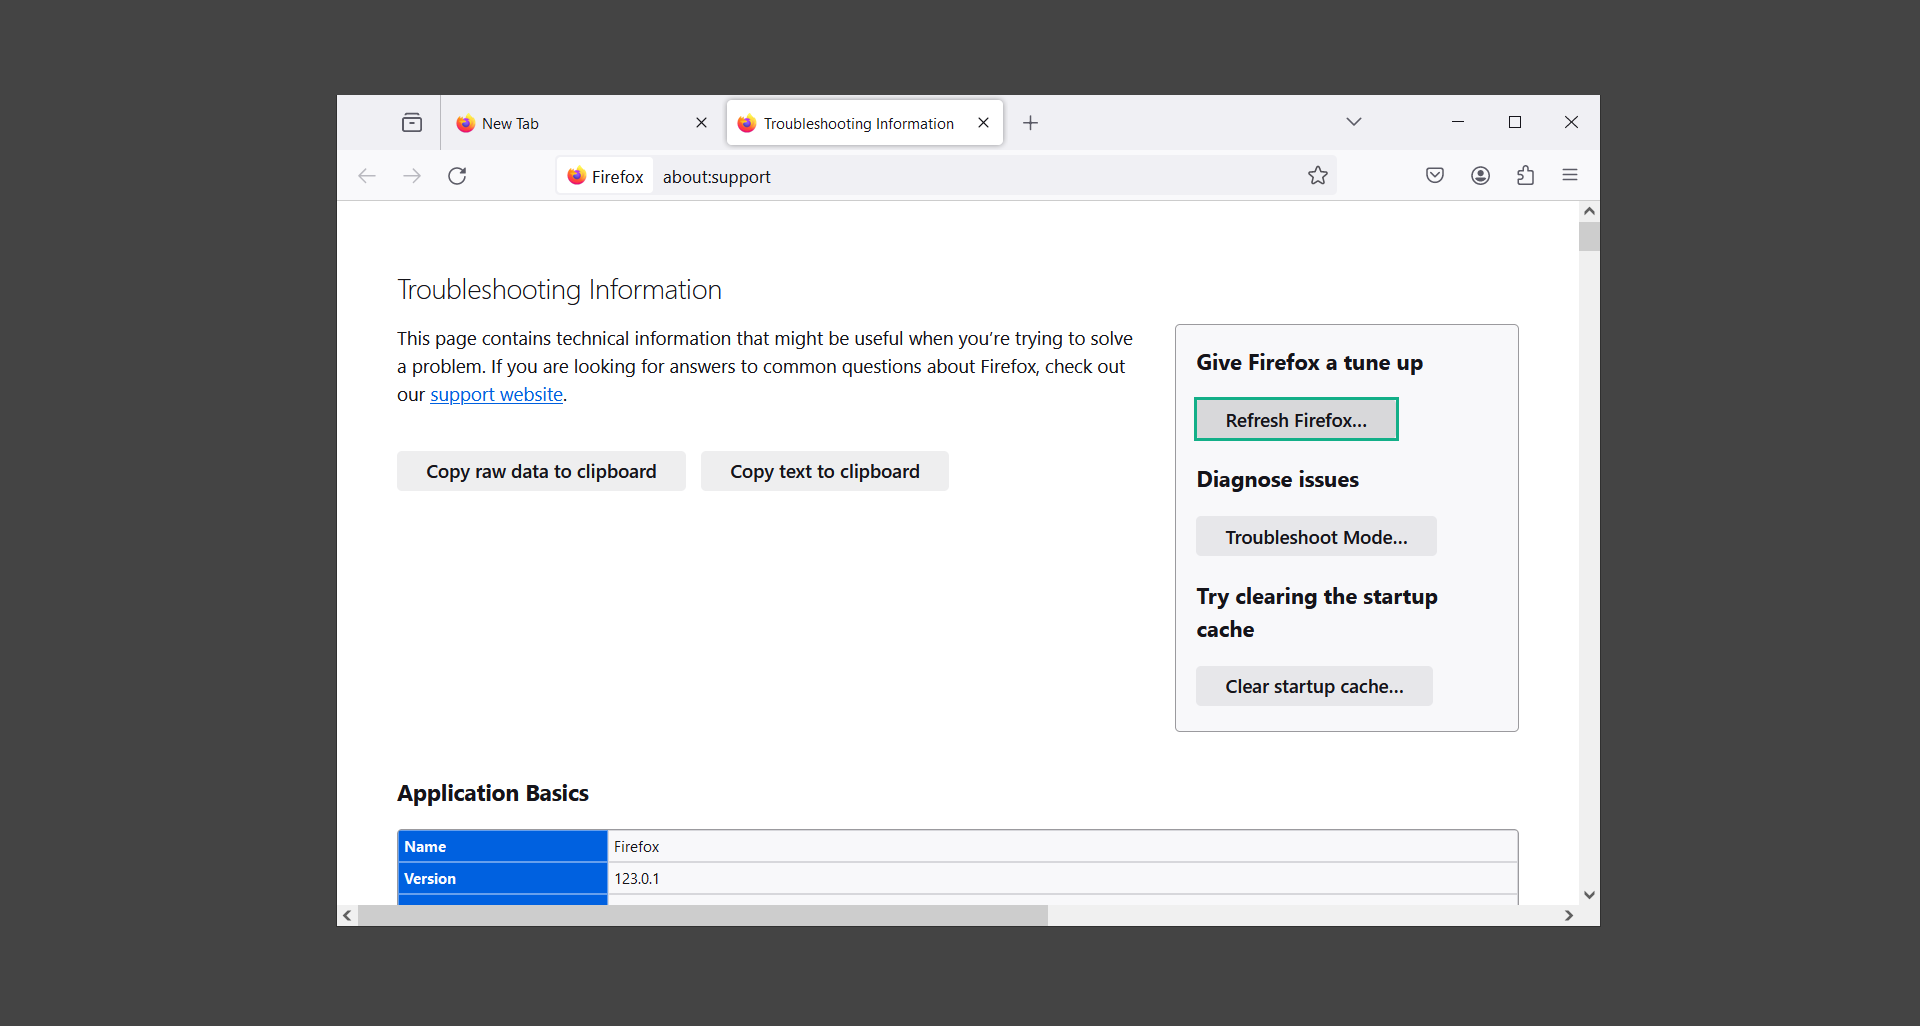
3. Inside the Firefox help menu, click More troubleshooting information.
4. Under Give Firefox a tune up, select Refresh Firefox… to reset the browser.
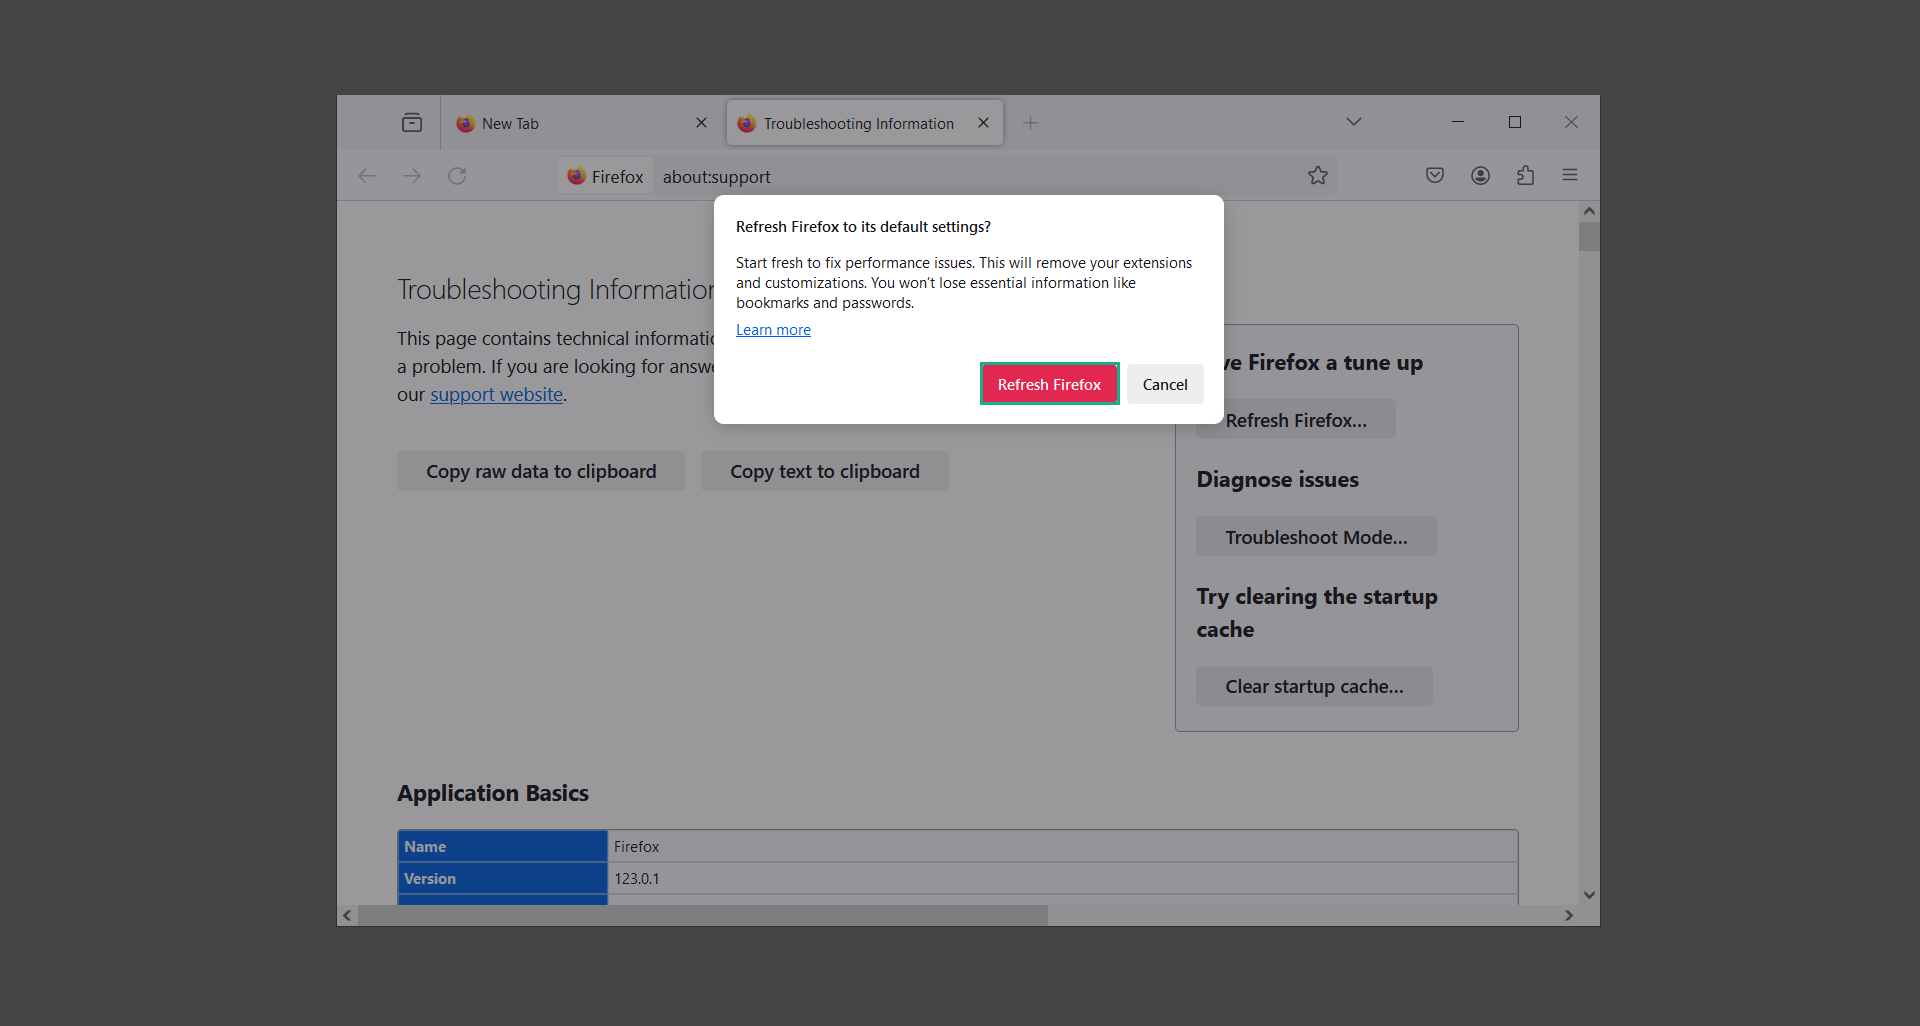
5. A confirmation window will appear, proceed by clicking Refresh Firefox.
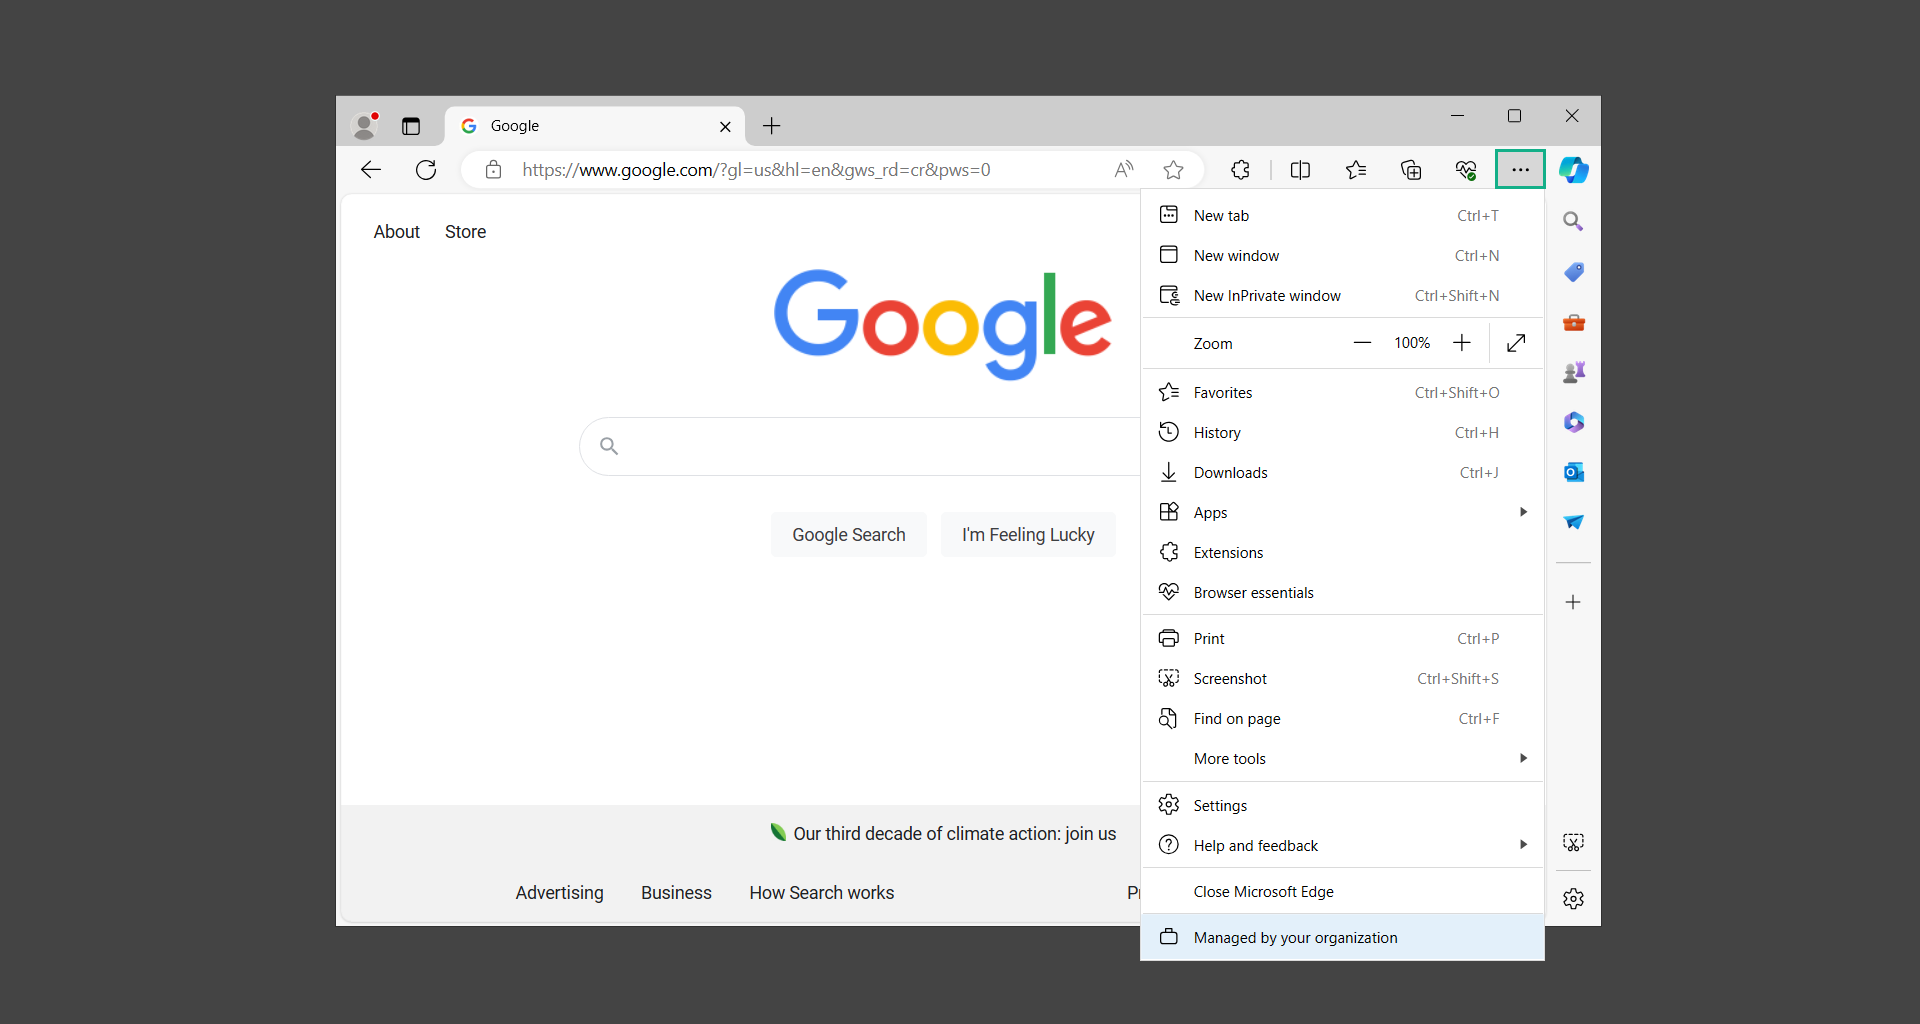
1. Run Microsoft Edge and click on the three horizontal dots on the upper-right side of the screen.
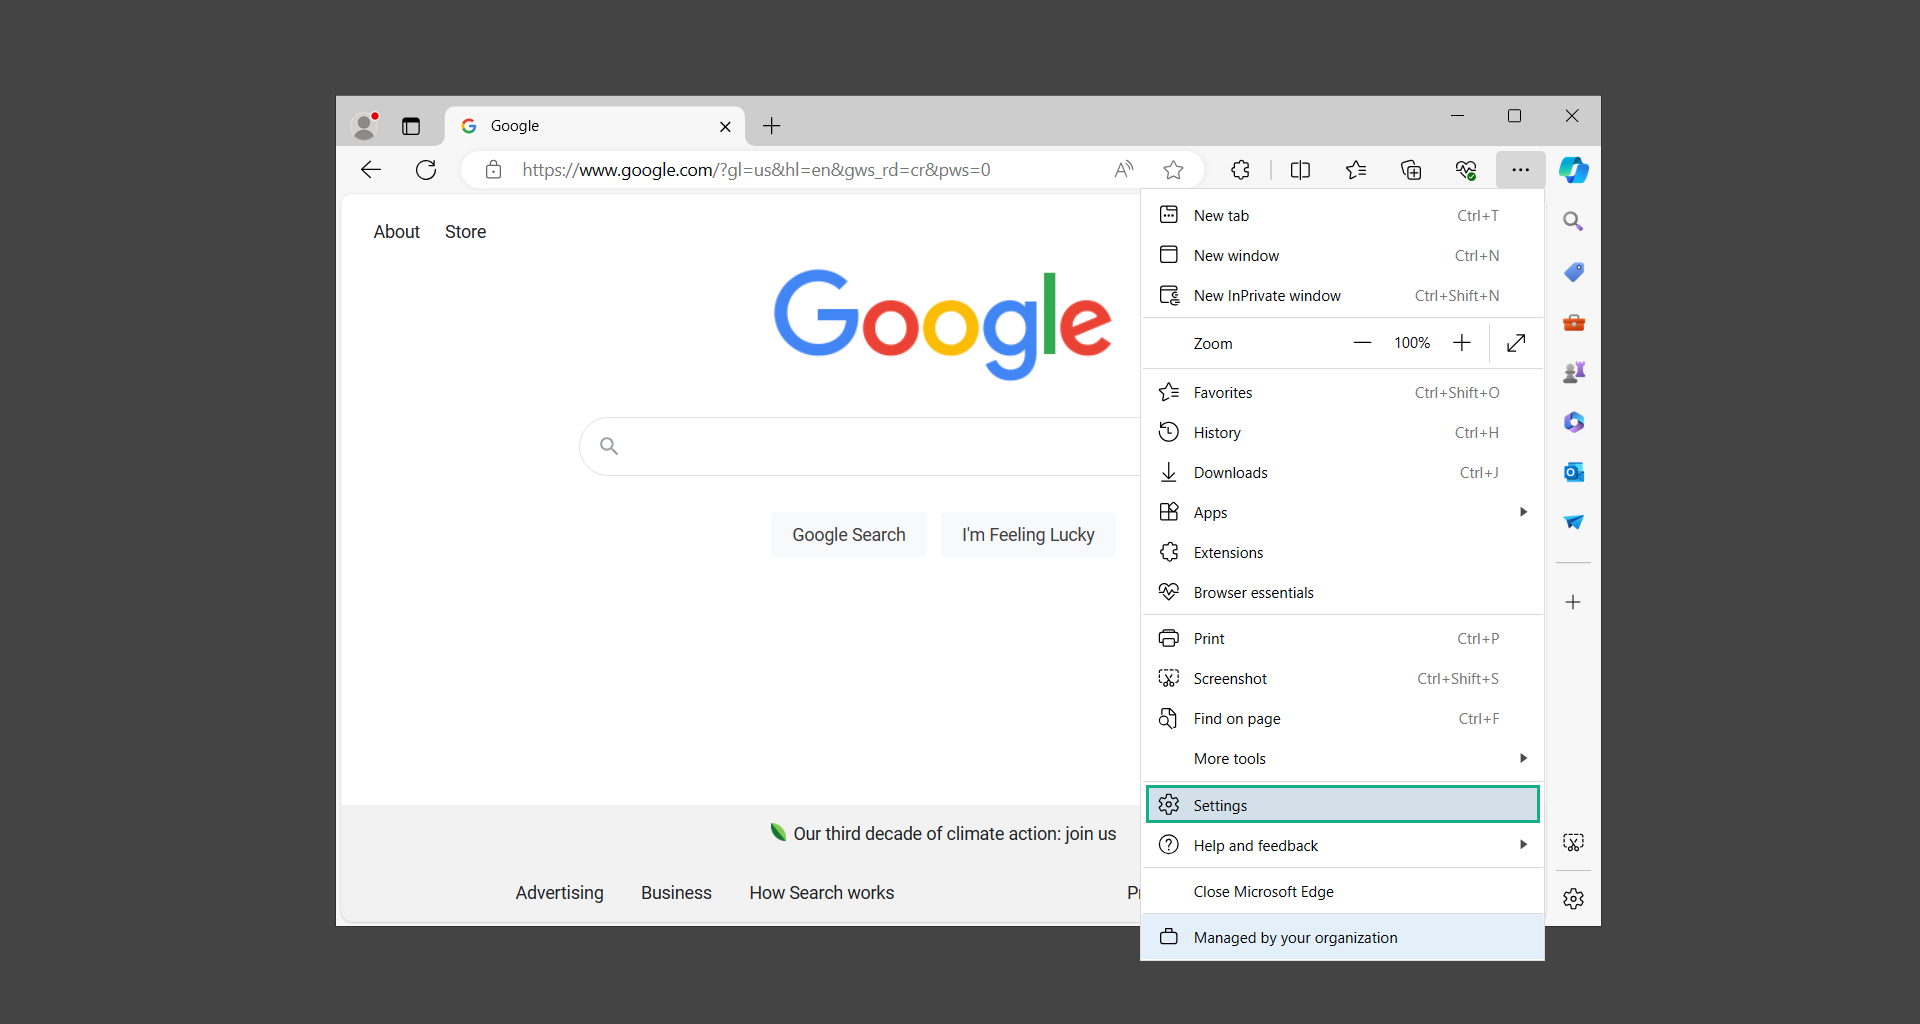
2. From the dropdown menu, select Settings.
3. Open the hamburger menu, scroll down, and select Reset settings.
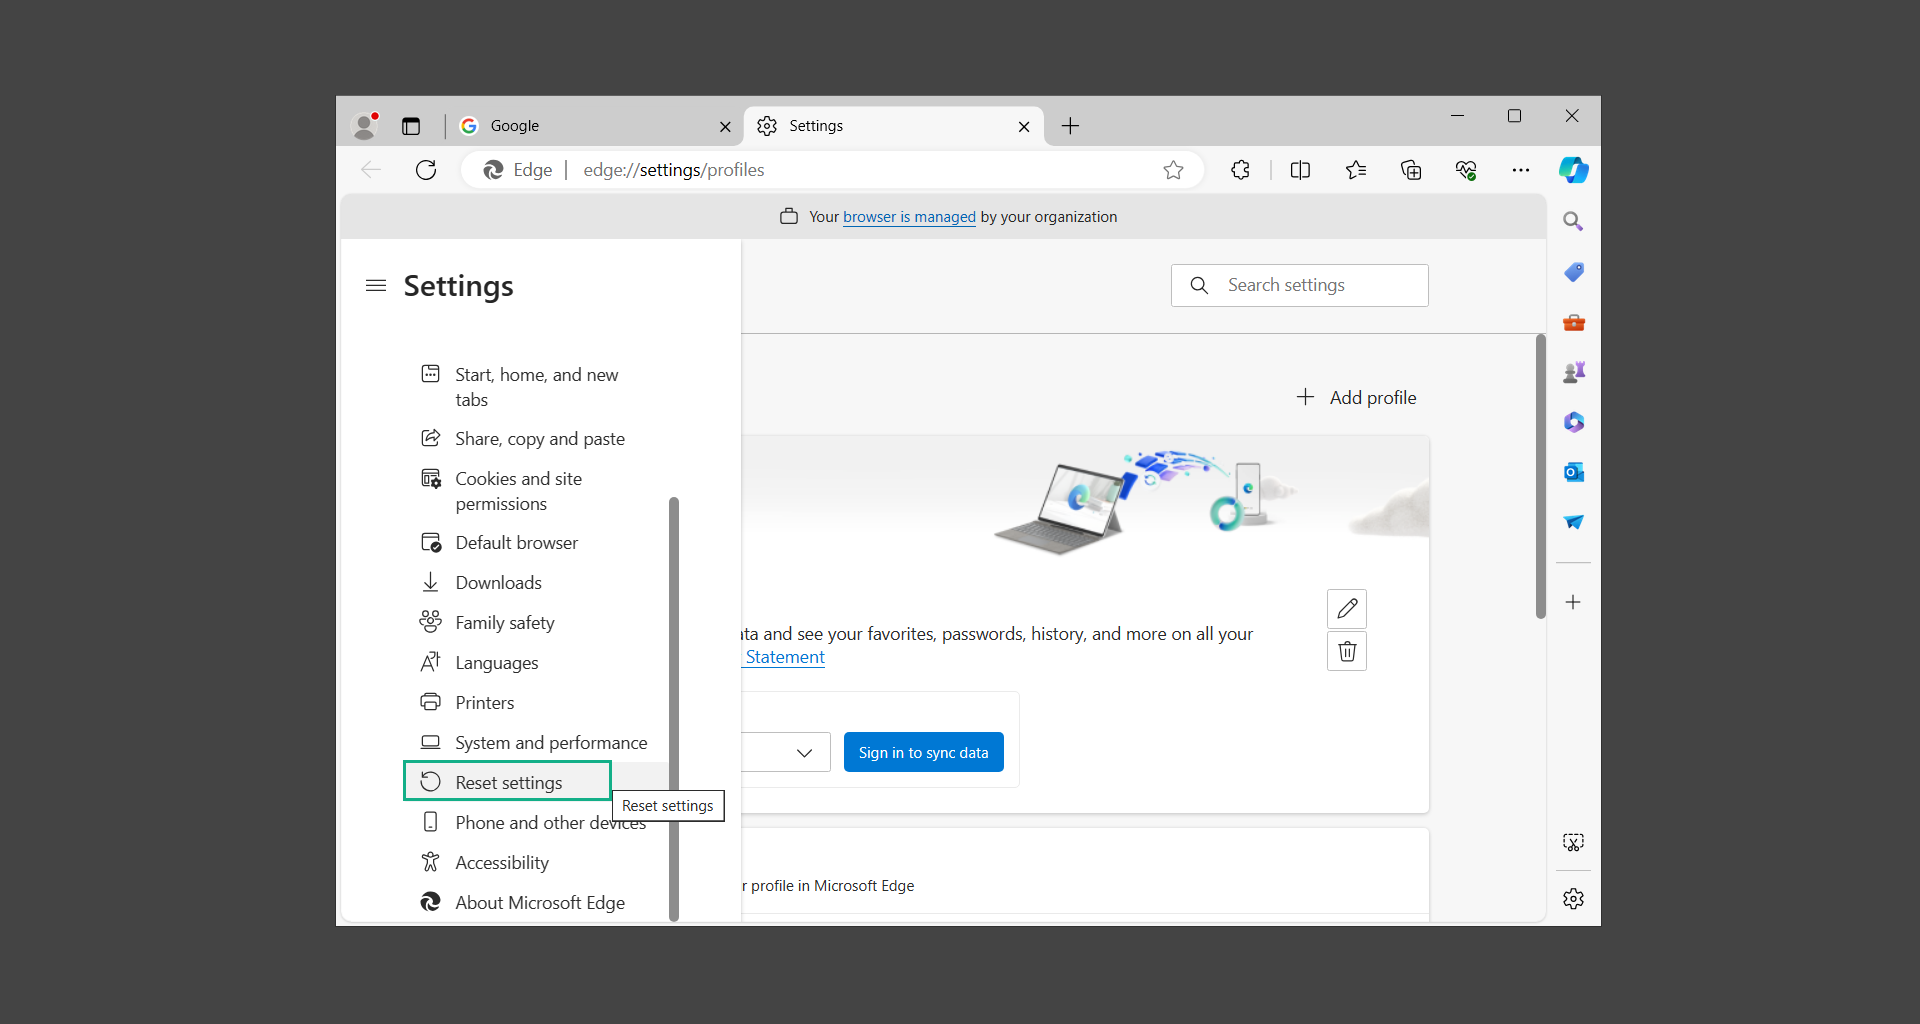
4. Inside Reset settings, click on Restore settings to their default values.
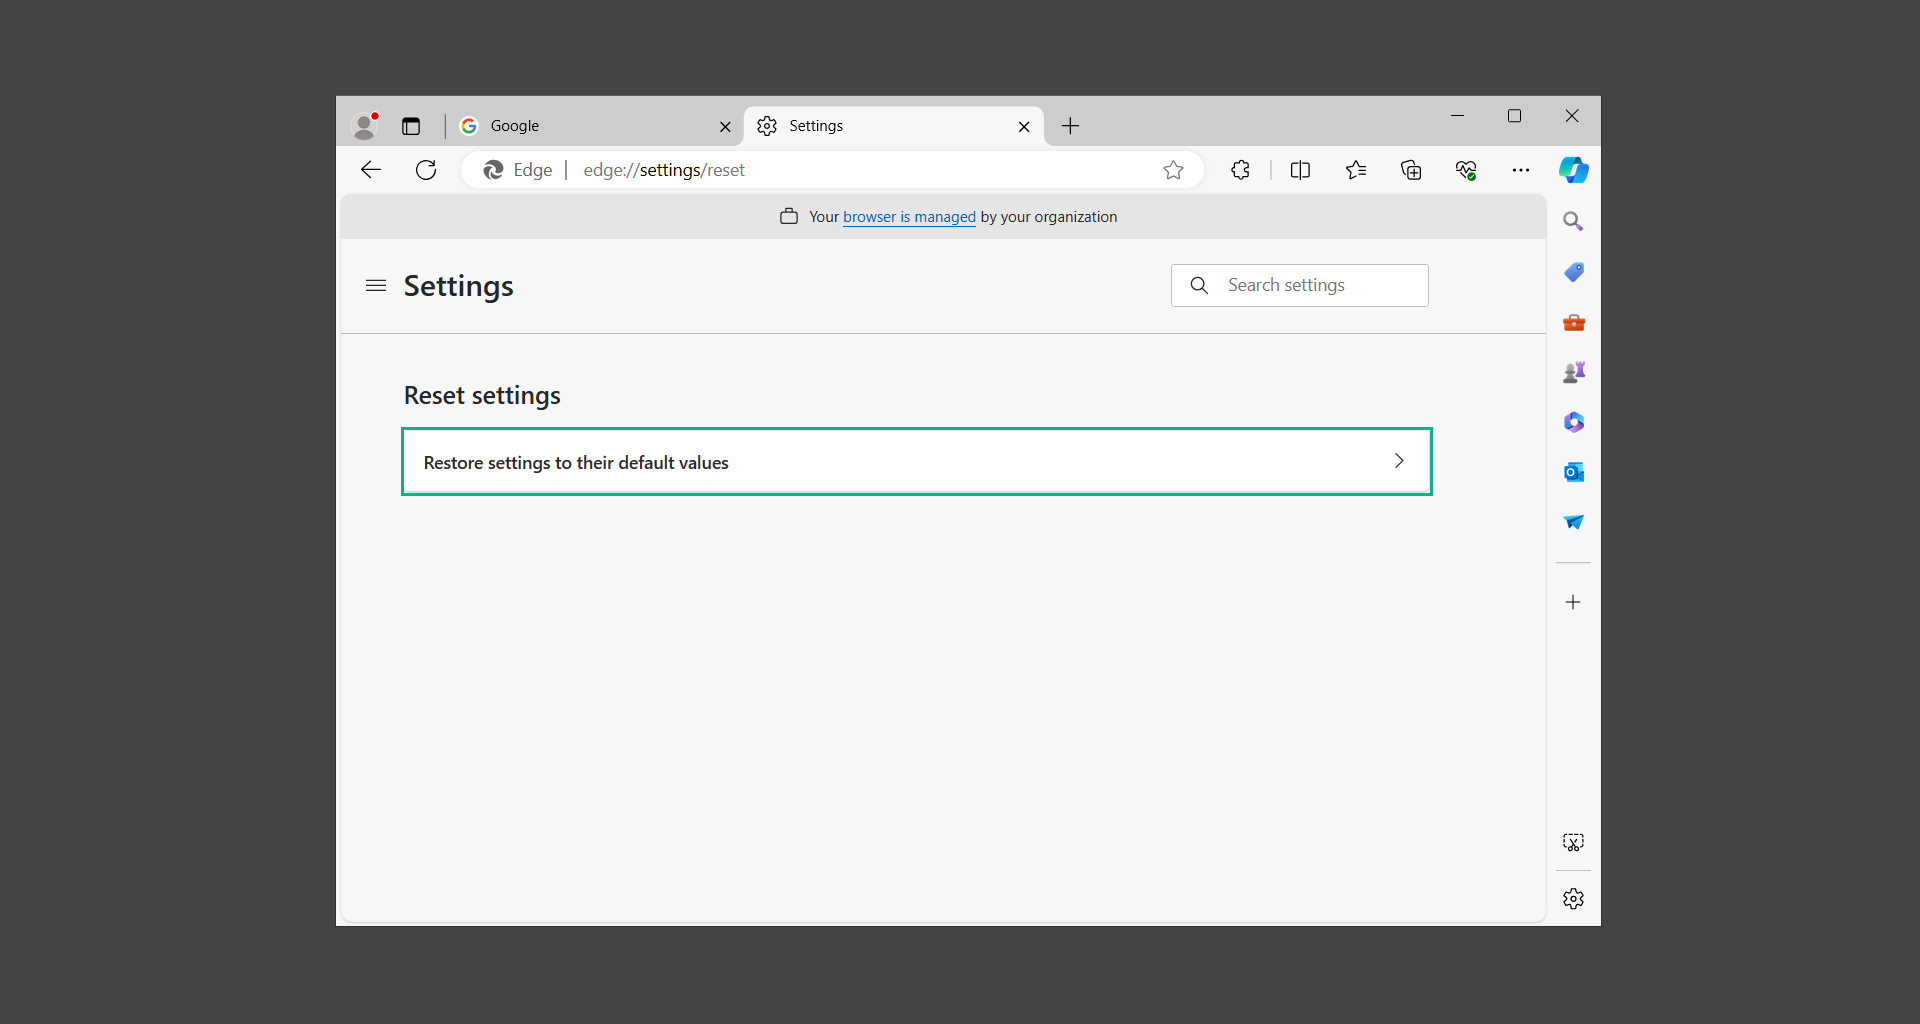
5. A confirmation window will appear, click Reset to proceed.
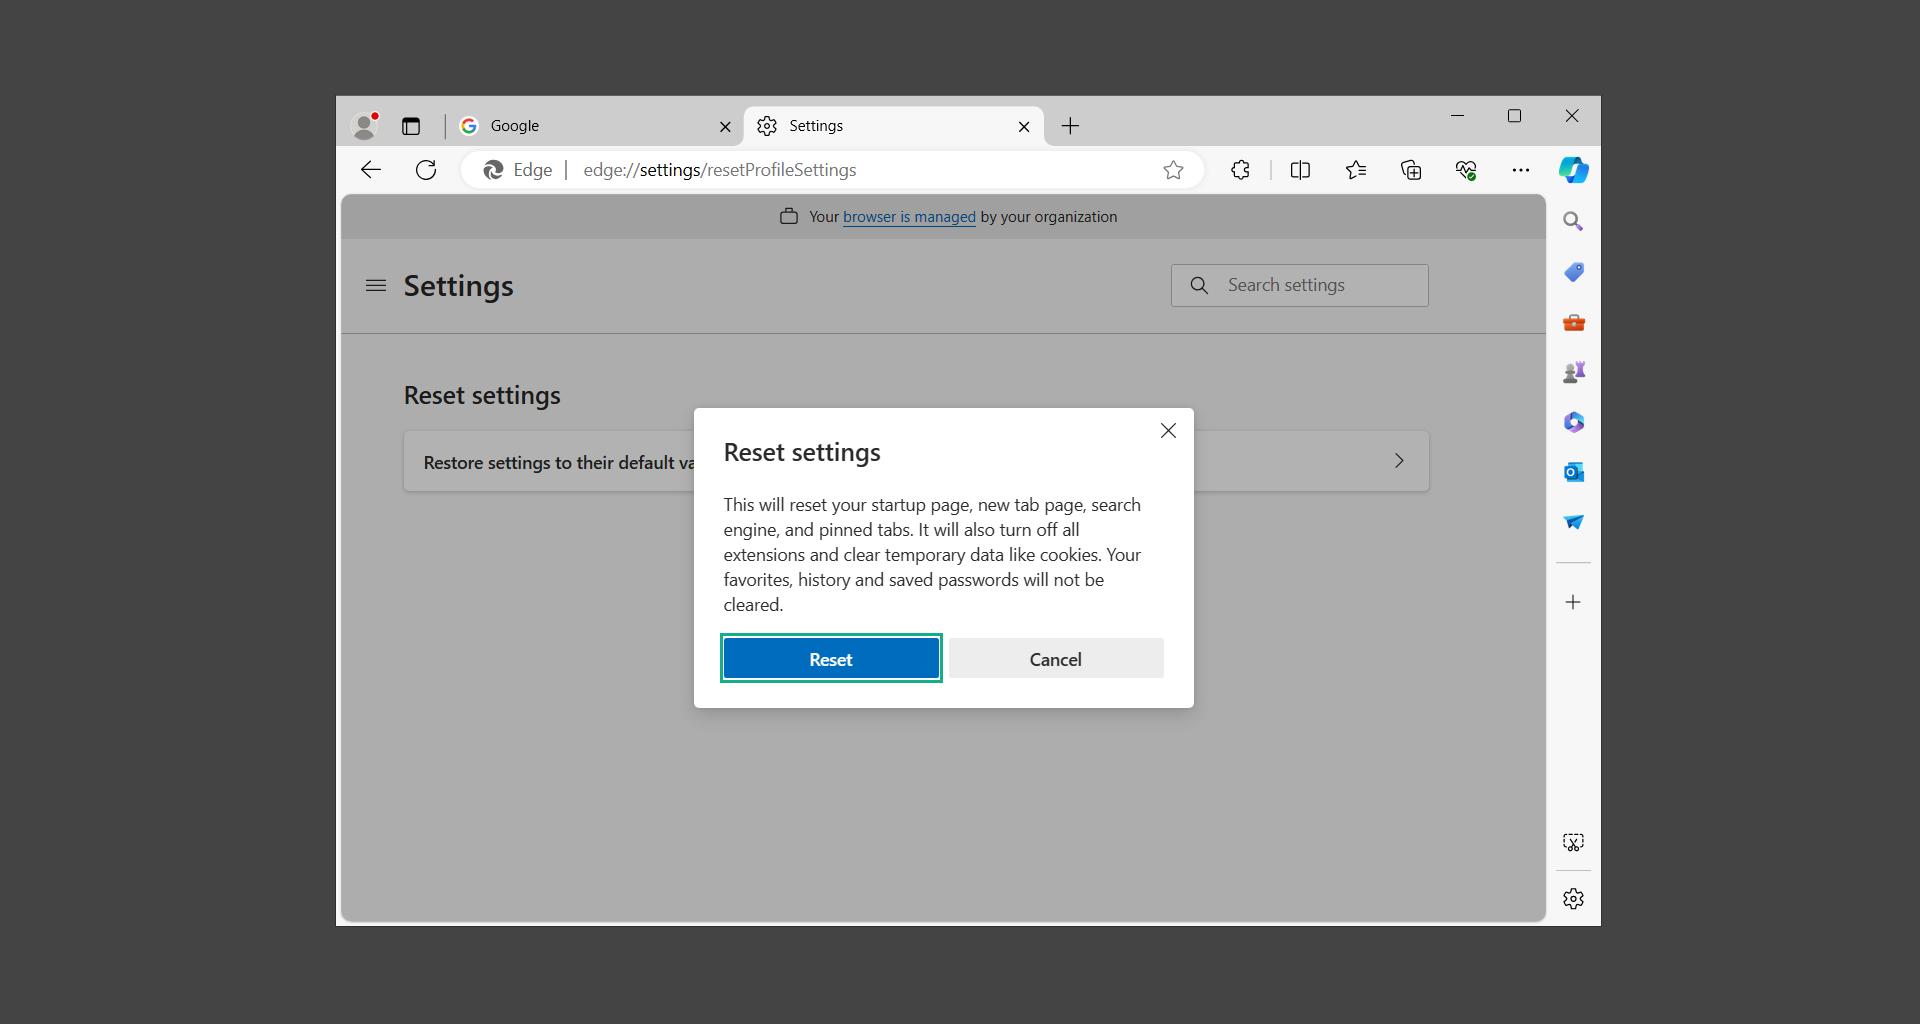
After the web browser has finished resetting, download the important extensions you previously used, and pin the tabs you once had. Set it the way it was previously configured before the malware infection.
Now let’s exit safe mode and we’re done
After doing all the steps above and making sure that malware is nowhere to be found in the computer, we will now begin to exit safe mode and return to the normal Windows mode where all of your files and programs are operational.
Here’s how to exit the Windows safe mode:
1. Click the Windows button and letter R at the same time to open the Run command.

2. Type msconfig on the provided area and hit enter.

3. Once the System Configuration program has launched, head over to the Boot tab.
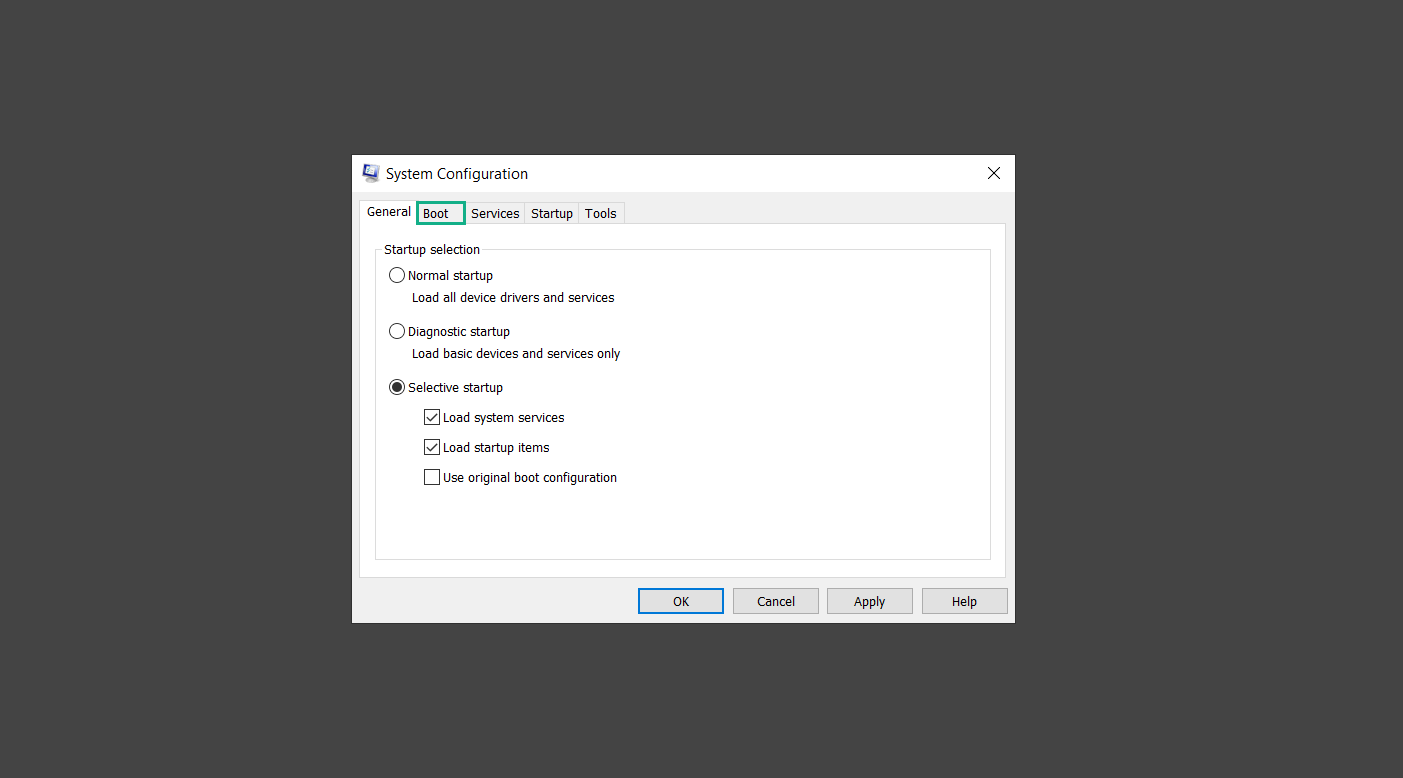
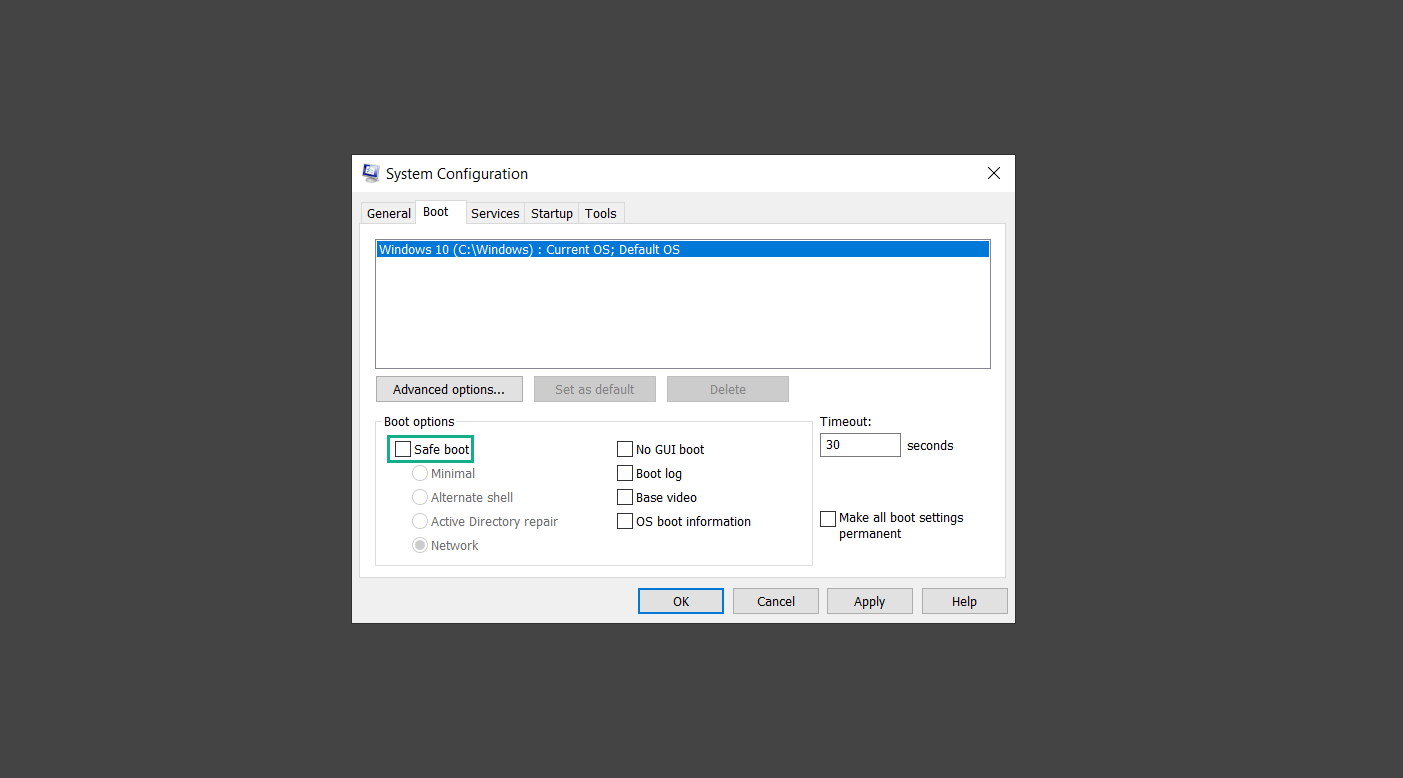
4. Under Boot options, uncheck the Safe boot option.
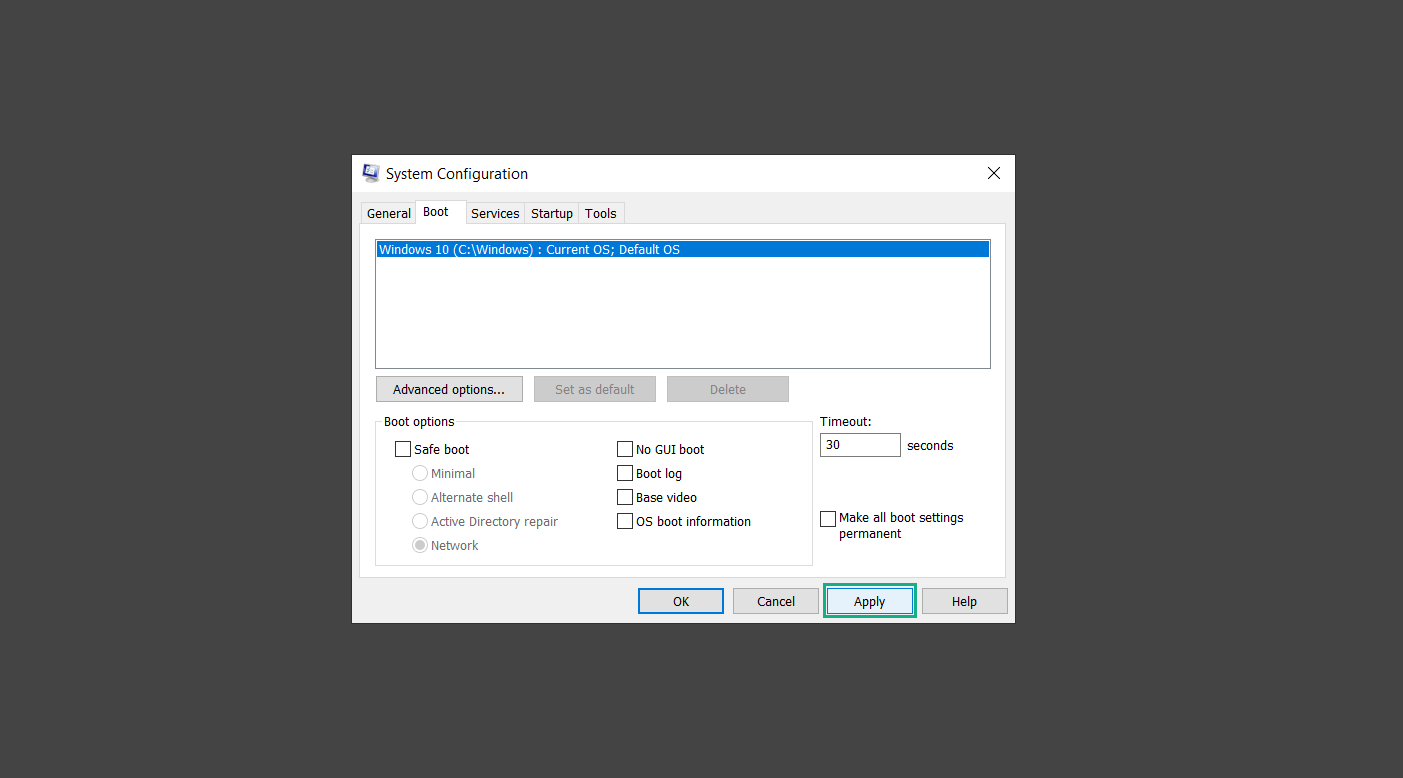
5. Select Apply to save your changes upon the next boot. Restart your computer once again and you will be back to the operational Windows mode.
Hey, you did it! You have successfully removed the malware on your computer as well as other malicious threats that were hiding alongside it. Now you can use your system with a piece of mind.
If the said steps did not work or the malware is still present, you can follow the advanced steps provided below. Although it may be quite difficult for an average computer user, we have made it detailed and easy to understand.
Advanced steps
For users who know their way around the computer and have the capability to diagnose malware using their skills and understand how to use utility tools available in the system.
Step 1: Use Process Explorer to detect and remove malware
Findflarex.com and the malware threats alongside it could have been hiding in the system as Windows services and processes. If the malware is a service, it can have bad effects on the computer system as a whole.
They can create or modify existing services, basically tainting them, particularly for persistence, but can also be used for granting further privileges to malware inside an infected system.
In order to find unwanted services as well as processes from running in the computer and causing further harm, we will be using Process Explorer, an alternative to the Windows Task Manager and is a part of the Sysinternals suite.
Here are some of the features of Process Explorer:
- Hierarchical relationship and connection between processes.
- Identify which processes have loaded DLLs, and opened/locked certain files and folders.
- It can kill a process tree including any newly spawned processes.
- Simplifies analysis with a color-coded list of processes.
Process Explorer is a tool that is frequently used to analyze malware which is why it is the perfect fit to use in this particular case.
How to find and remove malware via Process Explorer:
1. Download and run Process Explorer from the official Microsoft download page.
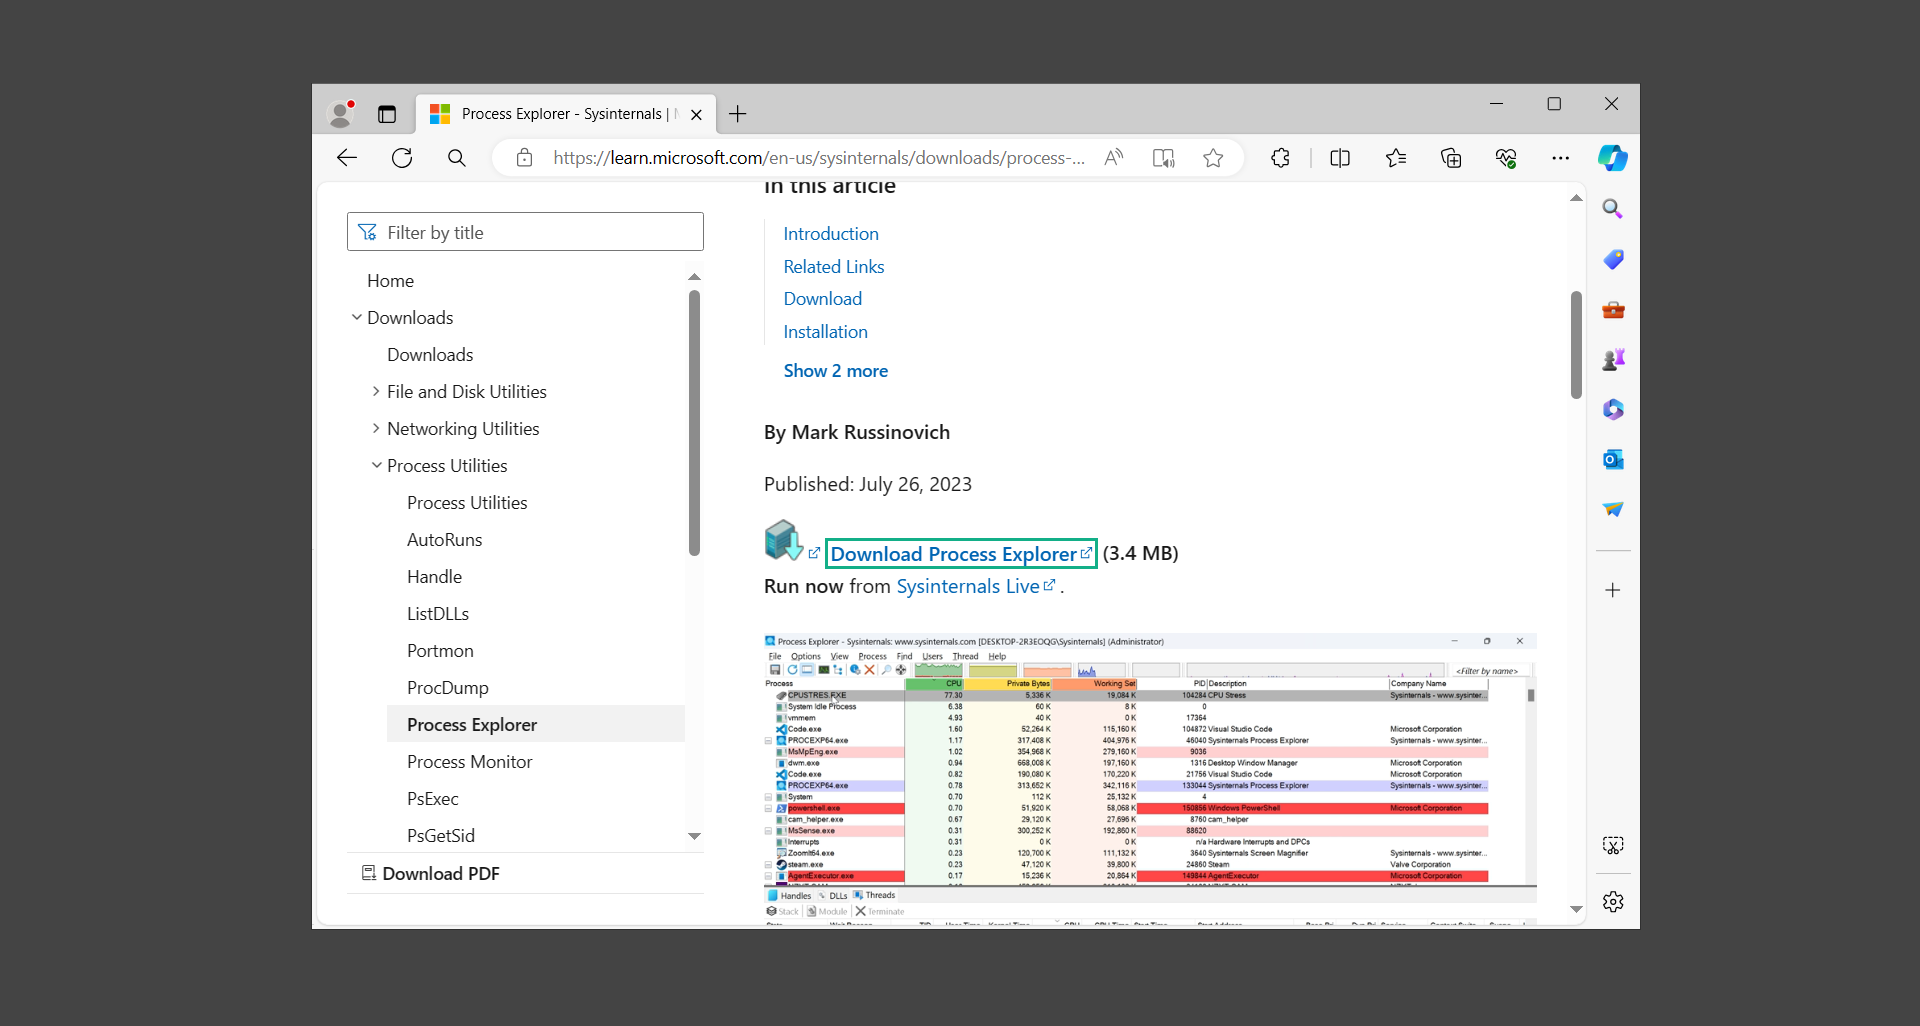
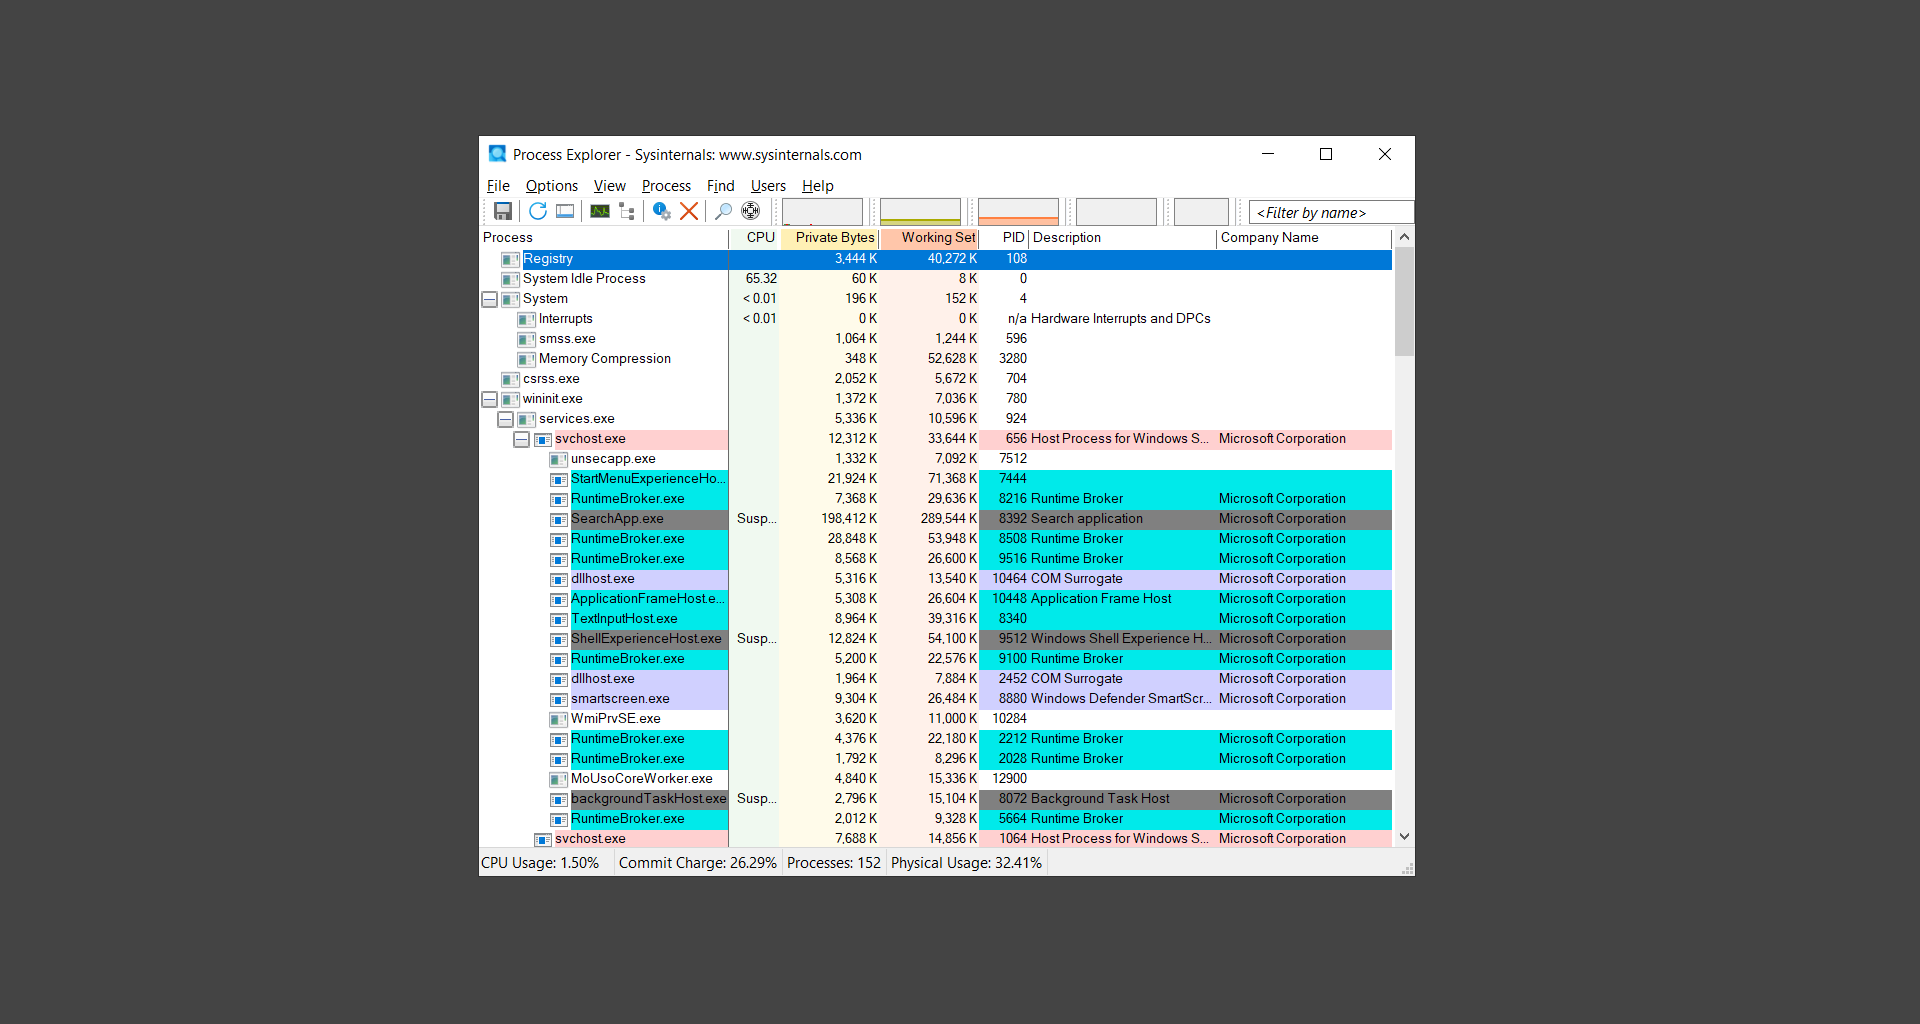
2. Upon opening the tool, you will see a list of processes running on the system. Alongside them have a designated color based on the type and current state of the process.
The default color scheme is as follows:
New ObjectsDeleted ObjectsOwn ProcessesServicesSuspended ServicesPacked ImagesRelocated DLLsJobs.NET ProcessesImmersive Processes
3. Now we will begin hunting for malware using Process Explorer. There are many ways to find malware within the vast number of processes shown. You can narrow down the scope to Services, Packed Images, and Jobs and exclude a few like Suspended Services and Deleted Objects.
Here are the ways you can check if a process is malware:
- An unreadable process name is an indication that something is not quite right.
- Find the file path of every suspected process. A Dllhost service that is currently located at the Temp file will most likely be malware in disguise.
- Check the developer name and description of each process you suspect. Most system processes will have Microsoft Corporation as their developer name and every app you have installed will show the company name that developed them.
- See which processes are hogging a great amount of CPU resources. This is another indicator that malware is installed in the system.
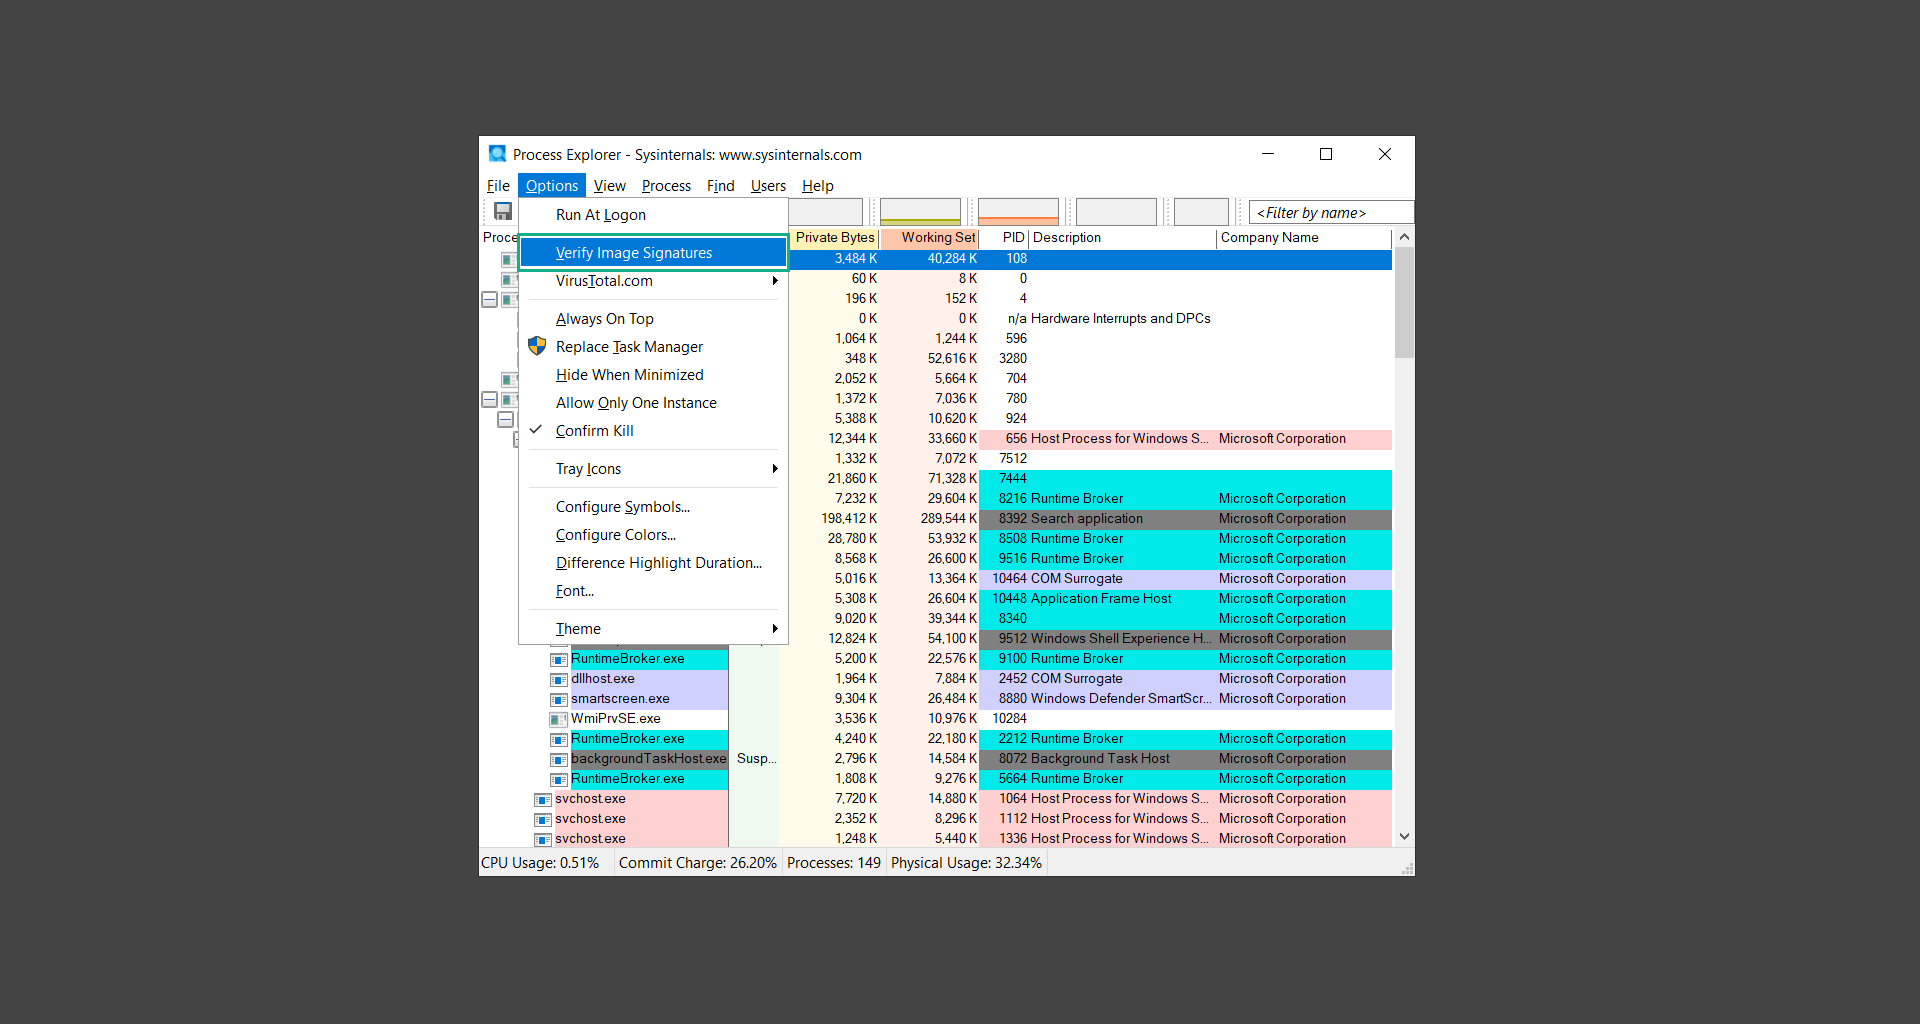
4. We can also verify if an executable file or a DLL has trusted signatures by enabling the Verify Image Signatures from the Options tab in the menu bar.
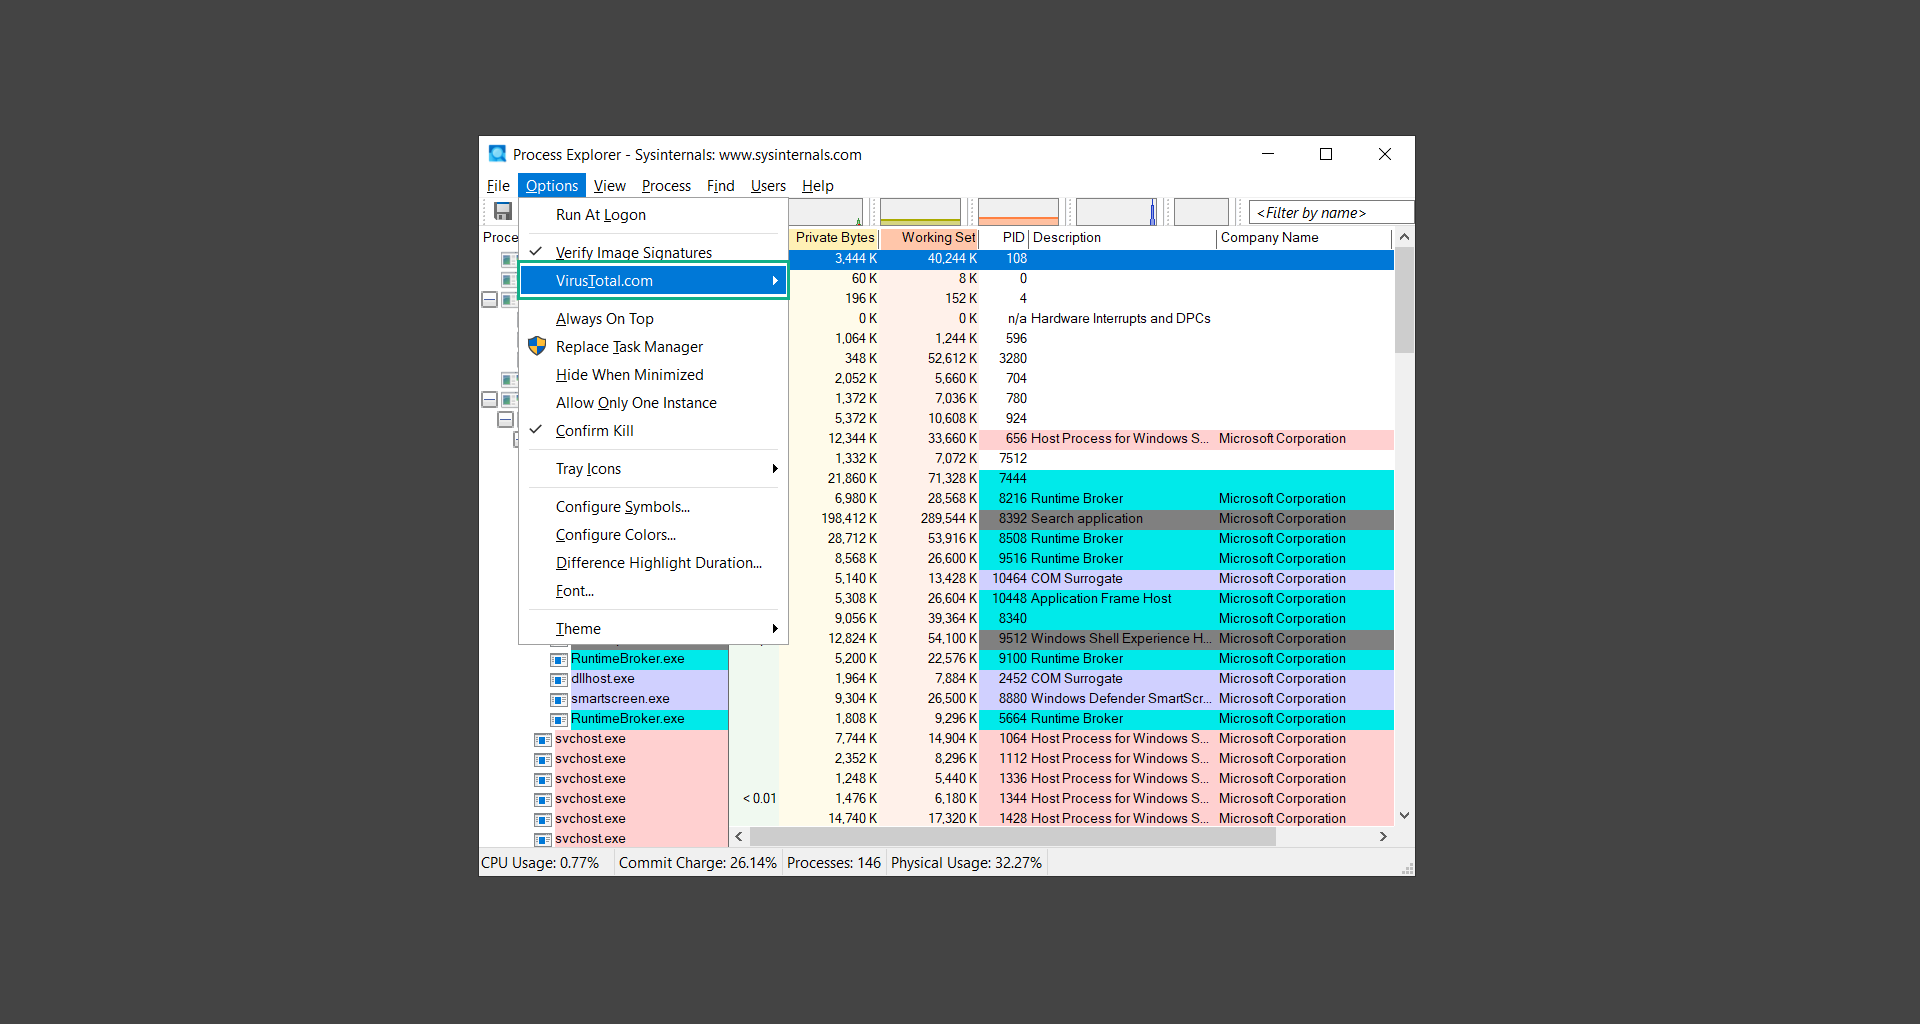
5. To further dig deep into the suspected process, we can submit it to VirusTotal and check if their antivirus engines have already been flagged as malware. We can do this by clicking Options on the top menu bar and clicking VirusTotal.com. Now you can right-click the processes and the Check Virustotal.com option will be enabled.
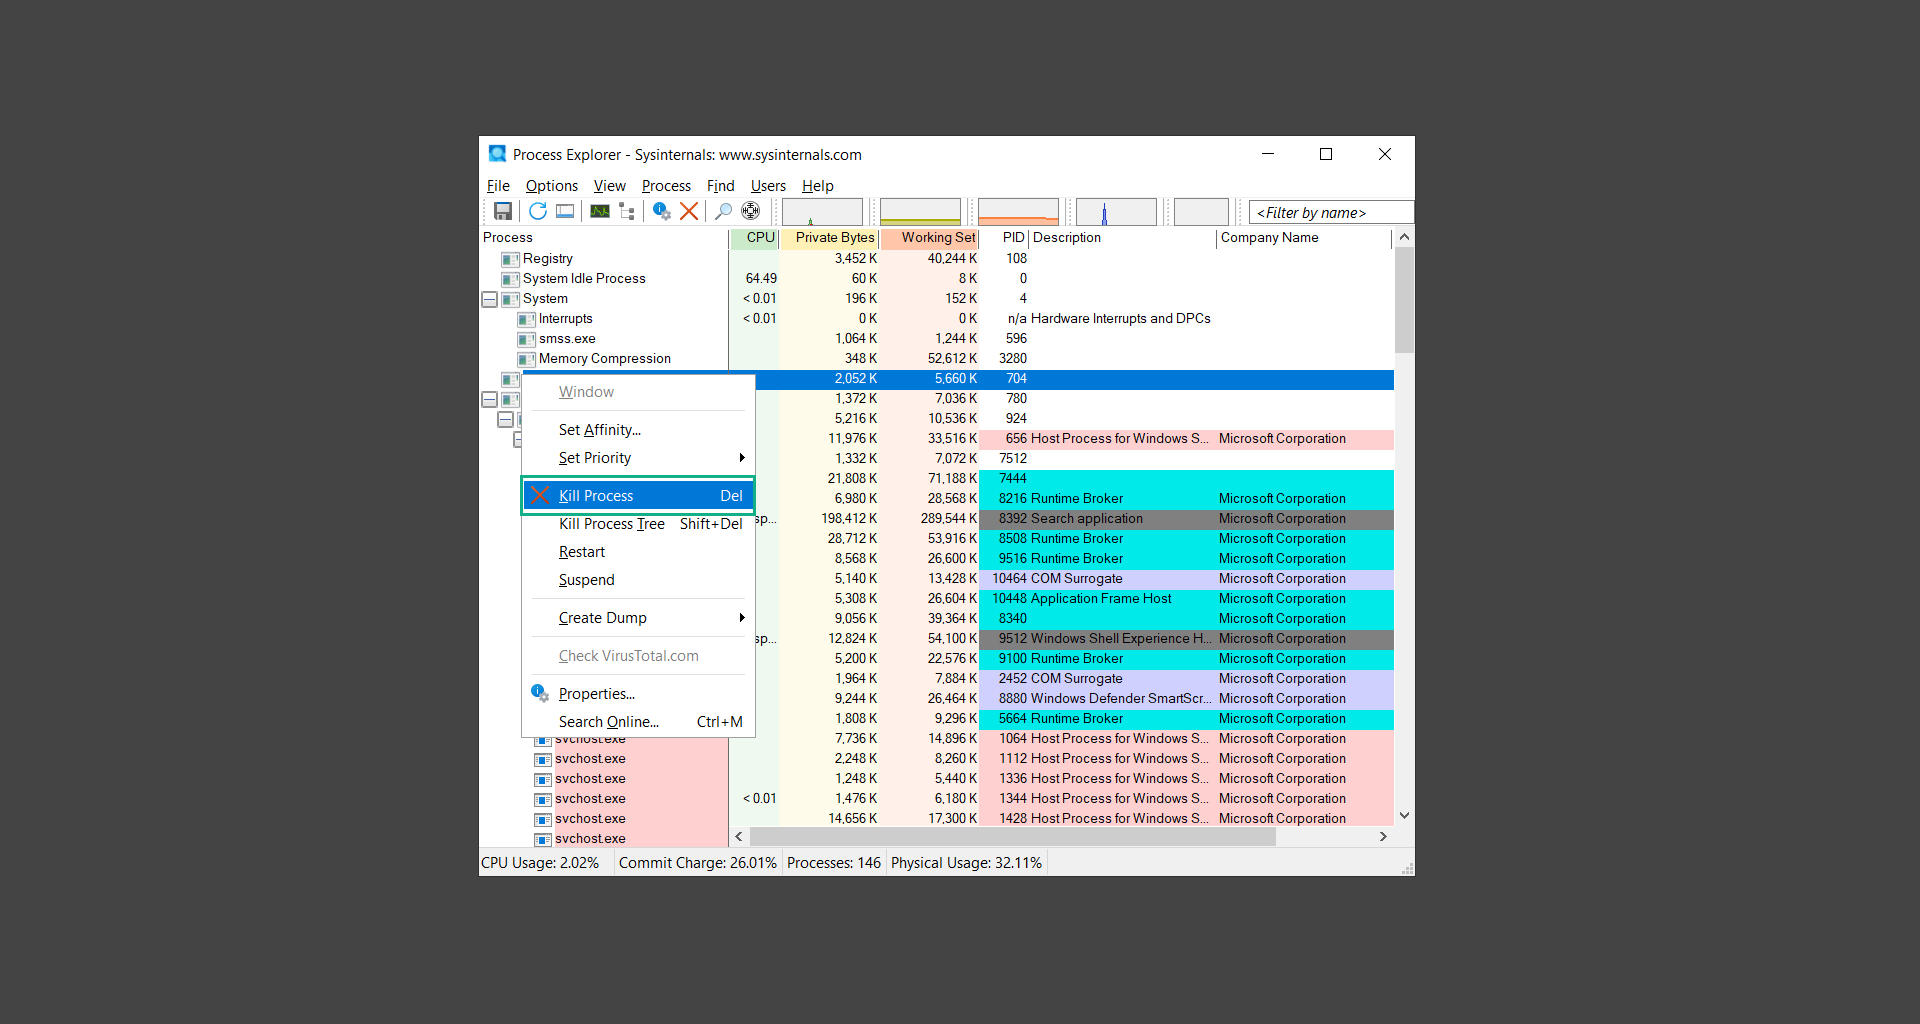
6. Once you have determined that a certain process is malware. Whether all suspected conditions are met or VirusTotal has flagged it numerous times. Kill/terminate the said process, open its path, and delete it from the system. (Tip: You can see its file location by hovering your mouse over the process.)
You may be able to find two or more malicious items therefore you should carefully look for suspicious processes before exiting the Process Explorer.
Step 2: Find and remove startup malware with Autoruns
Autoruns is another tool that is a part of the Sysinternals suite. It is a piece of software that is used to find processes that are configured to run upon system boot-up or whenever a user logs in to the computer.
We will use Autoruns to find threats inside a compromised system. Any installed malware will have the capability to survive a computer reboot.
1. First off, download the Autoruns tool from the official Microsoft website. Extract the zip folder and begin running the tool.
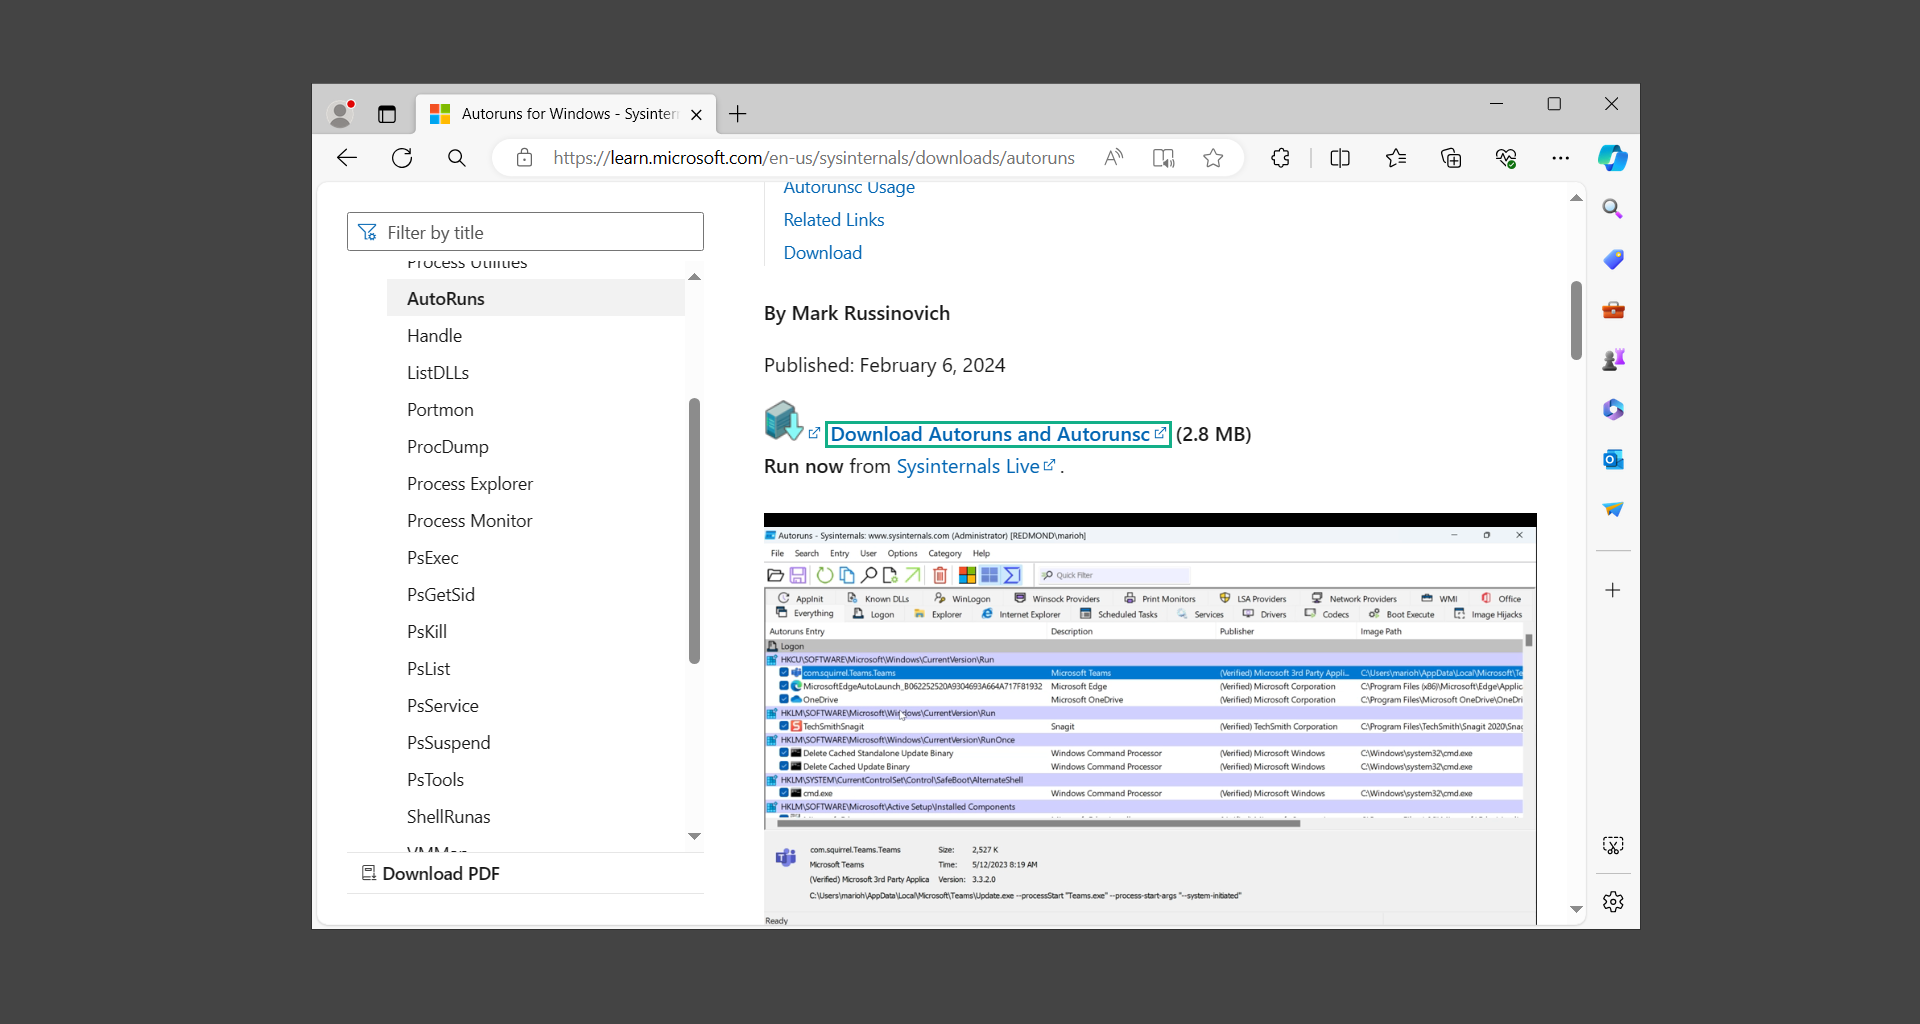
2. If this is the first time you have used Autoruns, then you may be probably overwhelmed at first. It consists of multiple tabs that each contain autostart mechanisms.
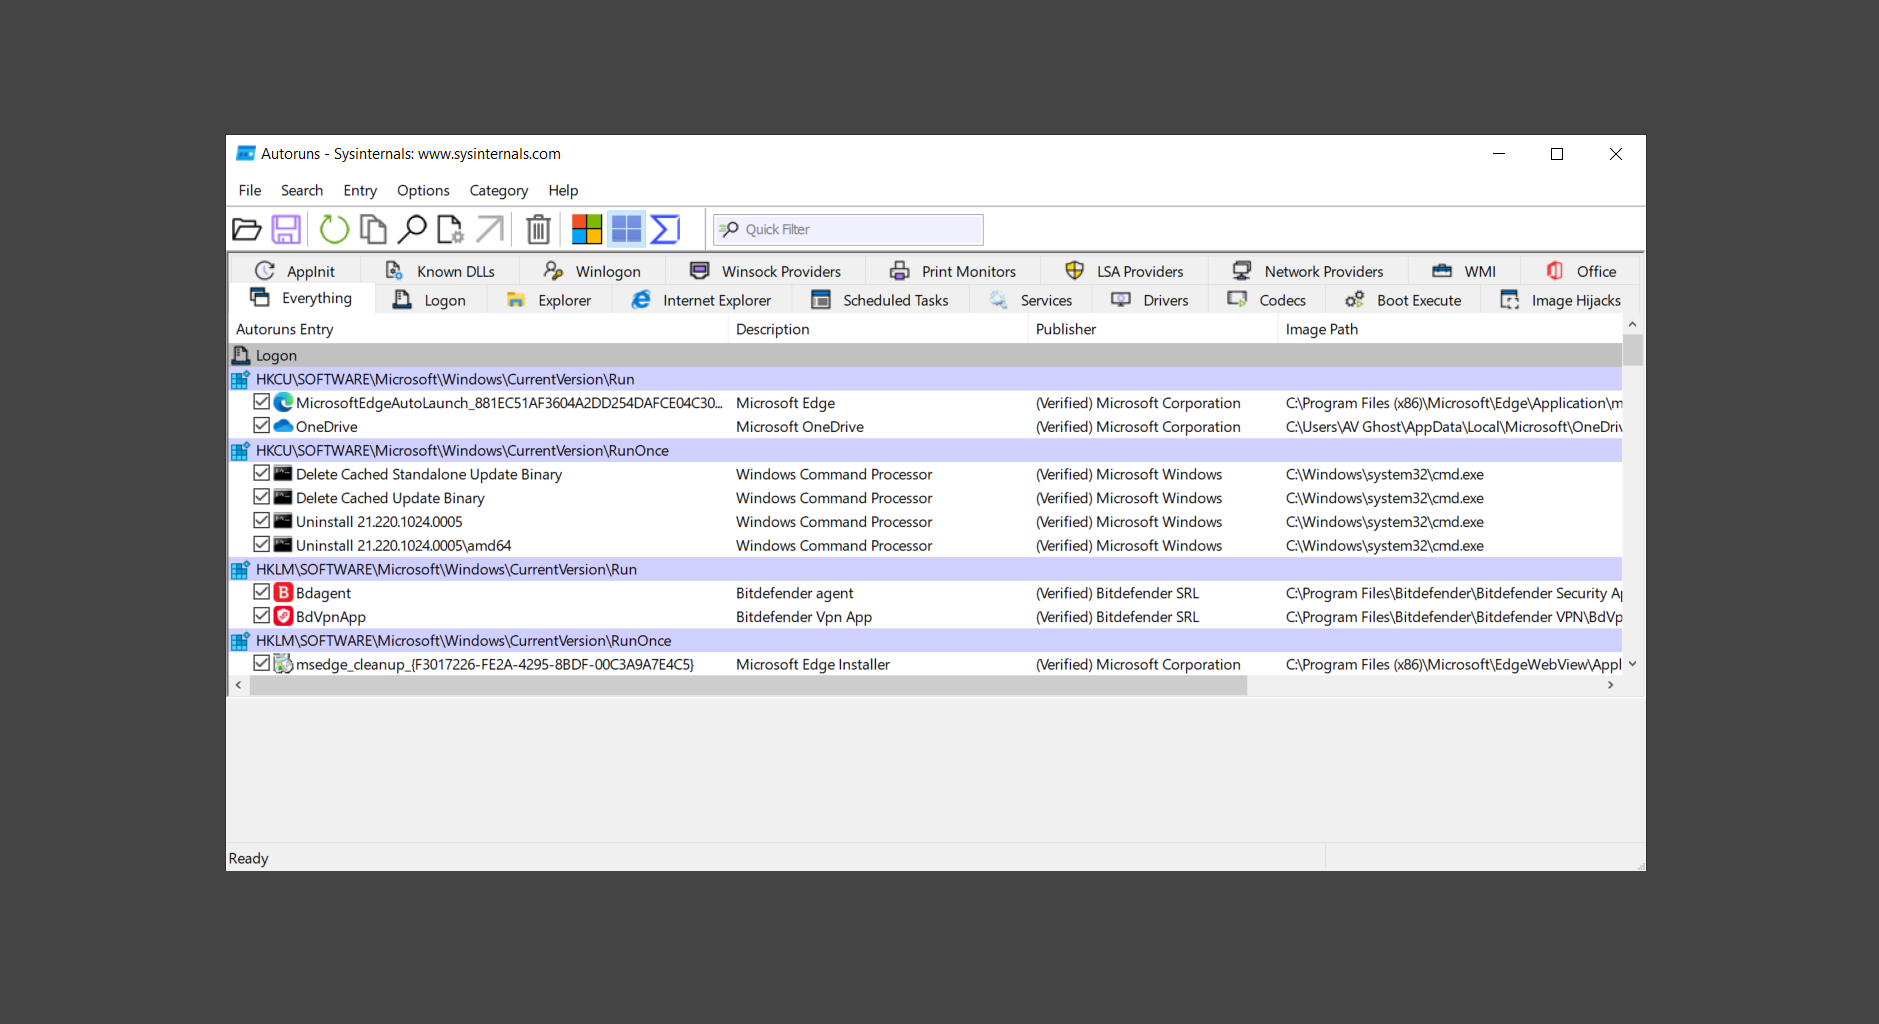
Here are what to expect in each tab:
- Logon: It displays the details for standard startup locations such as for installed programs and all the users on the computer.
- Explorer: This includes shell extensions, Browser Helper Objects, Explorer Toolbars, and Active Setup Executions. You may see a great number of DLL files within this tab.
- Internet Explorer: This tab displays a more in-depth look at the web browser which shows Browser Helper Objects, Toolbars, and Extensions that are installed within the browser.
- Scheduled Tasks: It displays the tasks that are set to execute upon system boot or user login. This is commonly used by malware therefore looking into the tasks that seem suspicious will lead you to the malware executable.
- Services: This tab shows all Windows services that are set to run upon boot. Normally, there should not be any suspicious processes within this tab. But malware may cloak itself as a system process as a persistence mechanism so it might be worthwhile to check.
- Drivers: It allows a piece of hardware such as the keyboard and mouse to communicate with the system. This tab displays all registered drivers that the computer used.
- Image Hijacks: This tab will show all registry settings that redirect and control how a certain program or executable will be loaded. It is worthwhile to check this tab as there is a great chance that you will find malware.
There are more tabs within Autoruns but the ones mentioned above are where you will want to check for malware.
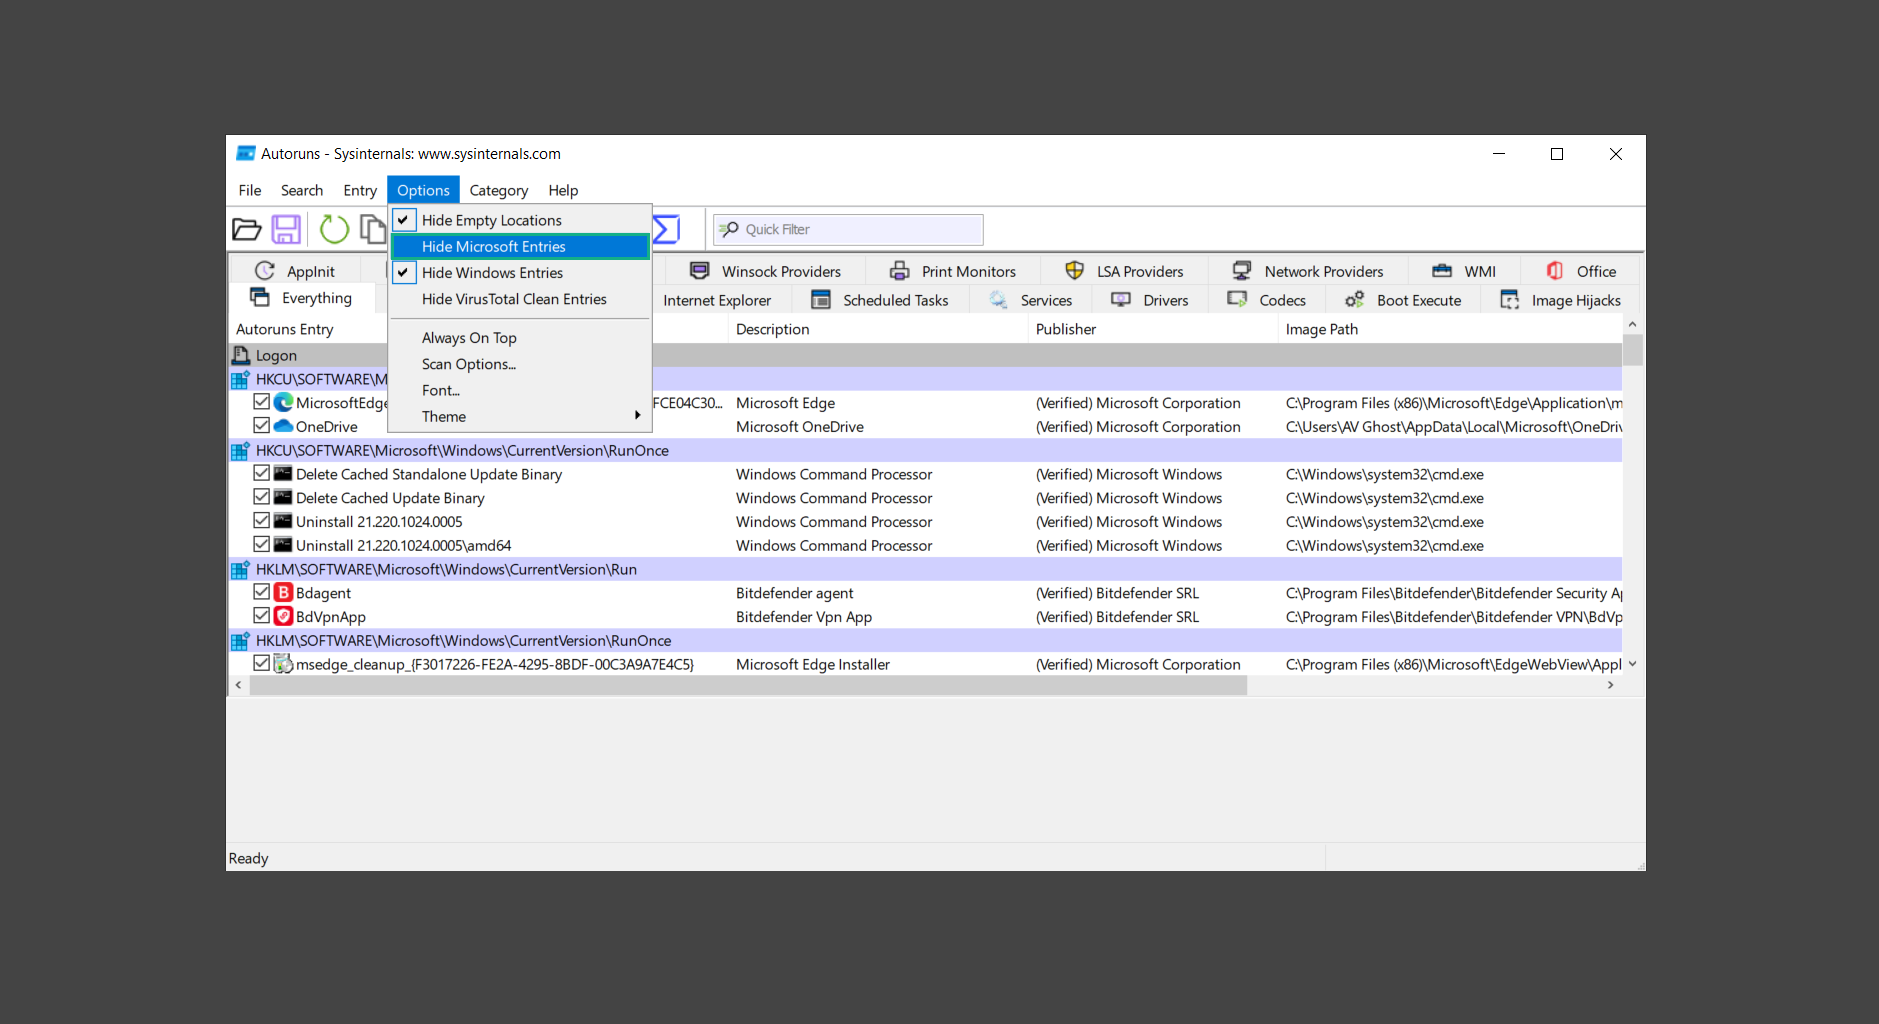
3. In order to make the search for malware easier, we can exclude verified processes and entries from displaying. To do this, click Options, from the menu bar then tick Hide Microsoft Entries.
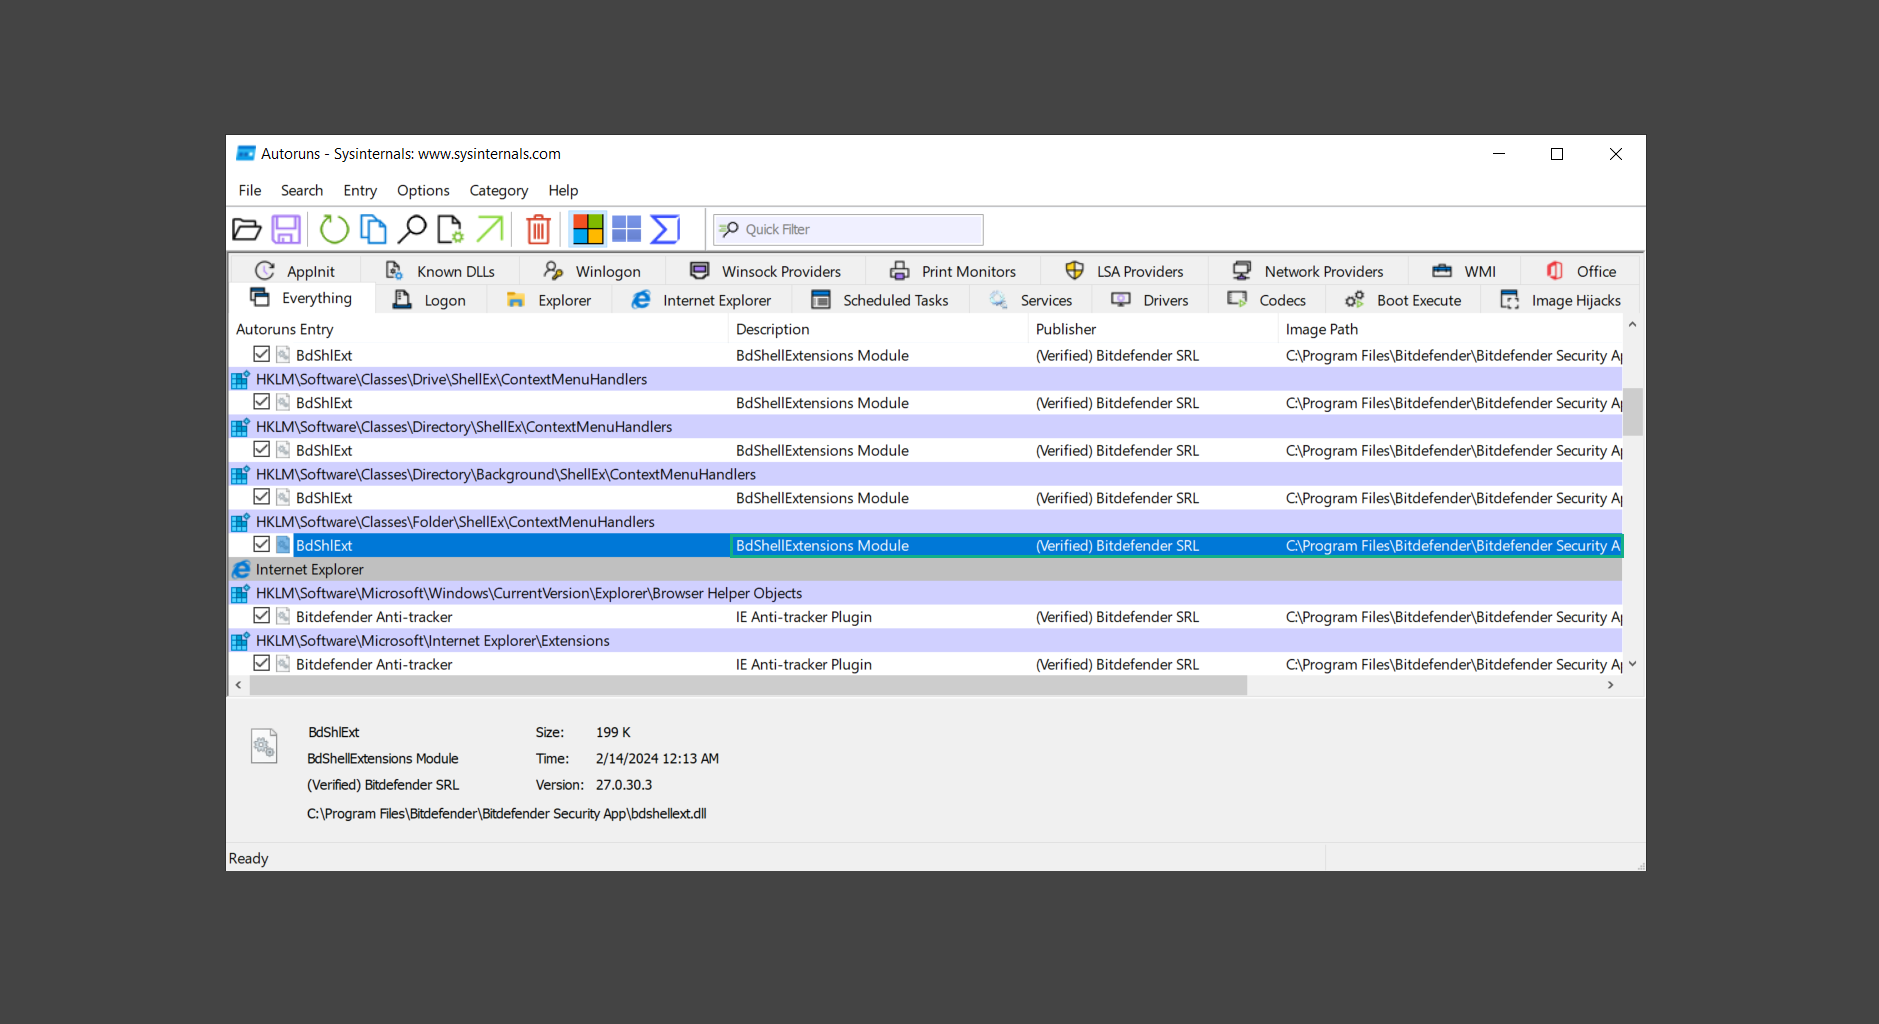
4. Now, check the tabs for malicious entries. We can do so by checking whether the entry has a verified publisher and a description. The Image Path also indicates where the file is located, so a suspicious directory such as the Temp folder will be a red flag.
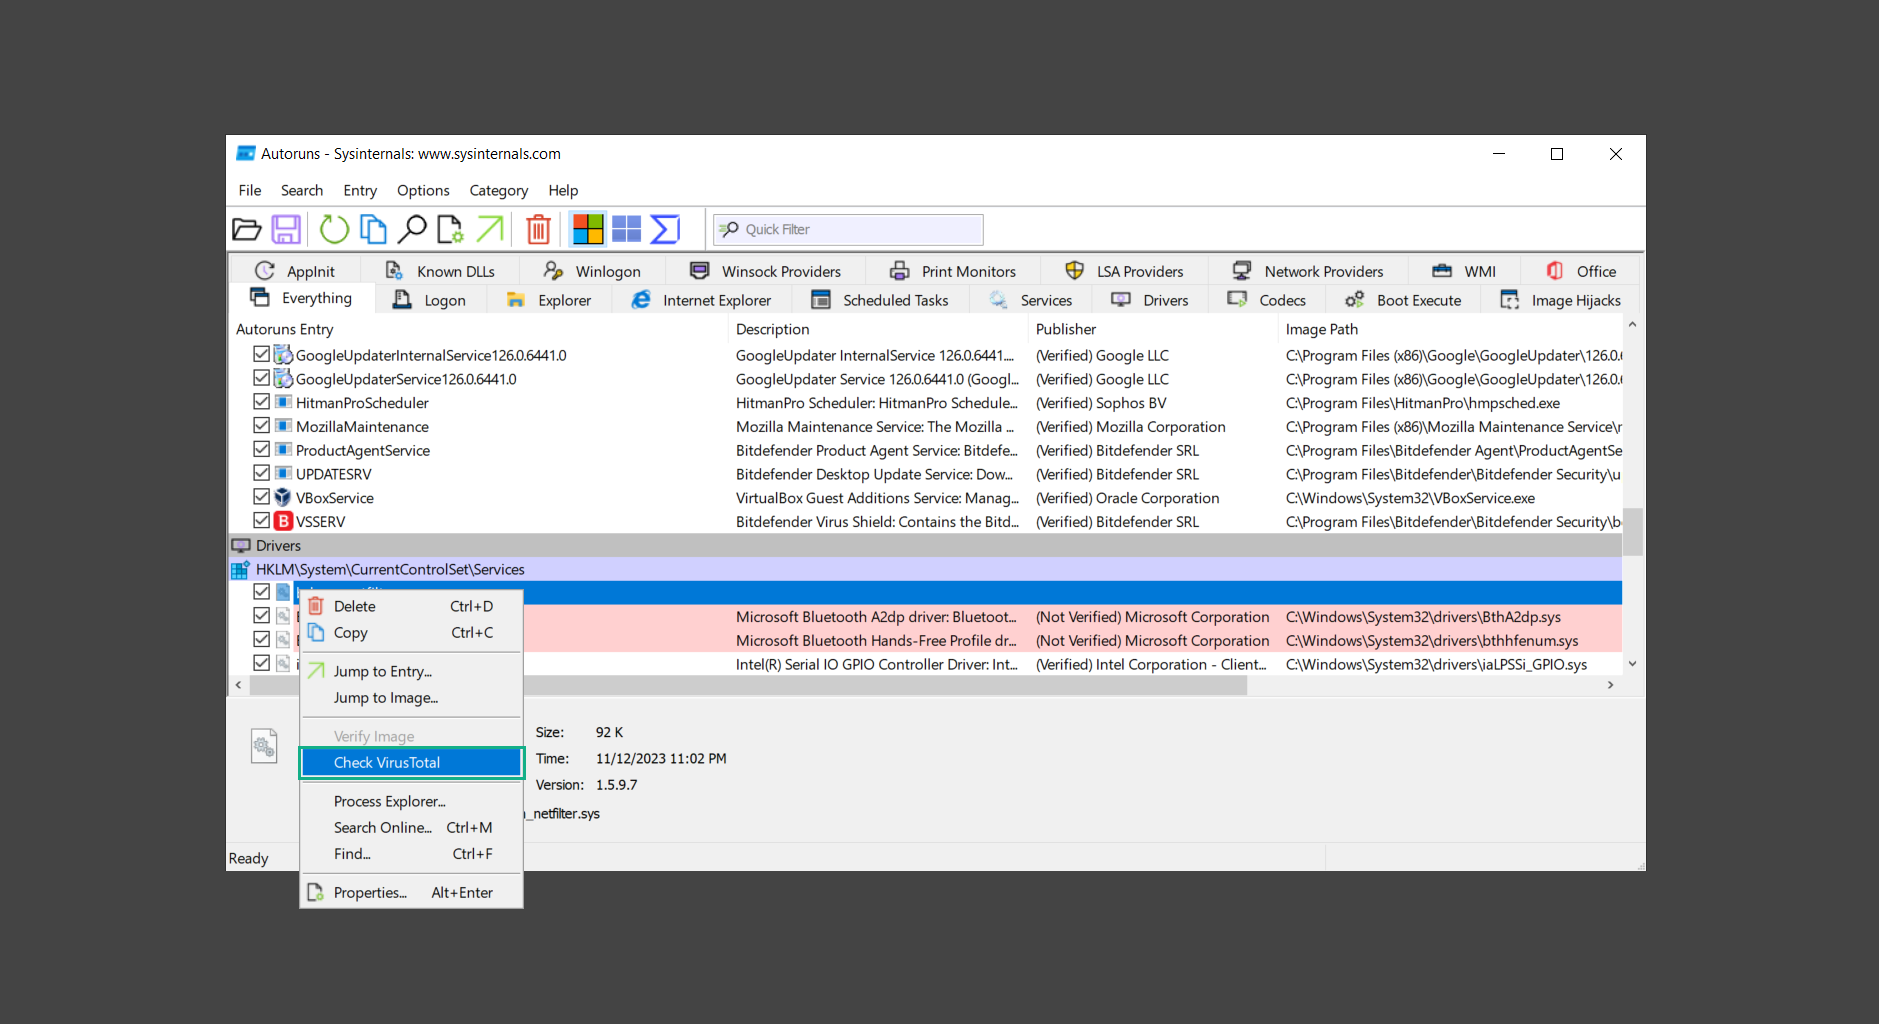
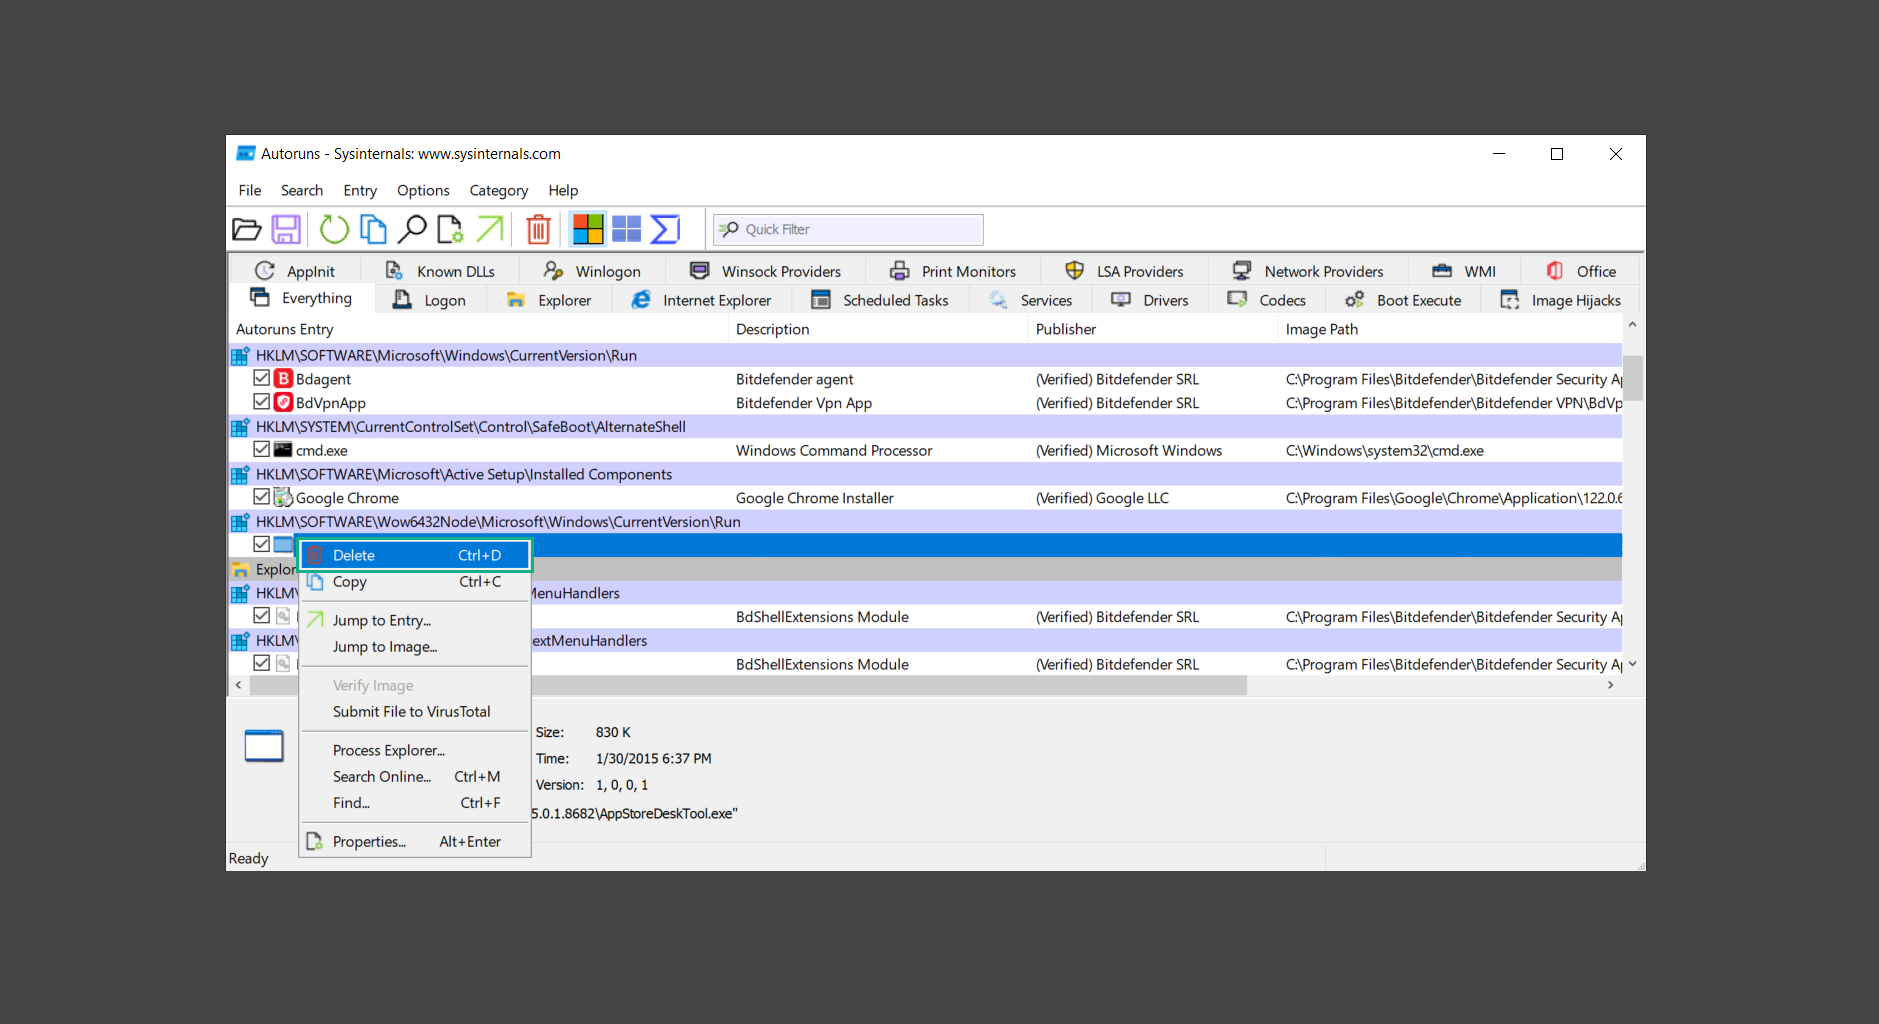
5. After investigating the files, we can right-click the file/s of suspicion and click Check VirusTotal to scan the entry for malware. This will scan the entry using multiple antivirus engines. (The scan results will be displayed on the right corner of the entry next to the Timestamp.)
6. Once VirusTotal has displayed how many antivirus vendors have flagged the file as malicious. Right-click the entry and select Delete to stop it from running. Confirm the deletion by selecting Yes when prompted if you are sure you want to do so.
Step 3: Run Norton Power Eraser
Norton Power Eraser can be described in a single word: false positives. The tool is notorious for not leaving any trace of malware unnoticed on the computer, therefore it always detects normal processes and programs as well.
The reason this is in the advanced steps is because it requires the skill to be able to discern between legitimate and harmful programs. In this instance, the Norton Power Eraser is an extremely effective tool to utilize. It effectively narrows your search for malware.
1. To begin with, download Norton Power Eraser from the official website.
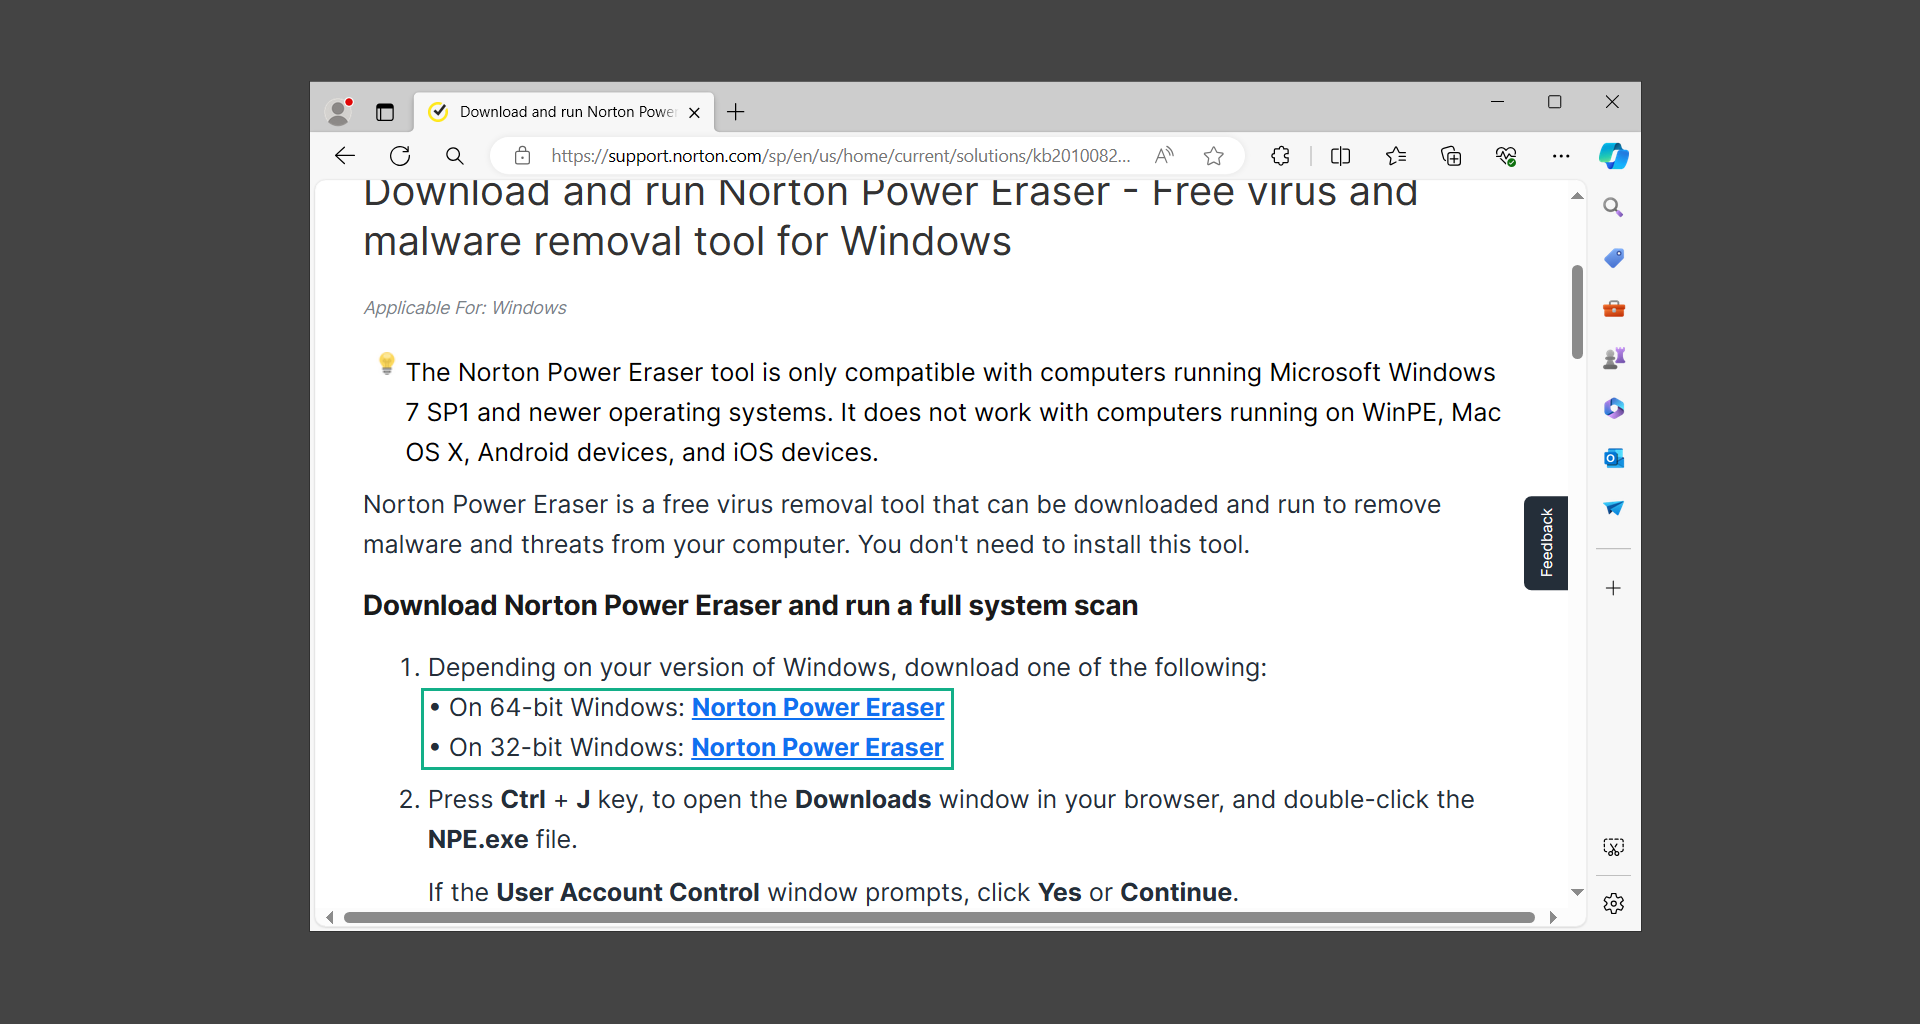
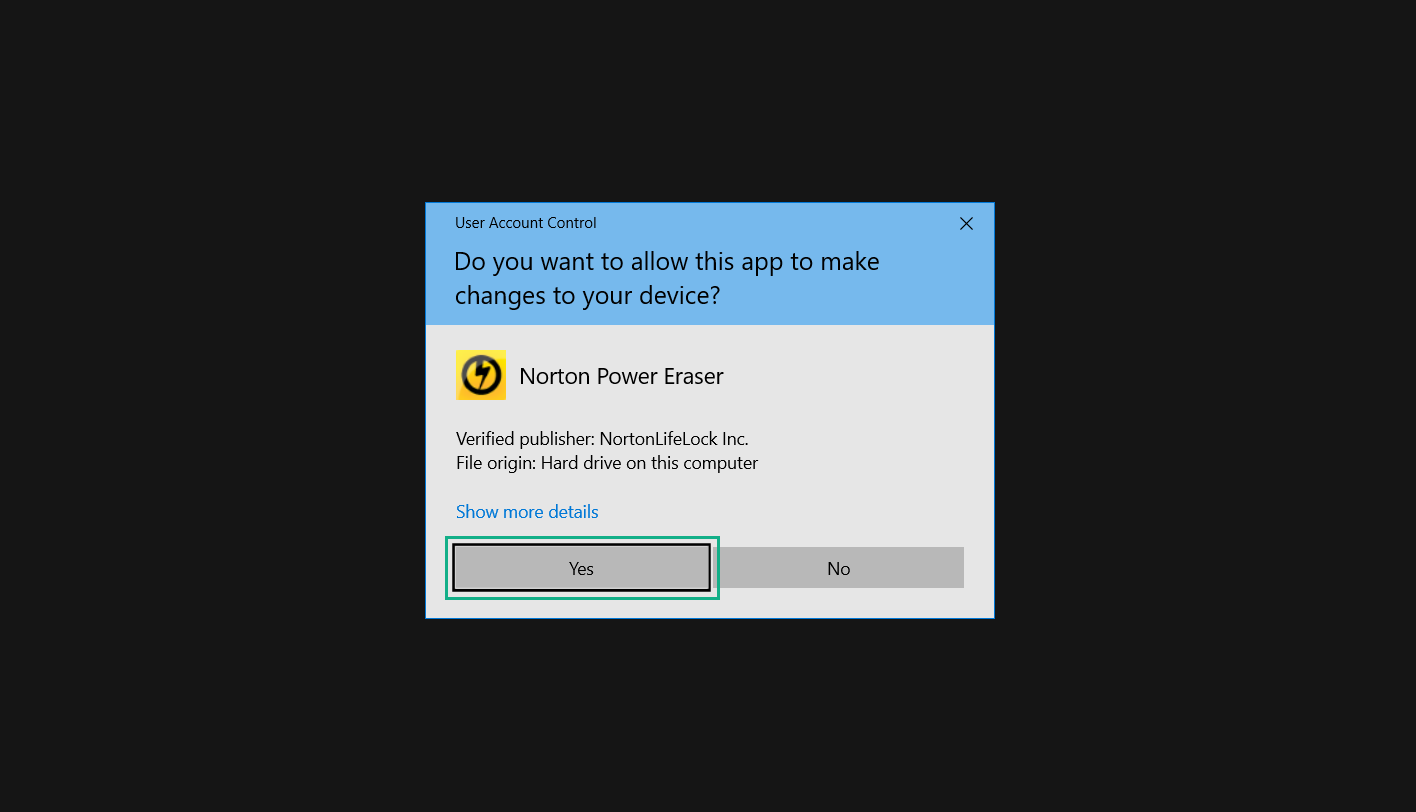
2. NPE.exe would have begun downloading on the computer. Wait for it to finish then run it afterwards.
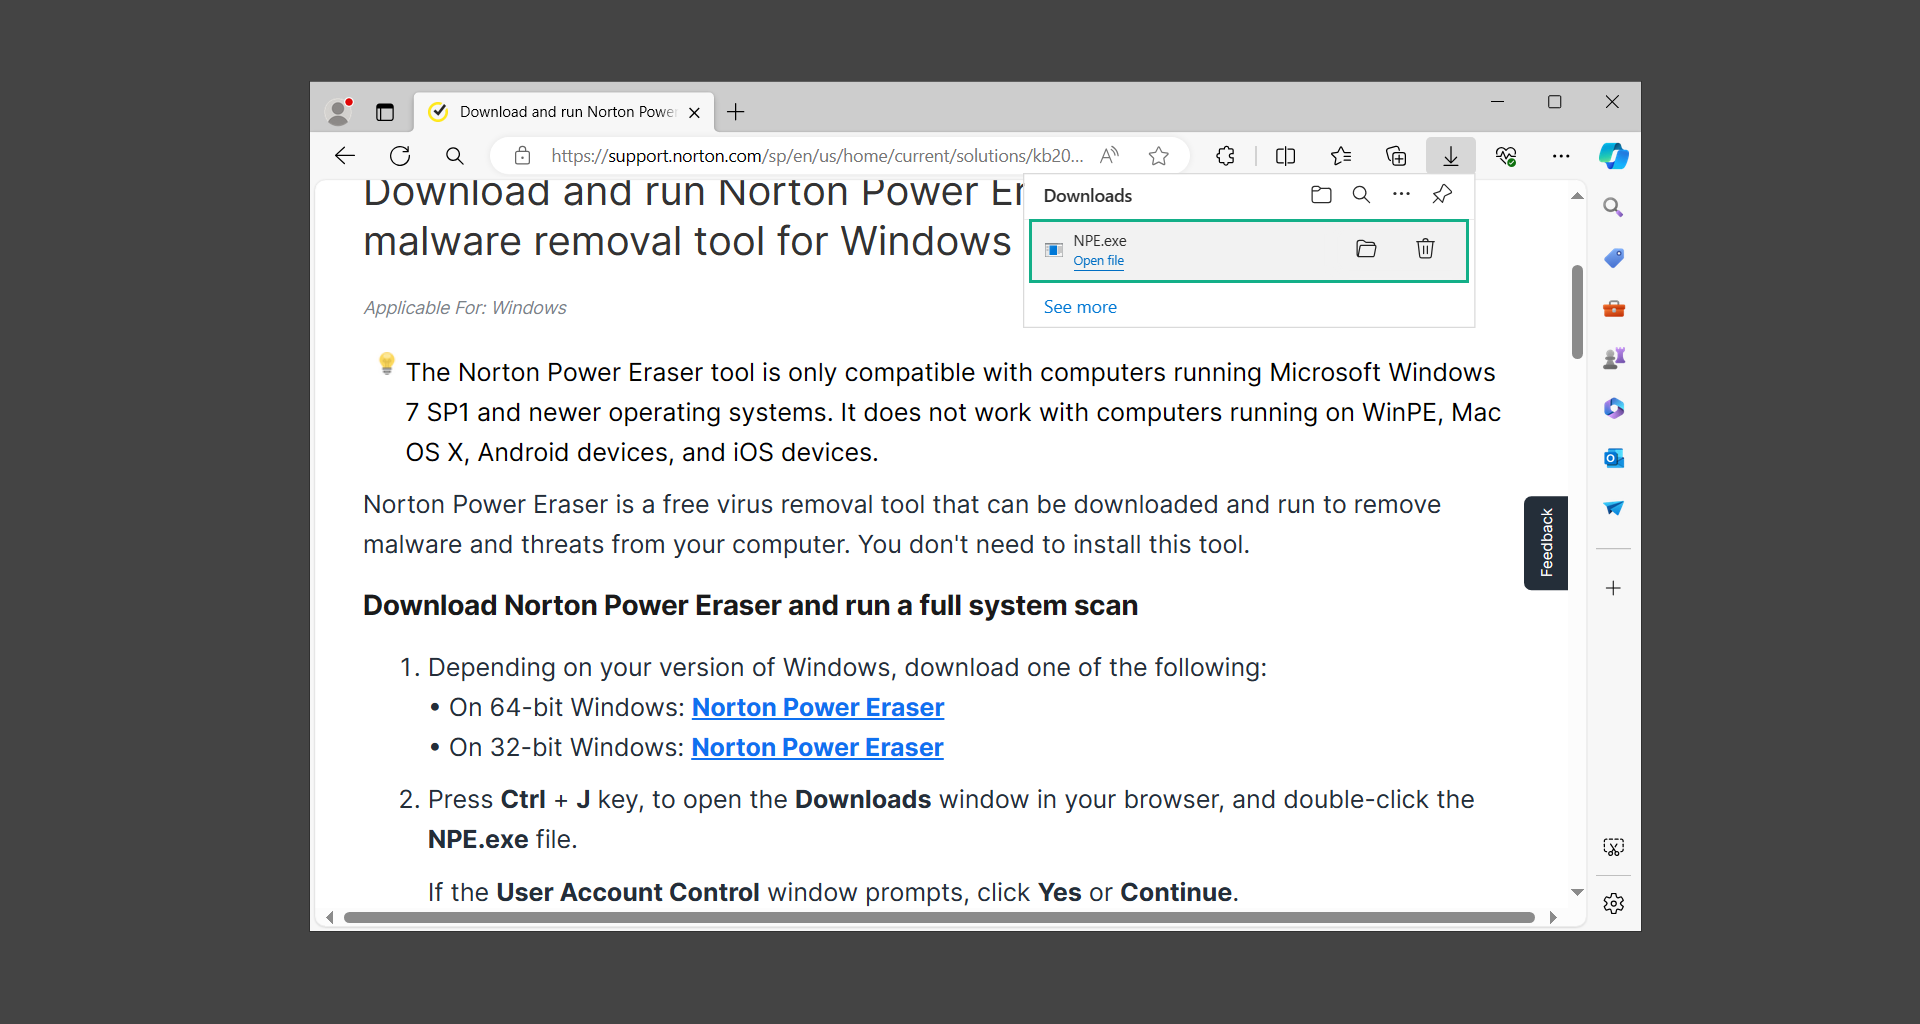
3. If the User Account Control window pops up, click Yes.
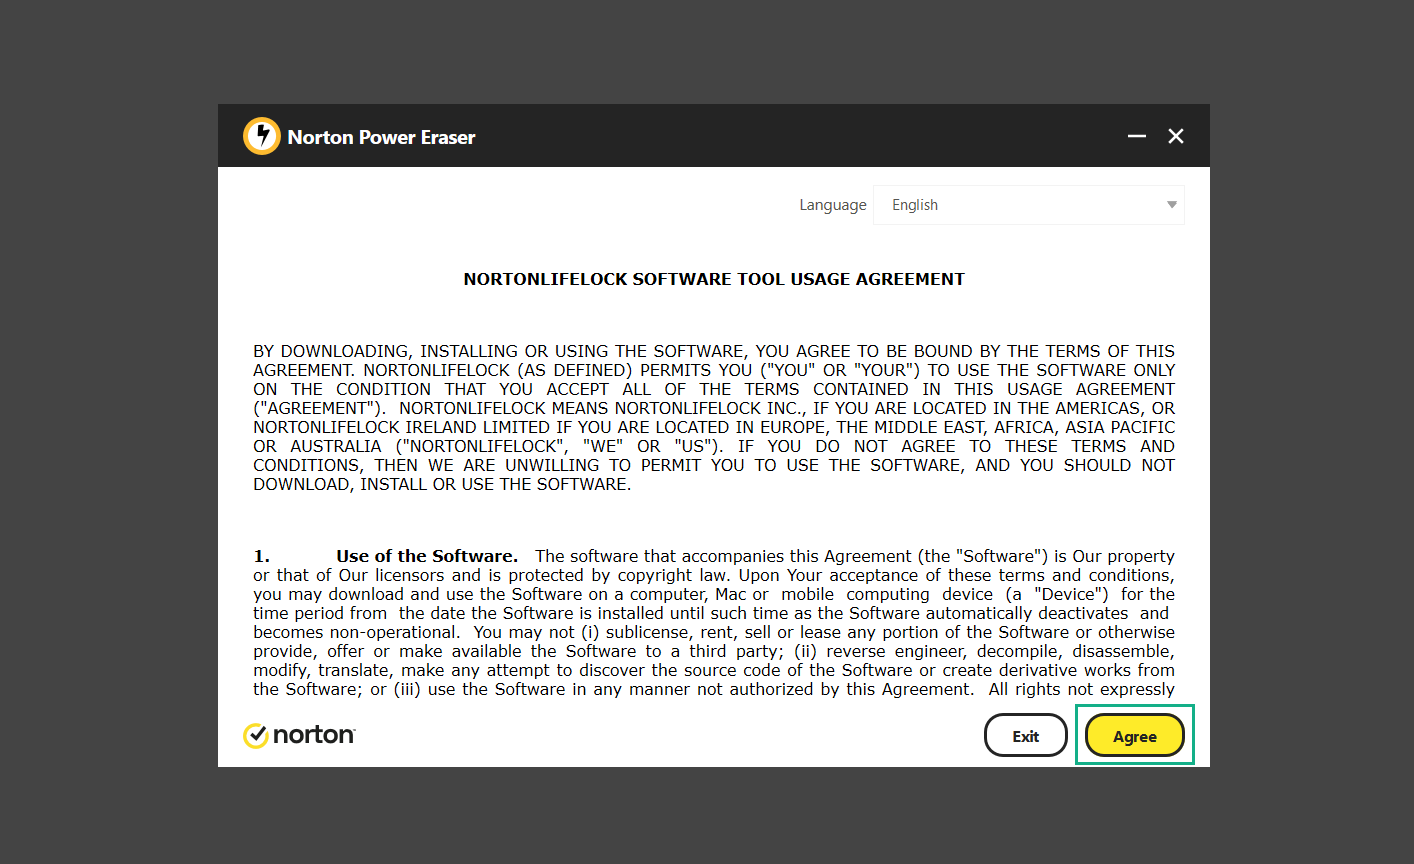
4. Read the program’s license agreement and click Agree. You will only be prompted upon the first launch.
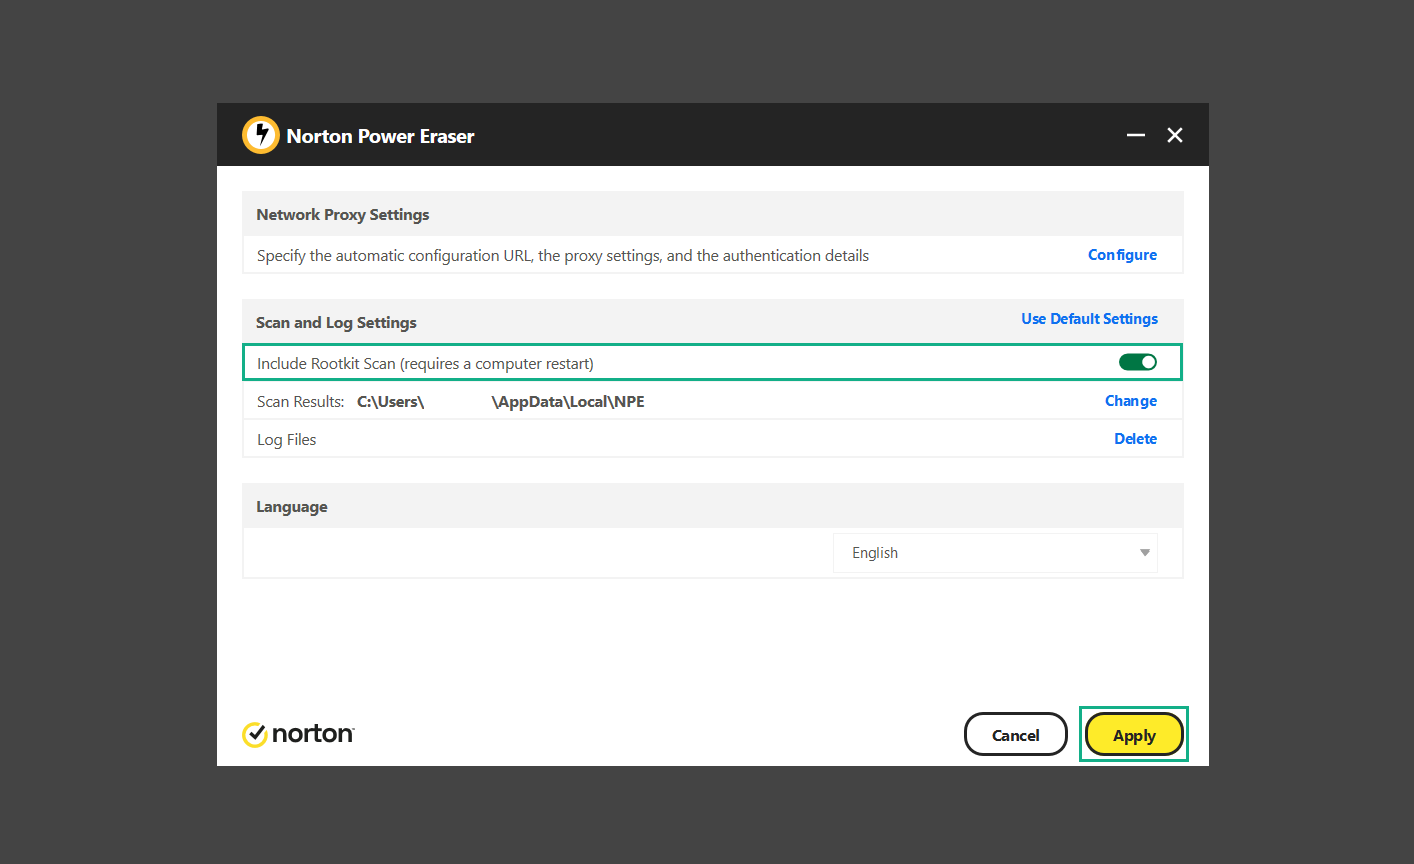
5. Once the Norton Power Eraser home menu has opened, select Settings, toggle the Include Rootkit Scan option, and click Apply. This will allow the program to scan for hidden malware on the computer. Do note that this will require a computer restart.
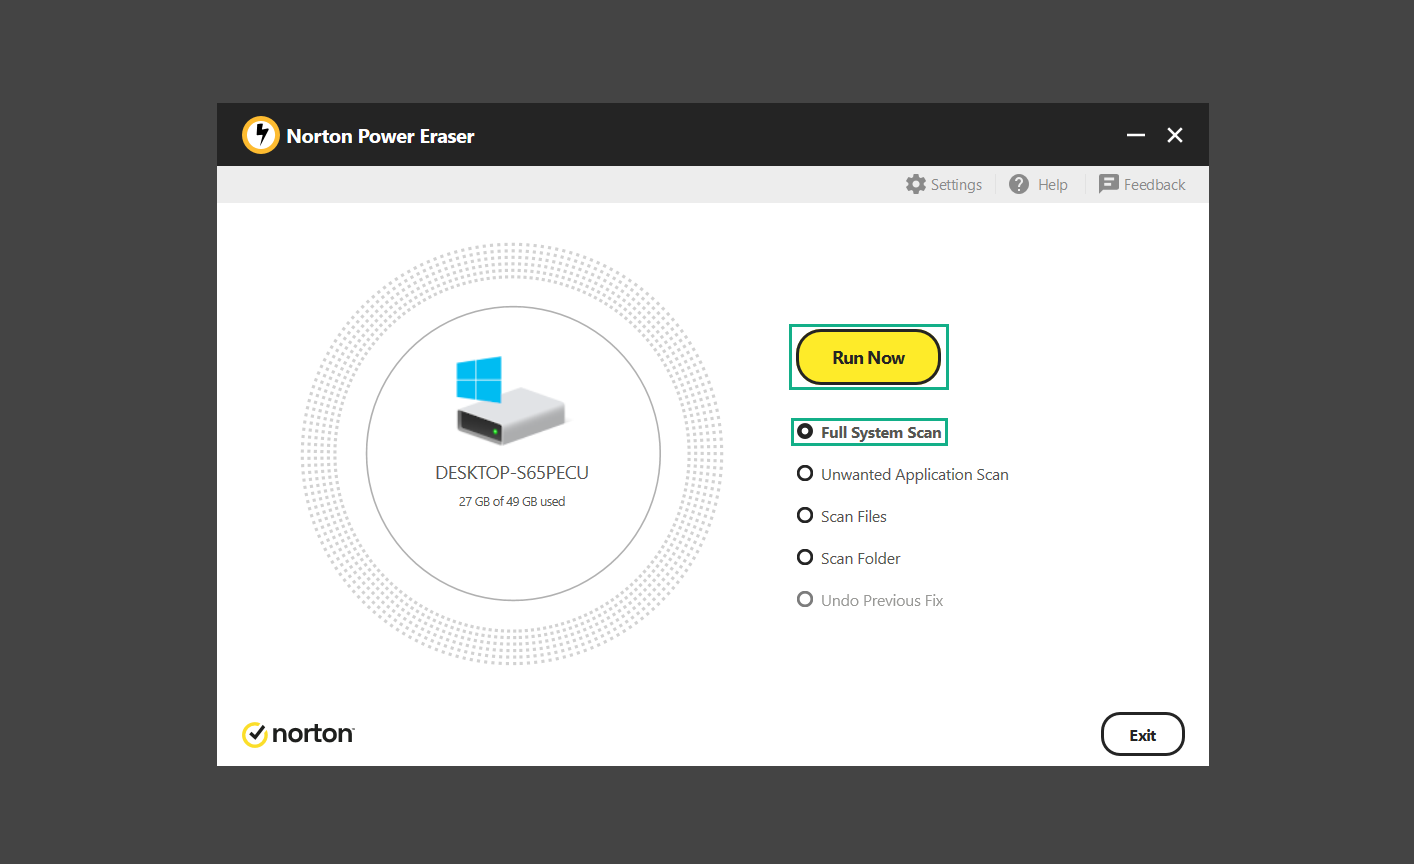
6. After the system has restarted, open Norton Power Eraser, select Full System Scan, and click Run Now to start the process.
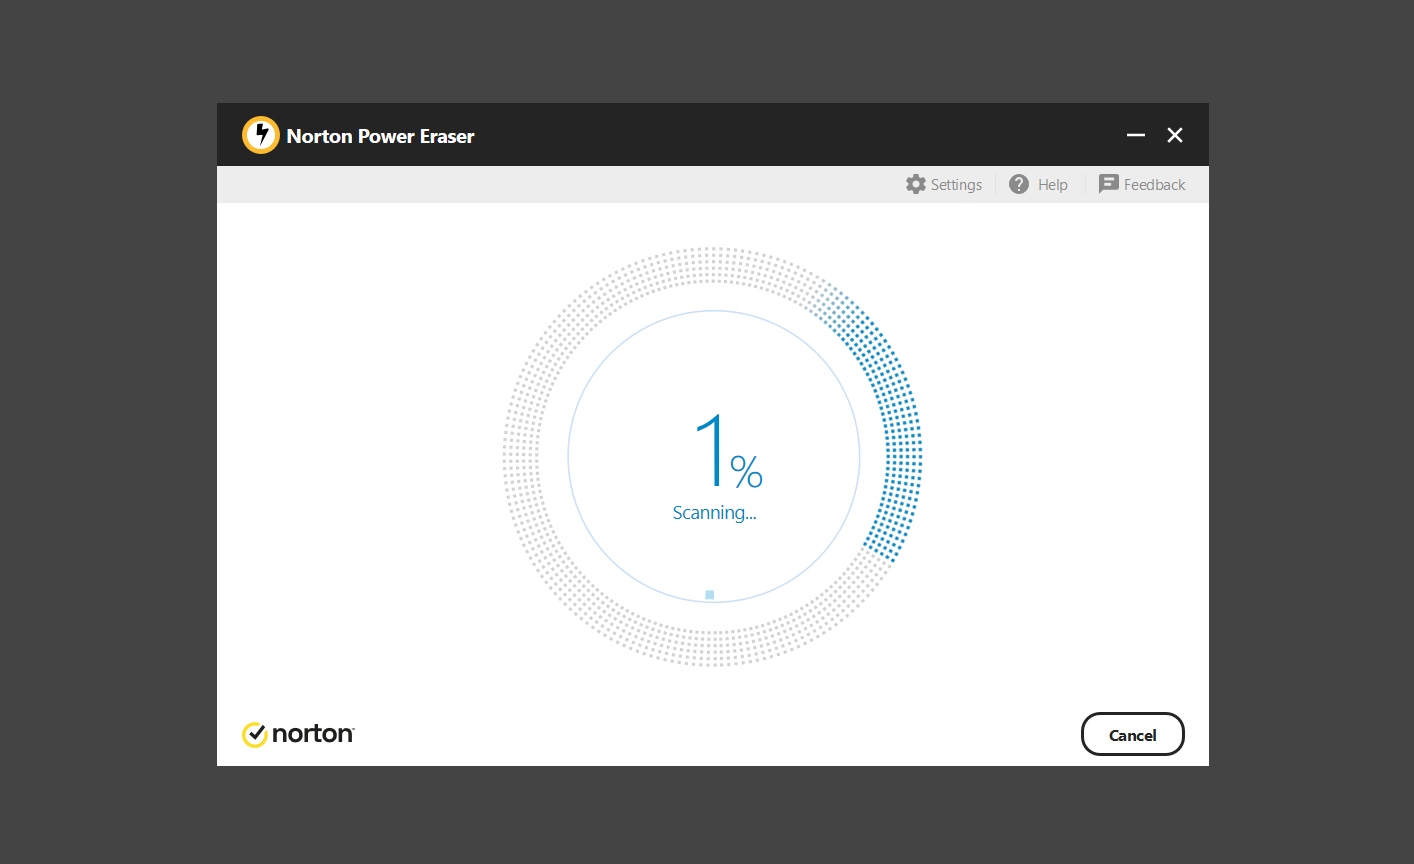
7. Wait for the scanning process to finish. This will depend on how many files you have on your computer, as well as the hardware capabilities of your system.
8. Once the scan is complete, Norton Power Eraser will show all the detected threats onscreen. Take action by clicking Delete/Fix on the right side of each item. After that, click Close to finish the process. On the other hand, if no threats are found, click Done.
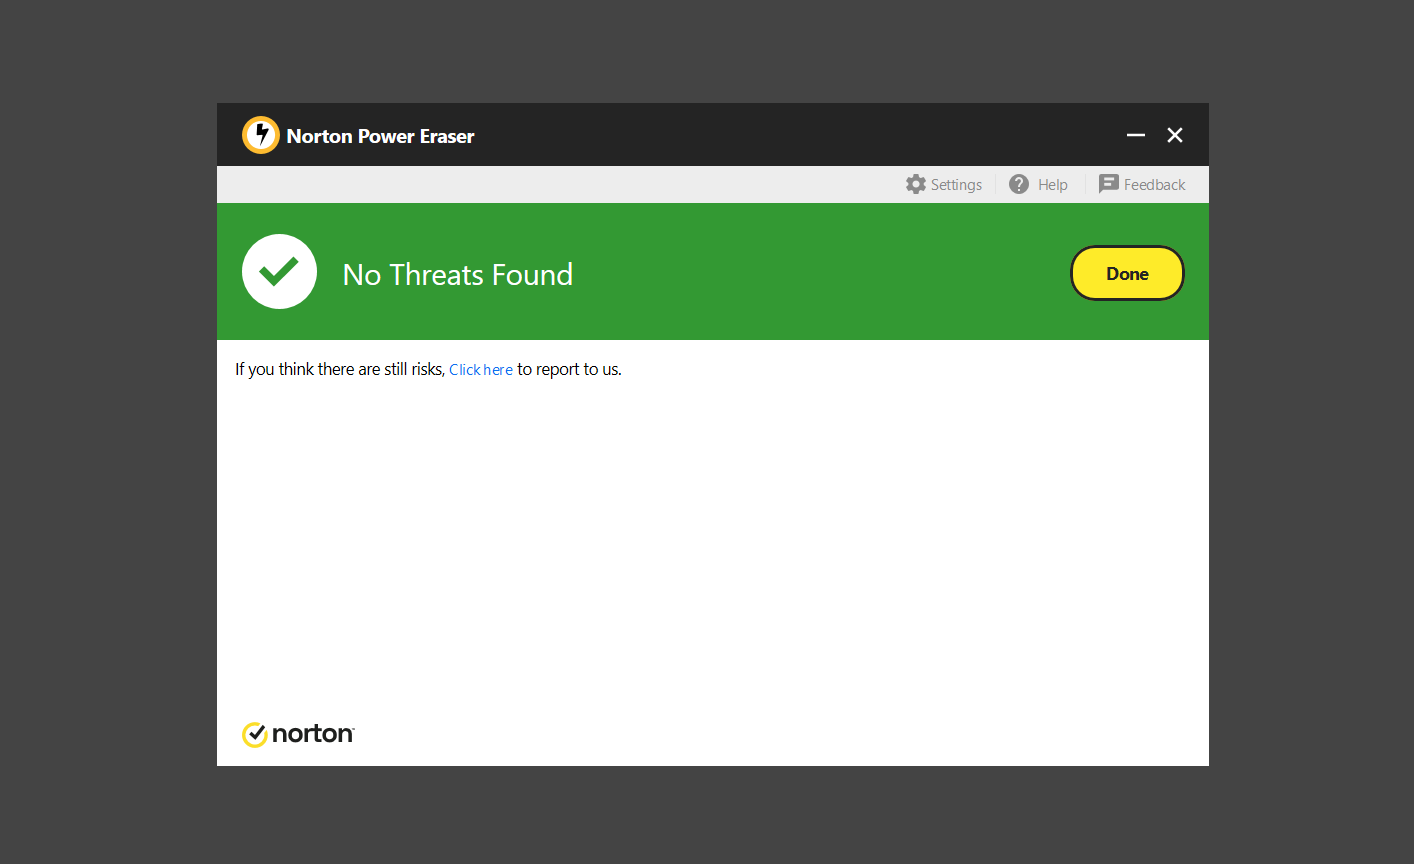
Norton Power Eraser is a portable tool that does not need to be installed to work. Therefore you can always run it at your disposal whenever you believe your computer is infected with malware you cannot find.
Step 4: Check the Hosts file for unwanted entries
Malware can hijack the browser and the computer network by inserting unwanted lines of IP addresses and websites in order to redirect the user’s browser without their consent.
The hosts file is a common point of target for malware developers since they are located deep into the computer system, making it harder for non-tech-savvy individuals to find, moreover, understand the contents inside it.
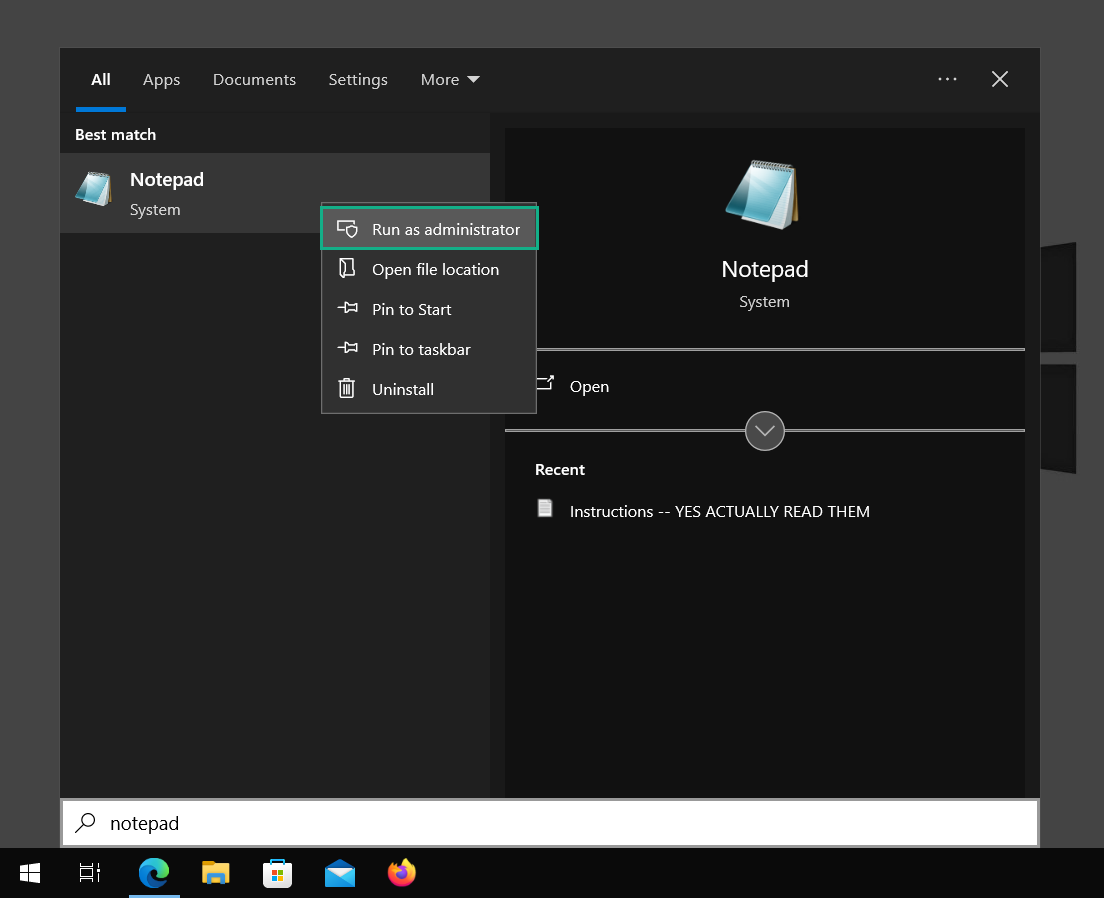
1. To start, open the Notepad program as an administrator. This is because admin privilege is needed to access the host file.
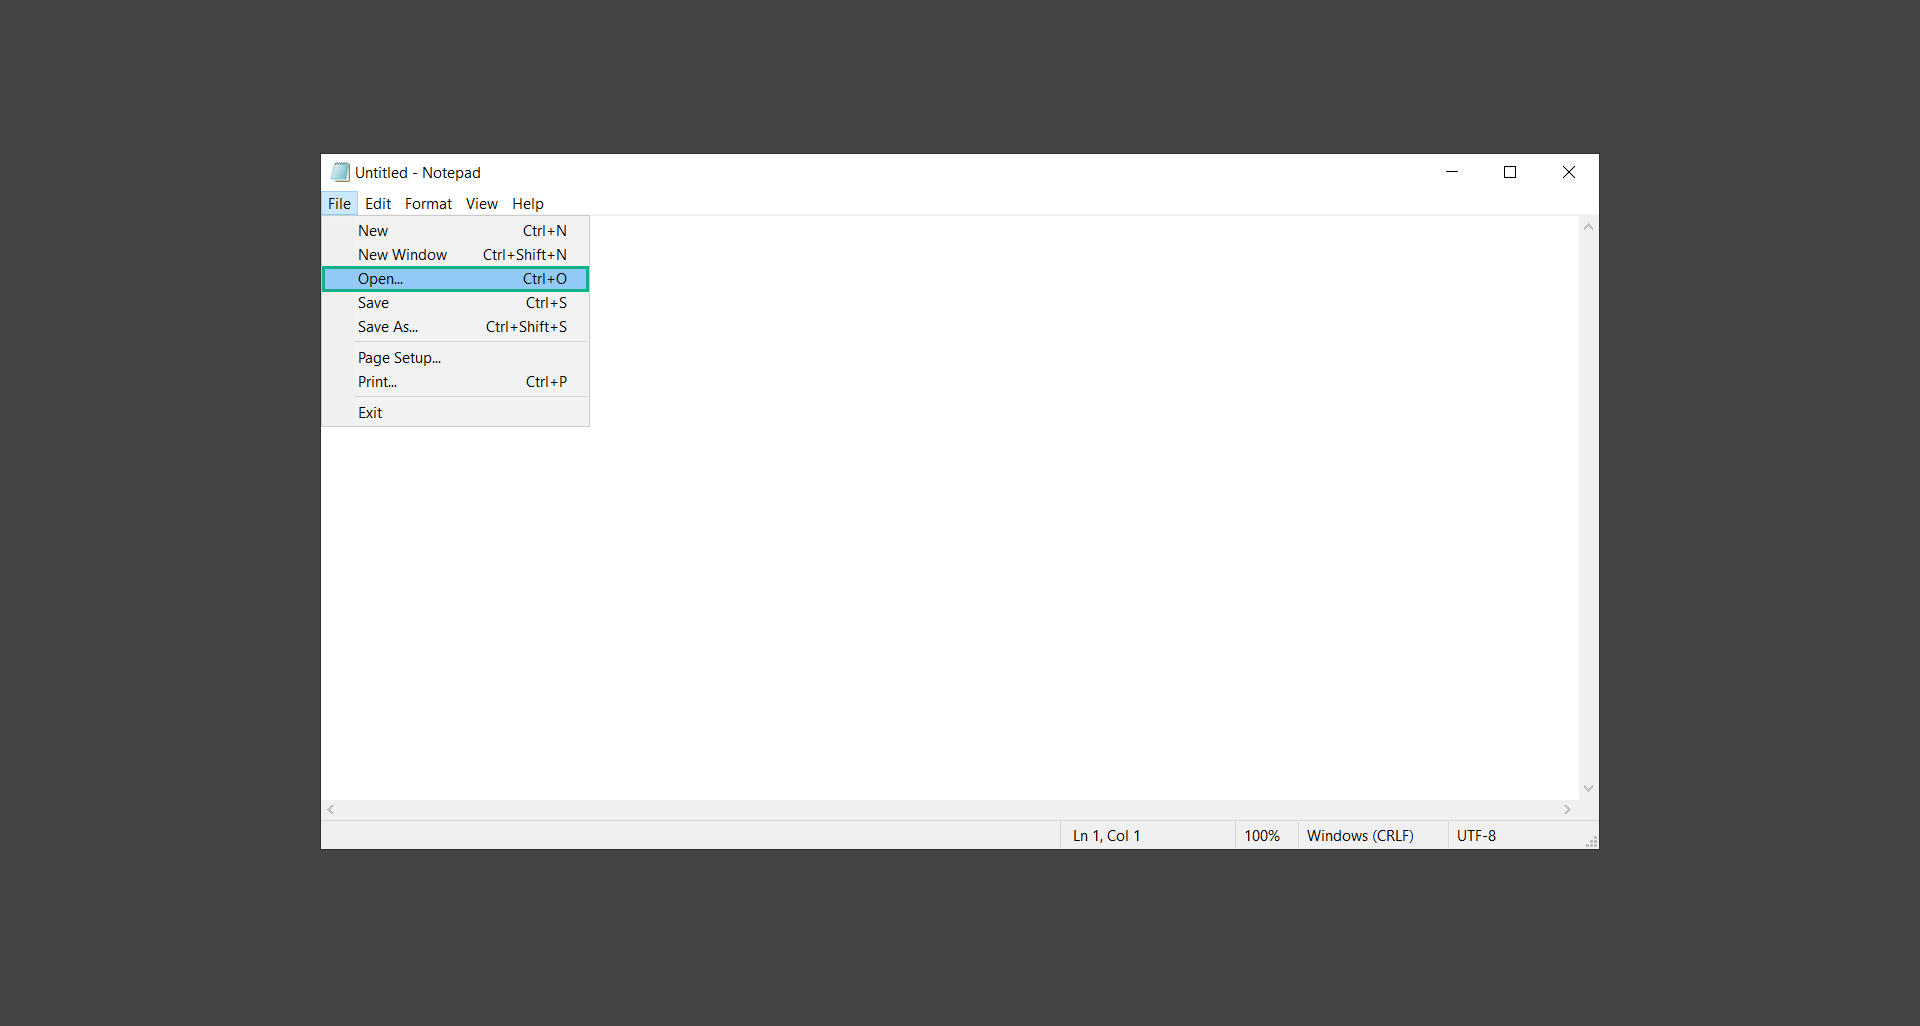
2. Inside the Notepad application, click File, and inside the dropdown menu, select Open.
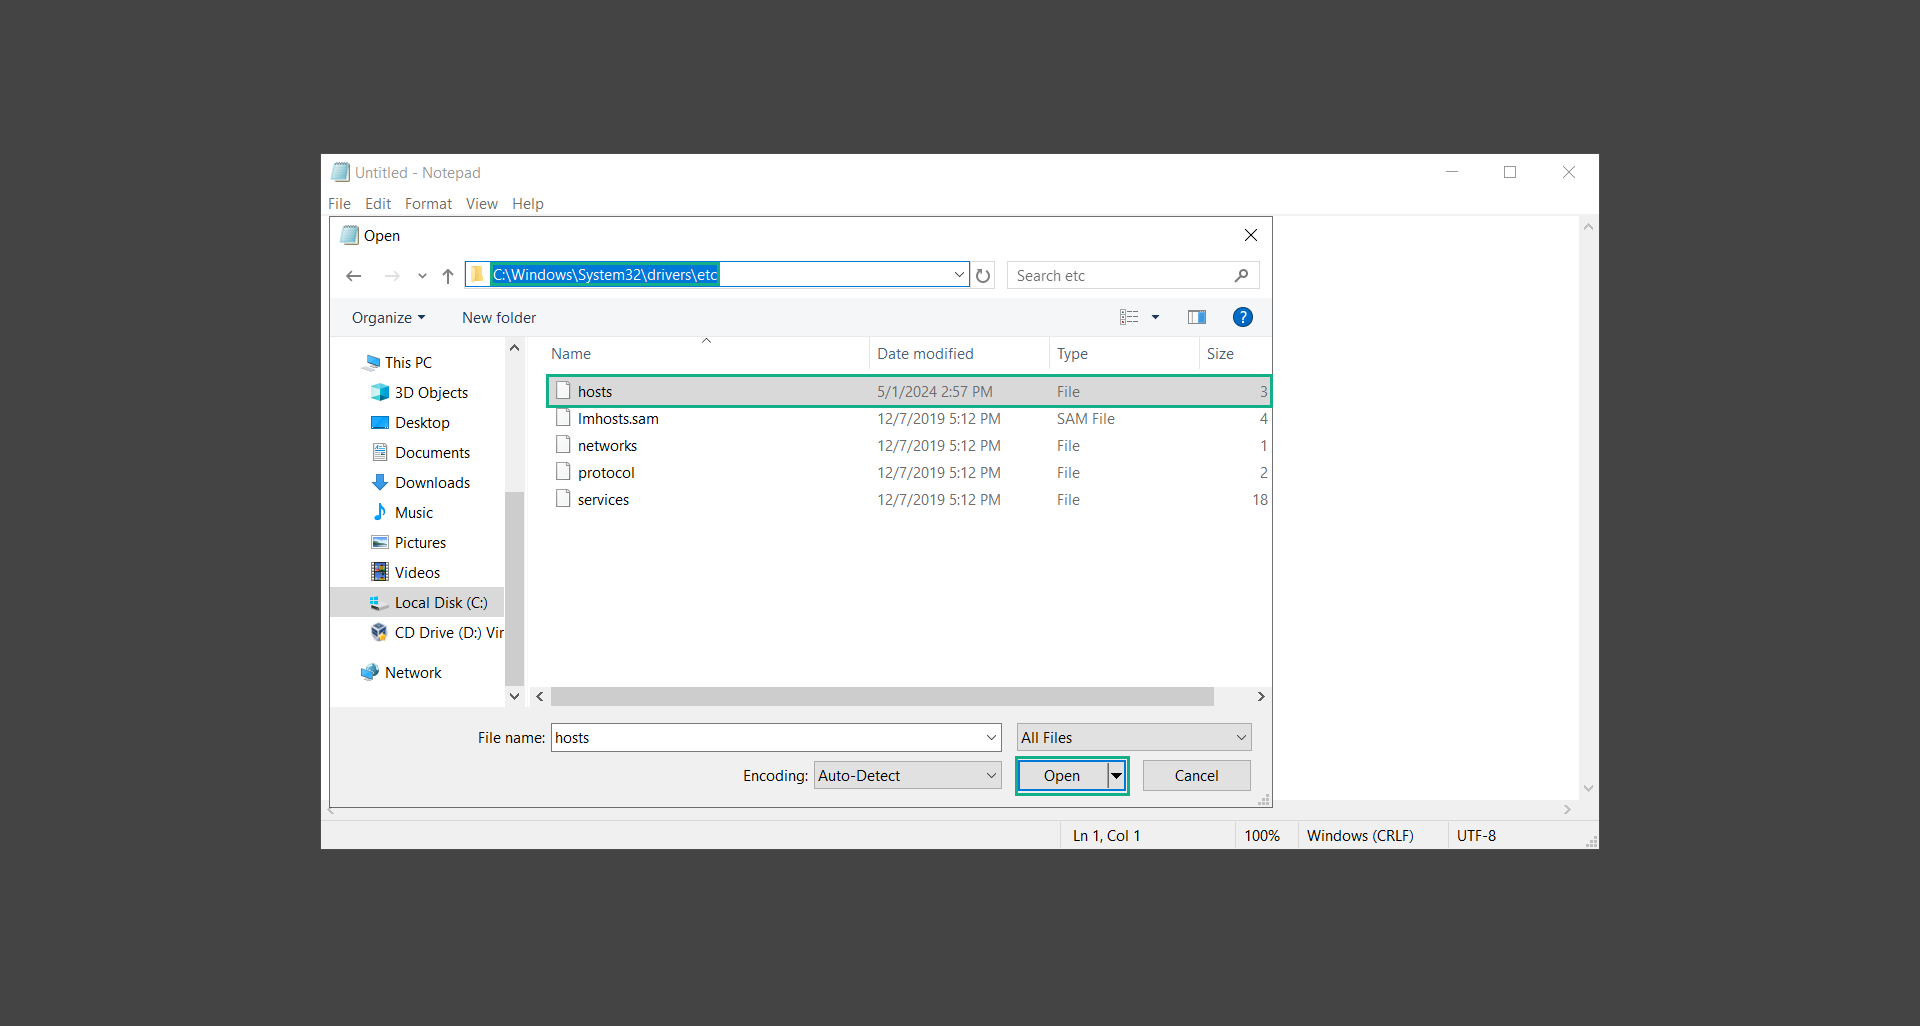
3. Heading over to the following directory: C:\Windows\System32\drivers\etc and open the hosts file.
4. Once the hosts file has opened in the Notepad, you may notice entries that are added by Microsoft and legitimate programs. But you may also see suspicious entries that you may not entirely recognize.
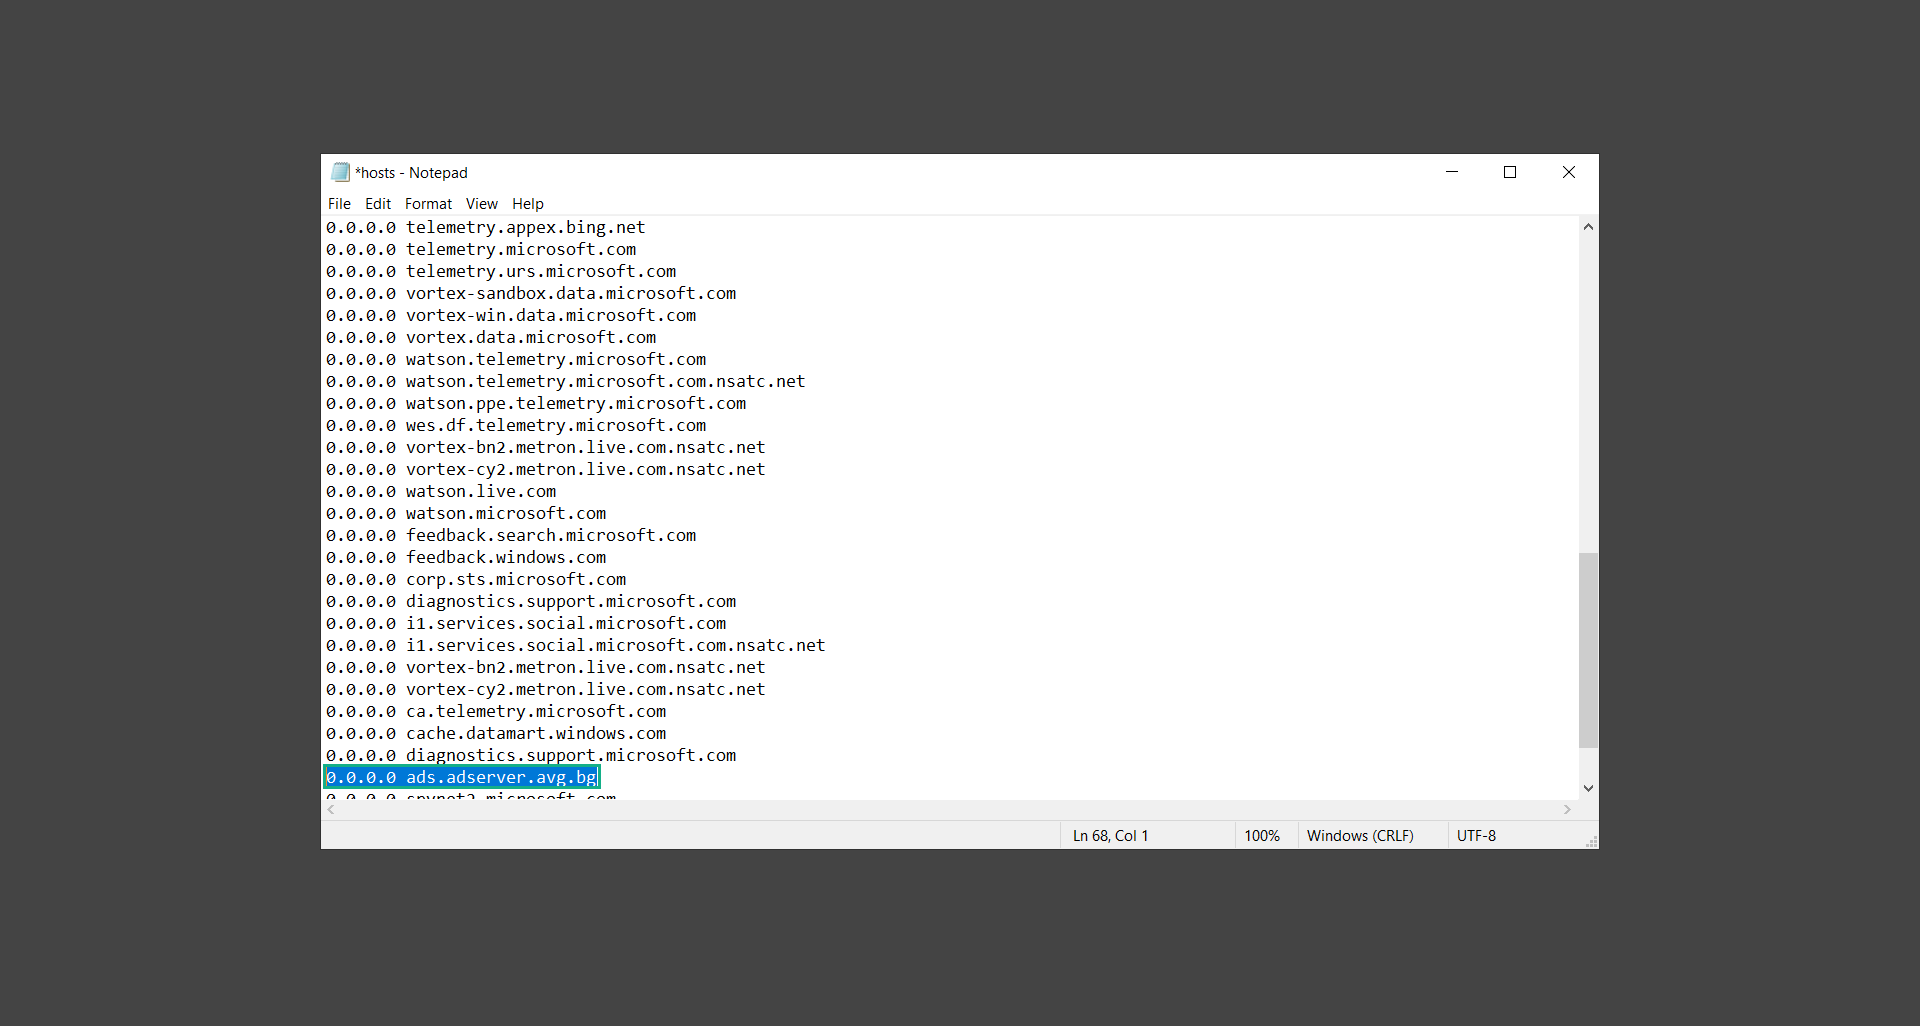
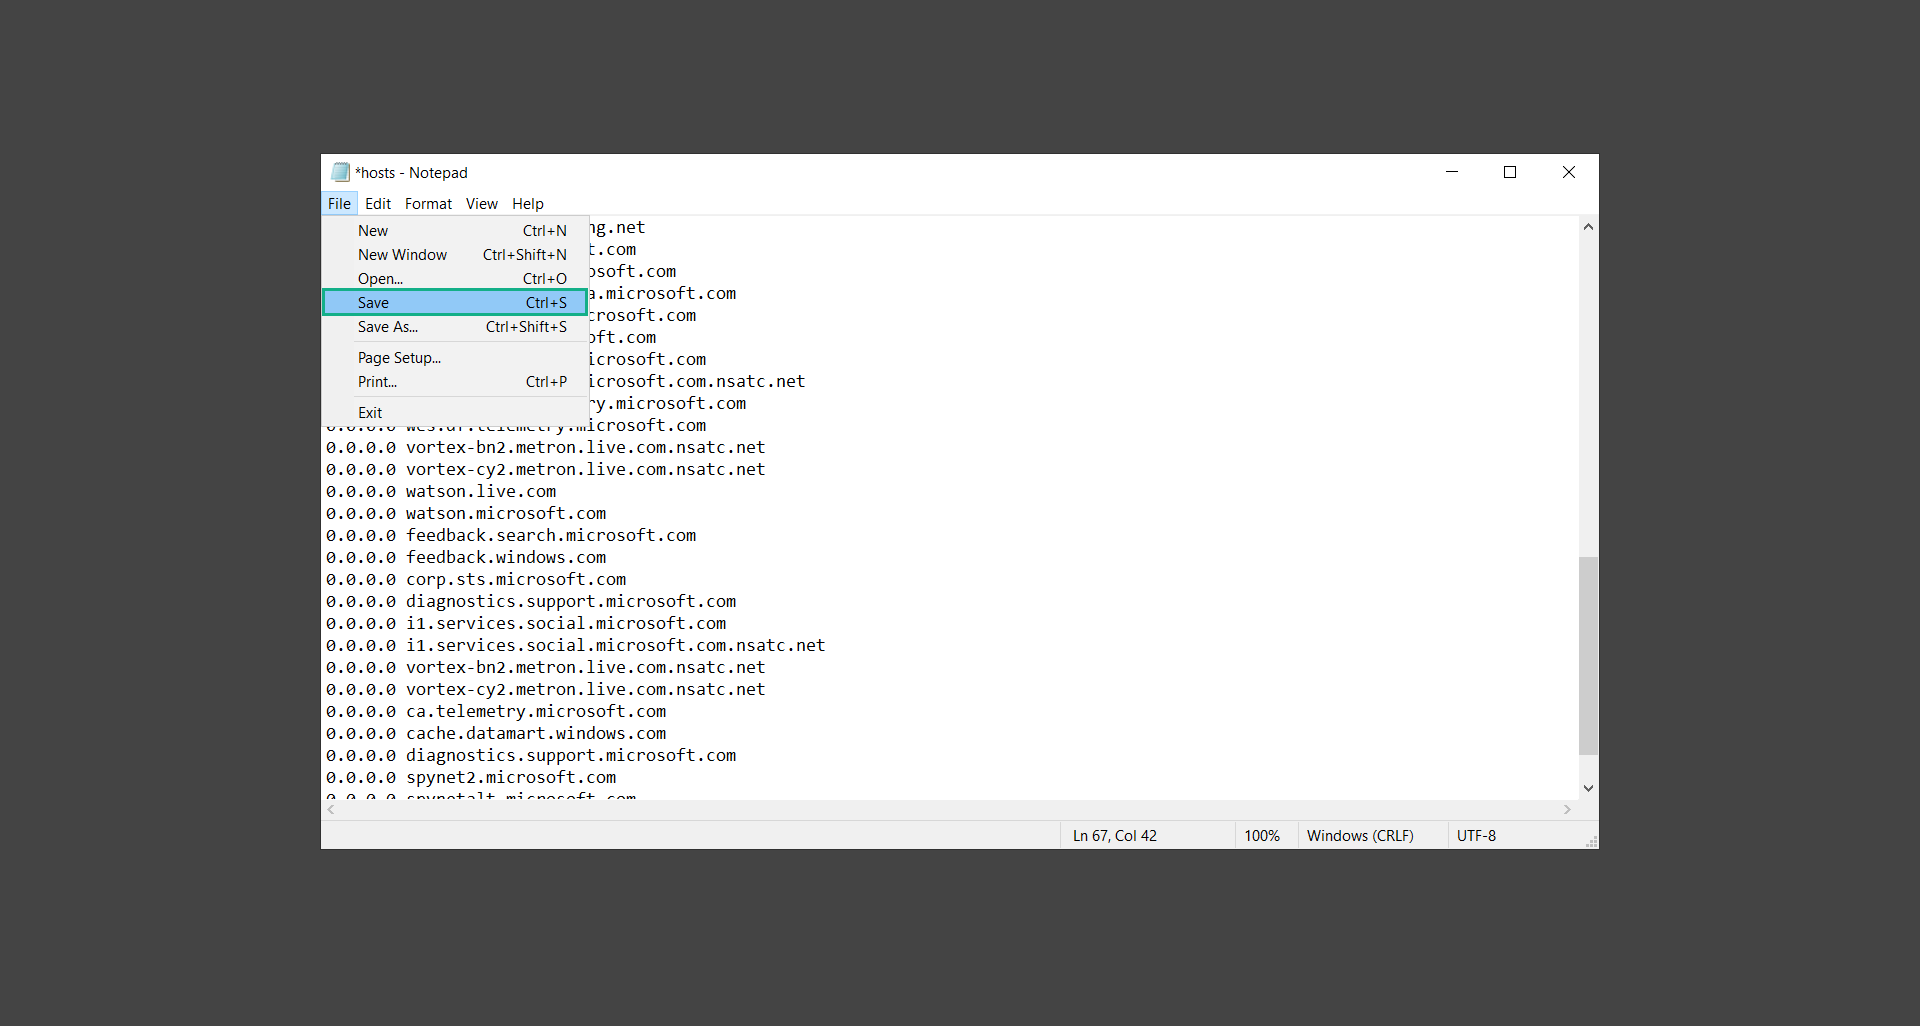
5. To remove them, simply delete the following entries from the hosts file. After that, click CTRL+ S to save the changes you made to the file. On the other hand, you can click File and select Save from the dropdown.
You have successfully removed malware from both the browser and computer system. Below are some tips and tricks you may use to make sure you never get infected by malicious threats ever again.
Computer protection tips
As the saying goes: “The biggest vulnerability is the person behind the screen“
So, here are some tips and what you need to know in order to keep your device safe and malware-free in the long run.
Keep every software installed up to date
Make sure that all of the programs in your computer is up-to-date with the latest version released by the developer. The reason behind this is that these updates frequently tackle bugs and issues that malware actors often exploit. The same goes for your computer’s operating system, make sure Windows is up-to-date with the latest software update to prevent malware from exploiting a hidden vulnerability.
Avoid downloading files from unknown sources
One of the biggest sources of malware infection in a computer system is third-party installations. This happens when a user downloads a certain program from sources that are not the official download links. Some of the common types of sources where malware is present are torrent files, cracked software, and games.
Be careful with opening email attachments
Malware often disguises itself as resumes and quotations and threat actors often send thousands of these infected emails to company employees around the world in order to infiltrate their network. Always check where your emails are coming from as there may be a chance that the project attachment you received via email did not actually come from a co-worker.
Do not visit unreputable websites
Avoid visiting websites that contain unfiltered advertisements such as illegal streaming websites, cracked software platforms, and links sent out to you by somebody you do not trust. These sites are often linked to redirect chains that load once you click on an ad element on the page. Following this chain often leads to drive-by malware and phishing pages that an average user may eventually fail to notice.
